


Welcome to this third article in my MLOps series. In the first article, we explored Docker and how it simplifies application packaging. In the second article, we managed machine learning models using MLflow, Azure, and Docker. Now, in this third part, we'll bring everything together by building a FastAPI application that serves our previously stored model on Azure. This allows us to create a prediction service that can be accessed globally!
What is an API?
An API is like a bridge. Whenever you interact with a library in Python, you're using its API. It's the public part of an application that you can interact with, while everything behind it is hidden.
APIs are commonly used to communicate with web applications, and they provide a set of URLs that return data (You send a request with some parameters and get a response back). Most often, the data comes back in formats like JSON or XML, which are easy to parse. This is different from websites that return HTML, which includes info for rendering pages. With APIs, you get just the raw data.
Some APIs are public, while others are private. When building an API, you decide what data to share, how to share it, and with whom. It's all up to you! Most APIs use the HTTP protocol to communicate. You've probably heard of REST APIs, which follow a common standard. The main HTTP methods include:
- GET: Retrieves data.
- POST: Submits new data.
- PUT: Updates existing data.
- DELETE: Removes data.
These methods form the CRUD (Create, Read, Update, Delete) operations that almost every API follows.
How to Request an API?
Now that we know what an API is, let's try calling one. We'll use the Cat Facts API, which returns random cat facts in JSON format.
APIs come with documentation that explains the available endpoints and parameters. Endpoints are addresses (the path in your URL) where you request data. Reading the documentation is essential, as it saves you time later.
Here's a quick example using Python's requests library to call the /fact endpoint of the Cat Facts API:
import requests
response = requests.get("https://catfact.ninja/fact").json()
print(response)
This fun API returns random facts about cats in JSON format:
{'fact': 'Cats lap liquid from the underside of their tongue, not from the top.', 'length': 69}Using requests helps you use APIs, but what if you want to build one? That's where FastAPI comes in. It's one of the best frameworks for building APIs.
FastAPI Basics
There are plenty of Python frameworks for building APIs, but for this tutorial, I've chosen FastAPI. It's one of the best and easiest frameworks for building APIs, and it comes with many handy features so you don't need to reinvent the wheel:
- Web server: FastAPI uses Uvicorn to set up a web server for you.
- Data validation: It uses Pydantic to validate data formats automatically.
- Automatic documentation: FastAPI generates API documentation automatically, making it super easy for developers.
The Basic Structure of Your FastAPI Python File
When you're building an API with FastAPI, your .py file will have a specific structure that looks like this:
import uvicorn
from fastapi import FastAPI

###
# Here you can define some configurations
###

app = FastAPI()

###
# Here you define enpoints
###


if __name__=="__main__":
uvicorn.run(app, host="0.0.0.0", port=8000) - app = FastAPI(): This creates an instance of FastAPI that will hold all the functionalities of your application.
- if name=="main": This ensures that the code block runs only if we're executing this file directly, and not importing it as a module.
- uvicorn.run(app, host="0.0.0.0", port=8000): This starts the Uvicorn web server, specifying the host IP and port.
Creating Endpoints
An endpoint is a URL where API users can request or send data. We have two main types:
- GET: Used to retrieve data.
- POST: Used to send new data.
Let's start with the simplest possible GET endpoint at /, which will display a greeting message:
import uvicorn
from fastapi import FastAPI

app = FastAPI()

@app.get("/")
async def index():

    return {"message": "Welcome to the Iris classification API. Use `/predict` to classify a flower."}

if __name__=="__main__":
uvicorn.run(app, host="0.0.0.0", port=8000) - @app.get("/"): This decorator defines that when a GET request is sent to the
/endpoint, theindex()function will be called. - async: FastAPI allows asynchronous operations. Asynchronous functions let you handle requests more efficiently, especially when dealing with input/output tasks like database queries.
Let's add a POST endpoint to submit data:
import uvicorn
from fastapi import FastAPI
from pydantic import BaseModel

app = FastAPI()


class Name(BaseModel):
    name: str

@app.post("/submit")
async def submit_name(data: Name):
    return {"message": f"Hello, {data.name}!"}

if __name__=="__main__":
uvicorn.run(app, host="0.0.0.0", port=8000)- This POST endpoint accepts user input data. Not all APIs accept data from users, but when they do, the data needs to have a specific structure, which is defined in the
Name(BaseModel)class.
Running the API with Docker
Why Docker? With Docker, you don't need to install dependencies on your local machine. Everything runs in a container, making it portable and easy to deploy. If you're unfamiliar with Docker, check out my previous article beginner guide to Docker.
Step 1: Create a Dockerfile
To deploy the FastAPI app, we start by creating a Dockerfile::
# python base image in the container from Docker Hub
FROM python:3.9-slim


RUN apt-get update -y
RUN apt-get install nano unzip
RUN apt-get install -y python3.10
RUN apt install curl -y

RUN curl -fsSL https://get.deta.dev/cli.sh | sh


# Set the working directory
WORKDIR /app

# Copy the current directory contents into the container at /app
COPY . /app

# Install Python dependencies specified in requirements.txt
RUN pip install --no-cache-dir -r requirements.txt


# expose the port that uvicorn will run the app on
ENV PORT=8000
EXPOSE 8000

# execute the command python main.py (in the WORKDIR) to start the app
# CMD ["python", "api.py"]
CMD ["uvicorn", "api:app", "--host", "0.0.0.0", "--port", "8000"]
- This Dockerfile installs all dependencies, sets up the working directory, and runs the app with Gunicorn and Uvicorn. The
requirements.txtfile will contain the necessary Python packages such as FastAPI, Uvicorn, and others.
Step 2: Build and Run the Docker Container
Build the Docker image:
docker build . -t fastapiserver
# if your are on mac, use :
# docker build - platform=linux/amd64 -t fastapiserver
Run the Docker container:
docker run -it -v "$(pwd):/app" -p 8000:8000 -e PORT=8000 fastapiserverOnce it runs, open your browser and go to http://0.0.0.0:8000. You should see your FastAPI app in action!

Create an Endpoint to Serve the ML Model
Now, let's combine MLflow with FastAPI to serve a machine learning model. We'll load the model stored in Azure and create an endpoint to make predictions.
At this point, you have two options:
- You already followed my previous article and have your model serialized and saved in Azure.
- You didn't follow my previous article. Here's what you need to know: We trained a model on the Iris dataset, which predicts the type of flower based on four characteristics. We serialized this model and stored it in Azure using MLflow. If you didn't do this, you can download the model.pkl file from this GitHub folder and upload it to Azure blob storage.
Once you've completed the steps above, whether you're in case 1 or 2, you'll need to retrieve your Azure Storage informations and replace the relevant values in the following script:
import uvicorn
import pandas as pd
from fastapi import FastAPI
from pydantic import BaseModel
from azure.storage.blob import BlobClient
import joblib
import io


# Initialize FastAPI
app = FastAPI()


# Define the request body format for predictions
class PredictionFeatures(BaseModel):
    sepal_length: float
    sepal_width: float
    petal_length: float
    petal_width: float

# Global variable to store the loaded model
model = None

# Download the model from Azure Blob Storage directly into memory
def download_model():
    global model

    # If you want to follow the tutorial but don't have an azure account, just load the model directly from the local file
    # model = joblib.load("path_to_your_local_model/model.pkl")
    blob = BlobClient(account_url="https://.blob.core.windows.net/",
                      container_name="",
                      blob_name="model.pkl",
                      credential="")

    # Download the model as a stream of bytes
    stream = io.BytesIO()
    blob.download_blob().download_to_stream(stream)

    # Load the model directly from the in-memory stream
    stream.seek(0)
    model = joblib.load(stream)
    print("Model loaded from Azure Blob Storage successfully!")

# Download the model immediately when the script runs
download_model()


# API Root endpoint
@app.get("/")
async def index():
    return {"message": "Welcome to the Iris classification API. Use `/predict` to classify a flower."}

# Prediction endpoint
@app.post("/predict")
async def predict(features: PredictionFeatures):
    # Create input DataFrame for prediction
    input_data = pd.DataFrame([{
        "sepal length (cm)": features.sepal_length,
        "sepal width (cm)": features.sepal_width,
        "petal length (cm)": features.petal_length,
        "petal width (cm)": features.petal_width
    }])

    # Predict using the loaded model
    prediction = model.predict(input_data)

    # Get the class number (0, 1, or 2)
    class_index = int(prediction[0])

    # Get the class name from the class index
    class_names = ['setosa' ,'versicolor' ,'virginica']
    class_name = class_names[class_index]

    return {
        "prediction": class_index,
        "class_name": class_name
    }

if __name__ == "__main__":
uvicorn.run(app, host="0.0.0.0", port=8000) - The
download_model()function retrieves the model from Azure Blob Storage and loads it into memory. - The root endpoint
/provides a welcome message. - The
/predictendpoint remains, allowing users to send flower measurements as JSON data to get a prediction from the model. - The
classin this script is used to define the structure of the data that the user has to send to the/predictendpoint. This is important in FastAPI because it helps validate the incoming data for predictions.
Test the API Locally
Rebuild and run your Docker container, then visit http://0.0.0.0:8000. Test the prediction endpoint with the following Python script:
import requests

# Define the API endpoint
url = "http://0.0.0.0:8000/predict"

# Define the input data
data = {
    "sepal_length": 5.1,
    "sepal_width": 3.5,
    "petal_length": 1.4,
    "petal_width": 0.2
}

# Make a POST request to the API
response = requests.post(url, json=data)

# Check if the request was successful
if response.status_code == 200:
    # Print the prediction result
    prediction = response.json()
    print("Prediction:", prediction)
else:
    print(f"Failed to get a prediction. Status code: {response.status_code}")
    print("Response:", response.text)
This will return the predicted flower class based on the input data. Our flower belongs to class 0, which is setosa.

That's great, but here's the catch: our API is only available locally at the moment. What if someone halfway across the world wants to use it to predict their flower's class? You guessed it — we need to deploy this API to the cloud. Let's deploy it to Azure so that every flower lover in the world can use it!
Deploy FastAPI to Azure
Before getting started, ensure you have your Subscription ID and other relevant details ready. You can retrieve this information from the Azure portal. Next, clone the necessary files from my GitHub , and update the deploy.sh script.
Once you've made the updates, simply run the deploy.sh script to automate the entire setup process. While Azure provides a graphical interface for setting up resources, this script streamlines everything with a single command.
Here's a breakdown of what you are doing by running the deploy.sh script :
1.Login and Set Subscription: First, log into your Azure account and set the subscription where your resources will be deployed.
az login az account set --subscription $SUBSCRIPTION_ID2.Create a Resource Group: This group will organize all the resources you deploy for FastAPI. If you already have a resource group, you can skip this step or comment it out in the script.
az group create --name $RG_NAME --location 3.Push Docker Image to Azure Container Registry (ACR): Before pushing the Docker image, retrieve your ACR credentials and log in.
export ACR_USERNAME=$(az acr credential show --name $ACR_NAME --query "username" --output tsv)
export ACR_PASSWORD=$(az acr credential show --name $ACR_NAME --query "passwords[0].value" --output tsv)

docker login $ACR_NAME.azurecr.io \
    --username "$ACR_USERNAME" \
    --password "$ACR_PASSWORD"
# Push the images
docker tag $DOCKER_IMAGE_NAME $ACR_NAME.azurecr.io/$DOCKER_IMAGE_NAME:$DOCKER_IMAGE_TAG
docker push $ACR_NAME.azurecr.io/$DOCKER_IMAGE_NAME:$DOCKER_IMAGE_TAG
4.Create an App Service Plan: Set up an App Service Plan to host your FastAPI server on Azure.
az appservice plan create \
    --name $ASP_NAME \
    --resource-group $RG_NAME \
    --sku B1 \
    --is-linux \
    --location $RG_LOCATION
5.Deploy the Web App with FastAPI Container: Deploy the Docker image from ACR to your web app.
az webapp create \
    --resource-group $RG_NAME \
    --plan $ASP_NAME \
    --name $WEB_APP_NAME \
    --deployment-container-image-name $ACR_NAME.azurecr.io/$DOCKER_IMAGE_NAME:$DOCKER_IMAGE_TAG
6.Configure the Web App to Use the Container Registry: Set up the app to pull the Docker image, and configure environment variables.
az webapp config container set \
--name $WEB_APP_NAME \
--resource-group $RG_NAME \
--docker-custom-image-name $ACR_NAME.azurecr.io/$DOCKER_IMAGE_NAME:$DOCKER_IMAGE_TAG \
--docker-registry-server-url https://$ACR_NAME.azurecr.io \
--docker-registry-server-user $ACR_USERNAME \
--docker-registry-server-password $ACR_PASSWORD \
--enable-app-service-storage true
az webapp config appsettings set \
--resource-group $RG_NAME \
--name $WEB_APP_NAME \
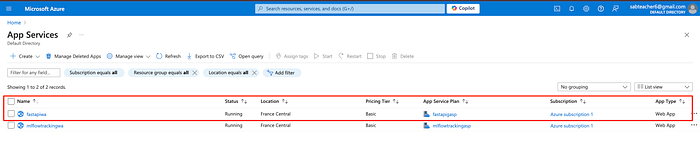
--settings WEBSITES_PORT=$MLFLOW_PORTOnce the deployment script completes, check the Azure portal to confirm that your API is live and accessible. Navigate to App Services to retrieve the URL of your deployed FastAPI web application.

Congratulations! Your API is now live, and anyone in the world can use it to classify flowers based on their characteristics.

Final Test: Accessing the Deployed API
Let's test the deployed API using the same Python request script as before, but this time replacing the local URL with the real one from Azure. You should see the prediction returned!
Conclusion
This concludes the article. You've successfully deployed your FastAPI app to Azure, and it's ready to serve predictions to anyone with flower data. In the next part of this series, we'll improve the API by adding documentation, and unit tests, and automating the deployment with CI/CD and GitHub Actions. Stay tuned!
Thank you for reading!
Note: Some parts of this article were initially written in French and translated into English with the assistance of ChatGPT.
If you found this article informative and helpful, please don't hesitate to 👏 and follow me on Medium | LinkedIn.