


In the last tutorial, we learnt using Tensorflow for designing a Variational Autoencoder (VAE) that could draw MNIST characters. Most of the created digits looked nice. There was only one drawback — some of the created images looked a bit cloudy. The VAE was trained with the mean squared error loss function. However, it's quite difficult to encode exact character edge locations, which leads to the network being unsure about those edges. And does it really matter if the edge of a character starts a few pixels more to the left or right? I don't think so.
In this article, we will see how we can train a network that does not depend on the mean squared error or any related loss function — instead, it will learn all by itself what a real image should look like. The architecture we will get to know is called Deep Convolutional Generative Adversarial Network (DCGAN). I got inspired to complete this project by an awesome article written by Rowel Atienza in late March, where he taught us how to apply the same technique in keras. For being able to draw comparisons to the last VAE-based model, we will firstly see how to implement a DCGAN which is able to draw MNIST characters. Afterwards, we will apply our knowledge in an even cooler project — with only a few minor tweaks, our network will learn how to draw (semi-)realistic human faces!
Deep Convolutional Generative Adversarial Networks
Like the VAE, the DCGAN is an architecture for learning to generate new content. And just like the VAE, a DCGAN consists of two parts. In this case, these are:
- The discriminator, which learns how to distinguish fake from real objects of the type we'd like to create
- The generator, which creates new content and tries to fool the discriminator
The basic idea is that both network parts compete with each other. When the discriminator becomes better, the generator needs to become better too, otherwise it can't fool the discriminator any longer. Similarly, when the generator becomes better, the discriminator has to become better also, else it will lose the ability to distinguish fake from real content.
If you would like to get more intuition on GANs, there is an article by Chanchana Sornsoontorn that describes some creative projects DCGANs have been applied to. One of these projects is the generation of MNIST characters, another is the generation of human faces. In this article, we'll find out how the described technique can be implemented in Python and Tensorflow. We'll begin with the MNIST characters. If you would like to see the whole code of this tutorial, go to my github account and take a look at the code for MNIST and face generation.
Setting up the basics
So, let's dive right into the code.
Like in the last tutorial, we use tensorflow's own method for accessing batches of MNIST characters. We set our batch size to be 64. Our generator will take noise as input. The number of these inputs is being set to 100. Batch normalization considerably improved the training of this network. For tensorflow to apply batch normalization, we need to let it know whether we are in training mode. The keep_prob variable will be used by our dropout layers, which we introduce for more stable learning outcomes. lrelu defines the popular leaky ReLU, that hopefully will be supported by future versions of tensorflow! I firstly tried to apply standard ReLUs to this network, but this lead to the well-known dying ReLU problem, and I received generated images that looked like artwork by Kazimir Malevich — I just got black squares.
Then, we define a function binary_crossentropy, which we will use later, when computing losses.
The discriminator
Now, we can define the discriminator. It looks similar to the encoder part of our VAE. As input, it takes real or fake MNIST digits (28 x 28 pixel grayscale images) and applies a series of convolutions. Finally, we use a sigmoid to make sure our output can be interpreted as the probability the input image is a real MNIST character.
The generator
The generator — just like the decoder part in our VAE — takes noise and tries to learn how to transform this noise into digits. To this end, it applies several transpose convolutions. At first, I didn't apply batch normalization to the generator, and its learning seemed to be really not efficient. After applying batch normalization layers, learning improved considerably. Also, I firstly had a much larger dense layer accepting the generator input. This led to the generator creating the same output always, no matter what the input noise was, e.g. it always output a 9 that looked completely the same (mode collapse). On the other hand, not using a dense layer at all led to the generator not learning anything meaningful after many iterations. Tuning the generator honestly took quite some effort!
Loss functions and optimizers
Now, we wire both parts together, like we did for the encoder and the decoder of our VAE in the last tutorial. However, we have to create two discriminator objects:
- The first object receives the real images
- The second object receives the fake images
reuse of the second object is set to True so both objects share their variables. We need both instances for computing two types of losses:
- when receiving real images, the discriminator should learn to compute high values (near 1), meaning that it is confident the input images are real
- when receiving fake images, it should compute low values (near 0), meaning it is confident the input images are not real
To accomplish this, we use the binary cross entropy function defined earlier. The generator tries to achieve the opposite goal, it tries to make the discriminator assign high values to fake images.
Now, we also apply some regularization. We create two distinct optimizers, one for the discriminator, one for the generator. We have to define which variables we allow these optimizers to modify, otherwise the generator's optimizer could just mess up the discriminator's variables and vice-versa.
We have to provide the update_ops to our optimizers when applying batch normalization — take a look at the tensorflow documentation for more information on this topic.
Training the GAN
Finally, the fun part begins — let's train our network! We feed random values to our generator, which will learn to create digits out of this noise. We also take care that neither the generator nor the discriminator becomes too strong by balancing their losses — otherwise, this would inhibit the learning of either part and could even stop the network from learning anything at all (I have made this experience).
MNIST results
Take a look at the pictures drawn by our generator — they look more realistic than the pictures drawn by the VAE, which looked fuzzier at their edges. Training however took much longer than training the other model. I also have to mention that I needed more iterations than Rowel Atienza before created characters looked meaningful, so especially if you don't have a strong GPU, you might want to refer to his architecture mentioned at the top of this article.
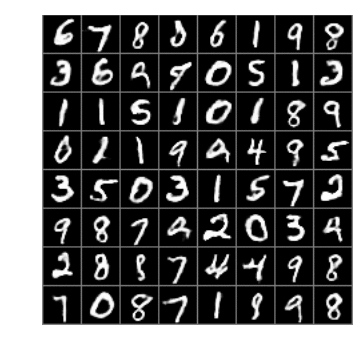
It's a real advantage that we are not dependent on loss functions based on pixel positions, making the results look less fuzzy. This is especially important when creating more complex data — e.g. pictures of human faces. So, just be a little patient, the results will reward you in the end.
Drawing Human Faces
I won't go over the complete code for generating human faces in the same detail, as the architecture is basically the same. The main difference is that we use three color channels now instead of one channel like before, and we allow our convolutional transpose layers to learn more filters for this more complex input data. You can find the whole code at my github.
The data set I used is the LFW (Labeled Faces in the Wild) data set by the University of Massachusetts. Probably using a larger data set could improve results, but I haven't tried this out. For the learning to happen in a decent amount of time, I downscaled the images to 40 x 40 pixels and trained a DCGAN in the same manner like mentioned before. The generator's convolutional transformation layers create some more filters, as expectedly this data set is more complex than the MNIST data set.
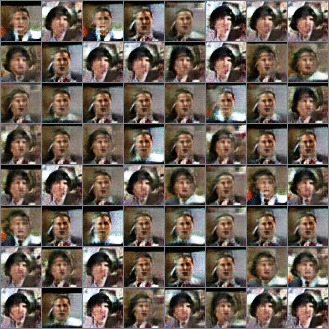
Take a look at the results! I trained the network on a Tesla K80 GPU for about one hour to get these. Maybe these guys wouldn't fool you into believing they are real people. But think about that the neural network never has seen any people before, and how little effort we had to put into its redesign after having completed the MNIST project! This technique obviously has a lot of potential for great applications.
If you liked this article, you may also be interested in my tutorial on using Variational Autoencoders to generate MNIST characters.