There are three different APIs available in Keras to build deep learning models.
- Sequential model (API)
- Functional API
- Model subclassing
Each one has its own advantages and drawbacks. In this article, we'll discuss the Sequential model and Functional API in more detail. The Model subclassing method will be discussed in a separate article.
The Sequential model (API)
This is the simplest way to build models in Keras. Because of their simplicity, the Sequential models are easy to code and understand. They are suitable for beginners. The Sequential API is less flexible and, because of that, it has very limited applicability. That is the main drawback of Sequential models.
When creating a Sequential model, first we instantiate an empty Sequential model using the Sequentialclass and then add layers to that model one by one using the addmethod.
Instead of adding layers one by one using the addmethod, it is possible to build the same model specifying the layers as the elements of a list parameter inside the Sequentialclass.
Both methods generate the same model but when we build the model using the addmethod, it demonstrates the clarity of sequential layers.
It is possible to give a name to a Sequential model using the nameargument.
model = Sequential(name='Specify name here')There are three important methods in the Sequentialclass that we need to understand.
addmethod: This is used to add layers to the Sequential model one by one.
model = Sequential()
model.add(Dense(256, activation='relu'))summarymethod: This is used to get a summary of the model architecture. You will get a nice output that includes layer types, output shape and the number of parameters in each layer
model.summary()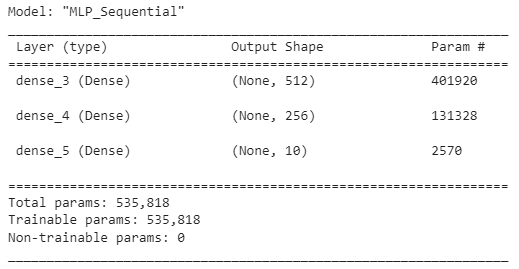
popmethod: This is used to remove layers in the model. Once called, it removes the last layer in the model. If we call it again, then it removes the next available last layer in the model, and so on.
model.pop() # Remove the last layer
model.pop() # Remove the next last layer, and so on...
When to use a Sequential model
According to the Keras documentation,
A
Sequentialmodel is appropriate for a plain stack of layers where each layer has exactly one input tensor and one output tensor — Source: https://keras.io/guides/sequential_model/
According to the Keras documentation, a Sequential model is not appropriate when:
- Your model has multiple inputs or multiple outputs.
- Any of your layers has multiple inputs or multiple outputs.
- You need to do layer sharing.
- You want a non-linear topology (e.g. a residual connection, a multi-branch model)
Source: https://keras.io/guides/sequential_model/
If we want to build more complex models that have multiple inputs/outputs or sharing layers, we can use the Functional API.
The Functional API
The Functional API method allows you to build models in a non-sequential fashion. You can build models that have branches, multiple inputs or outputs.
Here, you will first create layers and bind them together in more creative and advanced ways to build non-sequential models. Finally, you will connect all the layers together by instantiating a Modelclass object that has three arguments.
from tensorflow.keras import Model
model = Model(inputs, outputs, name)- inputs: The inputs of the model.
- outputs: The outputs of the models. If there are multiple outputs in the model, we can specify them as a list. Each output is represented by the elements of the list.
- name: The name of the model. This accepts a string.
To start building a model using the Functional API, we need to create the input by instantiating an Inputclass object in which the most important parameter is the shape of the input defined by the shapeargument.
from tensorflow.keras import Input
inputs = Input(shape)- shape: The shape of the input. This is the shape of each sample, not the shape of one batch. This can take a vector, matrix or tensor. For example,
shape=(784,)indicates that the input is the batches of 784-dimensional vectors.shape=(20,20,3)indicates that the input is the batches of 20x20 px RGB images.
Now, we will discuss three examples of models created using both Sequential and Functional API methods.
Example 1: Building an MLP using Sequential API and Functional API
Here, we create a Multilayer Perceptron (MLP) architecture to classify MNIST handwritten digits. There are two hidden layers in the network. The first one has 512 hidden units and the other one has 256 hidden units. In both layers, we use the ReLU activation function. The output layer has 10 units which is equal to the number of classes. The input shape is (784, ) because we flatten each 28 x 28 px grayscale image.
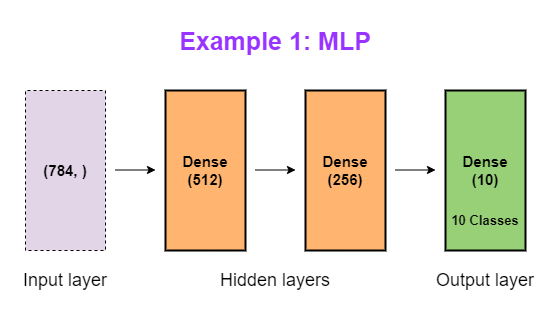
Each layer in an MLP has exactly one input and output and is stacked together to form the entire network. Therefore, an MLP can be instantiated as a Sequential model.
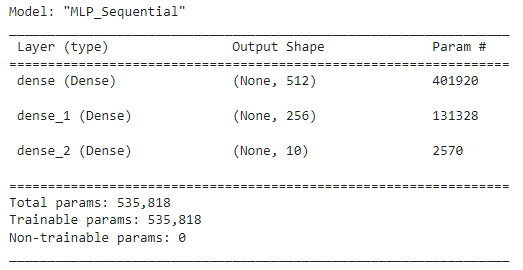
Now, we build the same MLP model using the Functional API method.
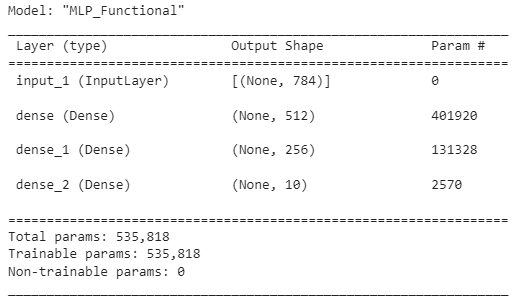
Here, we repeatedly use the variable x (one-time-use variable) to define each intermediate layer (the layers between the input and output). You can use any other variable name for this. You can also use different variable names for each layer. The common practice is to use the same variable which is usually x.
To bind two layers together, we can use the following syntax.
x = (...the next layer...)(...the layer you want to bind...)Example 2: Building a CNN using Sequential API and Functional API
Here, we create a Convolutional Neural Network (CNN) architecture to classify MNIST handwritten digits. There is one pair of convolution and pooling layers. We use 32 filters (feature detectors) in the convolution layer. We use the ReLU activation function in the convolution layer. We add three dense (fully-connected) layers in the MLP part. The last dense layer is the output layer which has 10 nodes. The other two dense layers have 64 and 32 nodes respectively. We use the ReLU activation function in the first two dense layers and the Softmax activation in the last dense layer.

A CNN can be instantiated as a Sequential model because each layer has exactly one input and output and is stacked together to form the entire network.
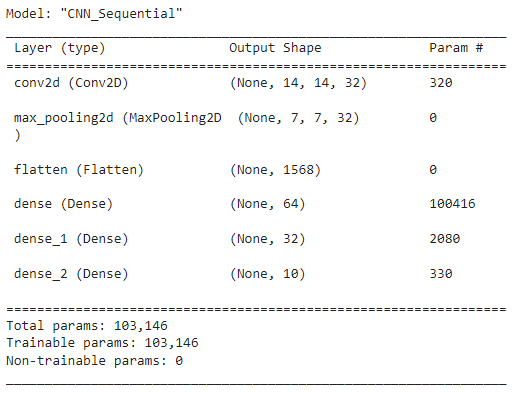
Now, we build the same CNN model using the Functional API method.
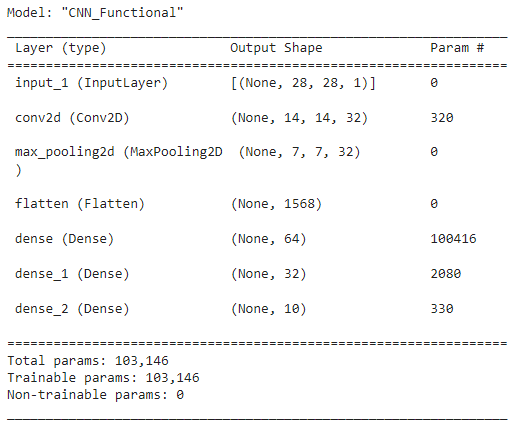
Here also, we repeatedly use the variable x (one-time-use variable) to define each intermediate layer (the layers between the input and output).
Example 3: Building an MLP with two parallel outputs using Functional API
Here, we build an MLP with two parallel outputs. This type of model is used for multilabel classification. Here, you can see two parallel outputs each connected to the same previous dense layer. In this example, the first output layer predicts a color (e.g. red) out of 5 available color categories and the second output predicts the gender type (e.g. male). So, the final output looks like "red: male".
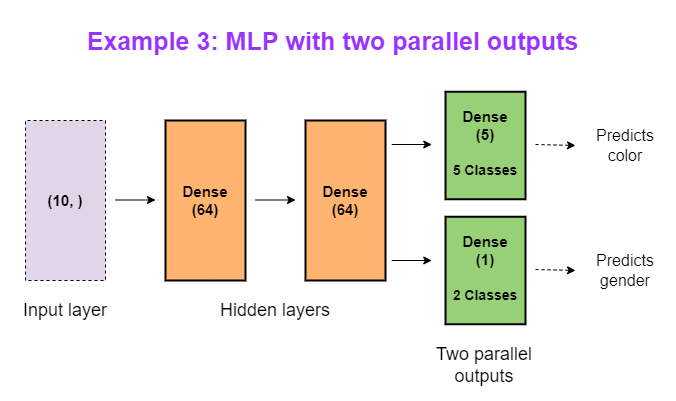
Here, we cannot use the Sequential API method. This is because the output has two parallel dense layers which both share the same previous dense layer. Therefore, only the Functional API method can be used to build the above architecture.
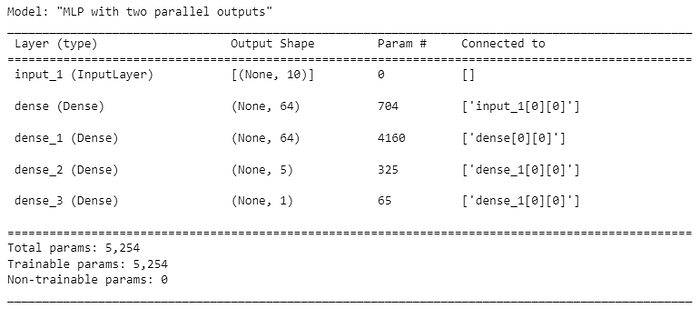
Likewise, we can build more complex, non-sequential models using the Functional API method.
This is the end of today's post.
Please let me know if you've any questions or feedback.
I hope you enjoyed reading this article. If you'd like to support me as a writer, kindly consider signing up for a membership to get unlimited access to Medium. It only costs $5 per month and I will receive a portion of your membership fee.
Thank you so much for your continuous support! See you in the next article. Happy learning to everyone!
Read next (recommended) — Written by me!
A step-by-step guide to creating a Multilayer Perceptron (MLP).
Learn how Convolutional Neural Networks (CNNs) work behind the scenes.
Coding a Convolutional Neural Network (CNN) Using Keras Sequential API.
Special credit goes to meineresterampe on Pixabay, who provides me with a nice cover image for this post.
Rukshan Pramoditha 2022–07–03


