Info: this article is only for android
Getting started
First, you need the Spotify App.
We start with the sample code, that you get, when creating a new project.
import 'package:flutter/material.dart';

void main() => runApp(new MyApp());

class MyApp extends StatelessWidget {
  @override
  Widget build(BuildContext context) {
    return new MaterialApp(
      title: 'Flutter Demo',
      theme: new ThemeData(
        primarySwatch: Colors.blue,
      ),
      home: new MyHomePage(title: 'Flutter Demo Home Page'),
    );
  }
}

class MyHomePage extends StatefulWidget {
  MyHomePage({Key key, this.title}) : super(key: key);
  final String title;

  @override
  _MyHomePageState createState() => new _MyHomePageState();
}

class _MyHomePageState extends State<MyHomePage> {
  int _counter = 0;

  void _incrementCounter() {
    setState(() {
      _counter++;
    });
  }

  @override
  Widget build(BuildContext context) {
    return new Scaffold(
      appBar: new AppBar(
        title: new Text(widget.title),
      ),
      body: new Center(
        child: new Column(
          mainAxisAlignment: MainAxisAlignment.center,
          children: <Widget>[
            new Text(
              'You have pushed the button this many times:',
            ),
            new Text(
              '$_counter',
              style: Theme.of(context).textTheme.display1,
            ),
          ],
        ),
      ),
      floatingActionButton: FloatingActionButton(
        onPressed: _incrementCounter,
        tooltip: 'Increment',
        child: new Icon(Icons.add),
      ),
    );
  }
}
Setting up the project
dependencies:

  spotify_sdk:
  flutter_web_auth2
The Spotify SDK is handling the connection and the "flutter_web_auth2" is for the callback, that you'll get, when signing in.
<activity android:name="com.linusu.flutter_web_auth2.CallbackActivity" android:exported="true">
      <intent-filter android:label="flutter_web_auth2">
        <action android:name="android.intent.action.VIEW" />
        <category android:name="android.intent.category.DEFAULT" />
        <category android:name="android.intent.category.BROWSABLE" />
        <data android:scheme="YOUR_APP_NAME" />
      </intent-filter>
    </activity>
Now, add this to your android\app\src\main\AndroidManifest.xml file.
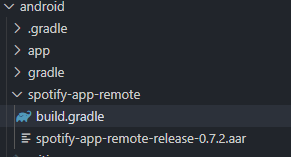
Finally, we must create a spotify-app-remote folder under the android path and add the spotify SDK: Releases · spotify/android-sdk (github.com)
We also must add buid.gradle file in this folder
configurations.maybeCreate("default")
artifacts.add("default", file('spotify-app-remote-release-x.x.x.aar'))
After your done this, you must create a spotify developer account My Dashboard | Spotify for Developers
For hist steps, I recommend this article: Android SDK Quick Start | Spotify for Developers
Now your project is configured.
 playSong() async {
var res = await SpotifySdk.connectToSpotifyRemote(
          clientId: "YOUR_CLIENT_ID",
          redirectUrl: "YOUR_APP_NAME://",
          scope:
              "app-remote-control,user-modify-playback-state,playlist-read-private");
      print(res);
var trackId ="0ct6r3EGTcMLPtrXHDvVjc";
      SpotifySdk.play(spotifyUri: "spotify:track:$trackId");
}
The final code:

import 'package:flutter/material.dart';

void main() => runApp(new MyApp());

class MyApp extends StatelessWidget {
  @override
  Widget build(BuildContext context) {
    return new MaterialApp(
      title: 'Flutter Demo',
      theme: new ThemeData(
        primarySwatch: Colors.blue,
      ),
      home: new MyHomePage(title: 'Flutter Demo Home Page'),
    );
  }
}

class MyHomePage extends StatefulWidget {
  MyHomePage({Key key, this.title}) : super(key: key);
  final String title;

  @override
  _MyHomePageState createState() => new _MyHomePageState();
}

class _MyHomePageState extends State<MyHomePage> {
  int _counter = 0;

playSong() async {
var res = await SpotifySdk.connectToSpotifyRemote(
          clientId: "YOUR_CLIENT_ID",
          redirectUrl: "YOUR_APP_NAME://",
          scope:
              "app-remote-control,user-modify-playback-state,playlist-read-private");
      print(res);
var trackId ="0ct6r3EGTcMLPtrXHDvVjc";
      SpotifySdk.play(spotifyUri: "spotify:track:$trackId");
}

  @override
  Widget build(BuildContext context) {
    return new Scaffold(
      appBar: new AppBar(
        title: new Text(widget.title),
      ),
      body: new Center(
        child: new Column(
          mainAxisAlignment: MainAxisAlignment.center,
          children: <Widget>[

          ],
        ),
      ),
      floatingActionButton: FloatingActionButton(
        onPressed: playSong,
        tooltip: 'Increment',
        child: new Icon(Icons.play_arrow),
      ),
    );
  }
}