


Hello World!
Today we are going to take a look at how to turn your Python script into a Windows service. There are a few ways to do this, but for this example, we are going to use my python package called tasKobra. tasKobra is a package focused on scheduling your code. The first version I've made a few days ago was focused on working with Windows Scheduler and you can find more about it in this post:
This time we are going to take a look at how to use my package to create and run a Windows service that executes your code.
As usual, I'll divide the article into a few paragraphs so that you can follow along. A quick disclaimer: tasKobra is a package I'm working on as a side project, it's still in a really early stage and it should not be used in a production environment (use it at your own risk).
1. Installing everything we need
The first thing we need to do is to install the package and the requirements. To install the package just open a terminal and paste this command:
pip install git+https://github.com/Inzaniak/tasKobra@masterThis should install the latest version of my package onto your machine. Now we also need to install NSSM. NSSM is a service helper to simplify how you manage Windows Services and is the tool I've used in the tasKobra package.
To install this we need to go to its webpage:
After that, you've to download the tool and open the zip once the download is completed. We need to extract the content of our zip somewhere on our disk, for example, I've extracted it in:
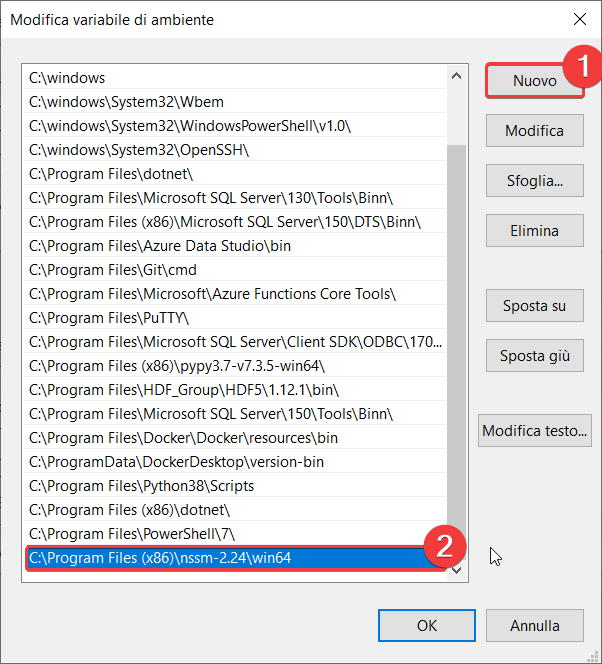
C:\Program Files (x86)\nssm-2.24
After you have extracted it press win+q and search for "path". You should see a tool named: "Edit environment variables for your account" on the top of the list. Click on it and then go to environment variables:

Now you need to select the Path row from the System Variables section and then click on edit:
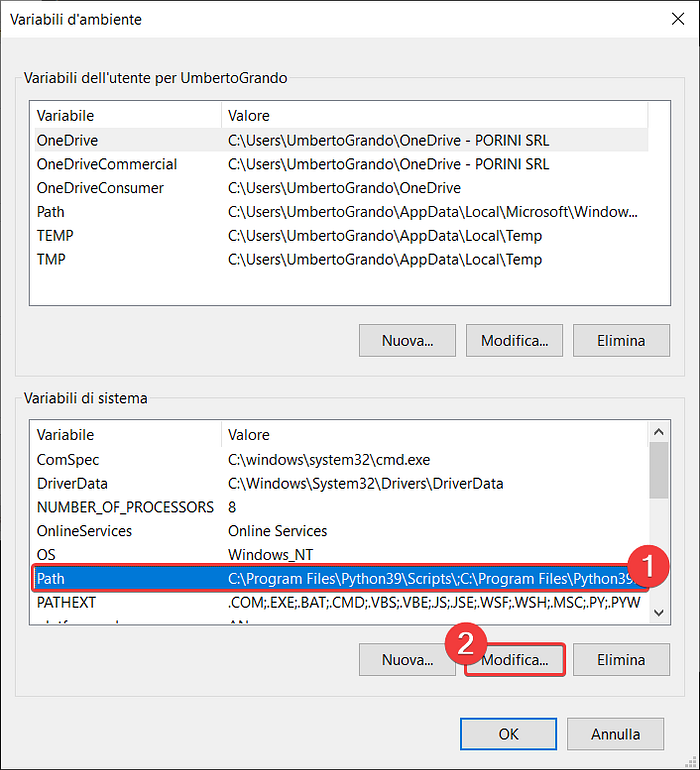
And finally, click new and add the path to our executable:
Now to test this you can open a new terminal (if you have one open you'll need to close it otherwise the changes won't work) and write:
nssmYou should see an output similar to this:

If you see an error you've probably made a mistake when you've added the path variable. If that happens repeat the steps shown above and everything should work accordingly.
2. Creating the code to run as a Service
Now we need to create a script to run as a service. If you already have something you wish to use feel free to skip ahead. For this example we are going to write something really simple:
This code writes the current datetime into a txt file every 5 seconds. You just need to specify the path and the filename for your output, after that, you can run the code to see if everything works correctly. You'll need to specify an absolute path (Good Example: c:\myfolder\output | Bad Example: myfolder\output) otherwise you won't find your output.
If you want to use your own code for this step you just need to be sure that the code is wrapped inside a while loop, otherwise the code will exit after the execution and your service will stop.
3. Using tasKobra to create the service
Now we can create the service by using tasKobra. Pay attention that you'll need to run this code as an Admin otherwise you won't be able to make any changes to Windows services. In this code, you'll need to change the variable path_to_script to the path of the script we've created in the last step. As you can see the code will create a new service named "ServiceExample" which targets your script. Then by using the start_service() method the service will start.
After that, if you run the code as an admin (comment the last 2 lines if you don't want to remove your service!) you should see the service running in your services list (you can press ctrl+shift+esc and go to the services tab).
To check if everything worked correctly just go to the path of your txt output (set in step 2.) and check if the timestamp has been changed.
Congratulations, you've created your first "Python service"!
So that's all for today. As usual, you can find the code for this tutorial on my GitHub.
I've recently become a Medium partner, so if you'd like to support me you can subscribe to Medium by using the referral here:
If you'd like to know more about me here are my personal links:
Personal Website:
Social Links:
LinkedIn:
More content at PlainEnglish.io. Sign up for our free weekly newsletter. Follow us on Twitter and LinkedIn. Join our community Discord.