

Introduction
Clean Architecture offers a powerful approach for iOS developers, making it easier to build scalable, maintainable, and testable apps. By combining Clean Architecture with tools like MVVM (Model-View-ViewModel) and SwiftData, you can structure your app in a way that keeps code organized and adaptable to change. In this tutorial, we'll create a SwiftUI app that manages a list of books with simple CRUD (Create, Read, Update, Delete) functionality, separating code into distinct layers, each with a unique purpose and demonstrating Clean Architecture in Swift.
Understanding the Architecture: Clean Architecture, MVVM, and SwiftData
Let's briefly go over each architectural concept:
- Clean Architecture: Popularized by Robert C. Martin (Uncle Bob) in 2012 and later detailed in his 2017 book, Clean Architecture: A Craftsman's Guide to Software Structure and Design, Clean Architecture draws inspiration from earlier patterns like Hexagonal Architecture (introduced by Alistair Cockburn in 2005). It emphasizes separating code into independent layers, each with a specific role, allowing modifications in one layer without impacting others, and enhancing maintainability and testability.
- MVVM (Model-View-ViewModel): First introduced by Microsoft in 2005 for Windows Presentation Foundation applications, MVVM enables a clear separation between UI and application logic, making code more modular and testable. A separation keeps Views focused solely on UI, while ViewModels handle data interaction, resulting in a clean, maintainable, and scalable structure.
- SwiftData : Apple's framework for data storage and persistence, designed to simplify managing and storing data within SwiftUI apps. It abstracts away the details of reading, writing, and updating data, allowing developers to perform CRUD (Create, Read, Update, Delete) operations with ease.
- Core Data integration: SwiftData is built on Core Data but offers a more SwiftUI-friendly API, making data handling in SwiftUI applications simpler and more intuitive.
- Declarative syntax: Using annotations like
@Modelfor data models, SwiftData provides a declarative approach that aligns well with SwiftUI, reducing boilerplate code and enhancing readability. - Automatic persistence: SwiftData manages data storage automatically, so developers can focus on app logic rather than low-level data handling.
This setup keeps each part of the code focused on a specific role, resulting in a modular, organized, and maintainable app.
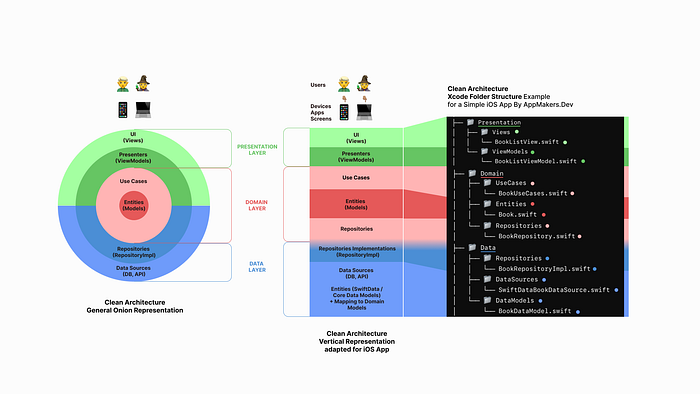
Clean Architecture in Swift — Xcode Project Structure
Here's our folder structure reflecting each layer of Clean Architecture:
📁 CleanArchitectureProject
├── 📁 Domain
│   ├── 📁 Entities
│   │   └── Book.swift
│   ├── 📁 UseCases
│   │   └── BookUseCases.swift
│   └── 📁 Repositories
│       └── BookRepository.swift
├── 📁 Data
│   ├── 📁 Repositories
│   │   └── BookRepositoryImpl.swift
│   ├── 📁 DataSources
│   │   └── SwiftDataBookDataSource.swift
│   └── 📁 DataModels
│       └── BookDataModel.swift
├── 📁 Presentation
│   ├── 📁 Views
│   │   └── BookListView.swift
│   └── 📁 ViewModels
│       └── BookListViewModel.swift
└── 📁 Core
    └── Extensions.swift
Folder Explanation
DOMAIN LAYER — The domain layer defines the "what" of the app — it represents the app's core functionality without being concerned with how data is stored or displayed. The domain layer stays free from dependencies on external libraries or frameworks. This is where you define the essential data structures and actions your app performs.
- Entities — models representing the app's essential data, independent of storage and UI (e.g.,
Book.swift) - UseCases: Actions your app can perform, organized into use cases. For example,
BookUseCases.swiftdefines what actions we can take with books, such as adding, deleting, or fetching them. Use cases keep specific actions separated, making the code easier to test and maintain. Here we represent UseCases in one file for ease of understanding, but each function can be represented in a separate UseCase file. - Repositories: Protocols that specify how the domain layer expects to access data. The
BookRepository.swiftprotocol defines the functions for data access (likegetBooks,addBook, anddeleteBook) but doesn't specify how those functions are implemented. By defining a protocol, you can easily swap out data storage solutions (such as using a remote API instead of local storage) without changing the rest of your code.
DATA LAYER — The data layer is responsible for how data is stored and retrieved. It's here that the app interacts with storage solutions like databases or APIs. This layer provides implementations of the protocols defined in the domain layer.
- Repositories (Or Repository Implementations): Concrete implementations of the repository protocols from the domain layer. For example,
BookRepositoryImpl.swiftimplementsBookRepository, using SwiftData to save and retrieve books. - DataSources: Classes that directly handle data interactions. Data sources connect with specific storage solutions, such as SwiftData or an API, to perform CRUD (Create, Read, Update, Delete) operations.
SwiftDataBookDataSource.swiftdirectly manages the interaction with SwiftData for storing and retrieving book data. - DataModels: Data models specific to the data storage technology, in this case, SwiftData. These models, like
BookDataModel.swift, represent how data is structured in storage and typically include conversion methods to map between domain entities and data models.
PRESENTATION LAYER — The presentation layer provides the user interface and manages data flow between the UI and the rest of the app. It focuses on how the app's information is displayed to the user.
- Views: SwiftUI components that visually represent the app's data and handle user interactions.
BookListView.swift, for example, displays a list of books and provides a way to delete or add entries. - ViewModels: Classes that manage the state and data for each view, separating UI logic from business logic.
BookListViewModel.swifthandles the list's state, interacting with the use cases to add, delete, or fetch books.
CORE LAYER (UTILITY) — The core folder includes shared utilities and extensions that support multiple parts of the app, such as Extensions.swift, which might contain Swift extensions or helper functions.
Setting Up the Structure in Xcode
- Create a new Xcode project named
CleanArchitectureProject. - In the Project Navigator, right-click the main project folder and select New Group to create each main folder (e.g.,
Domain,Data,Presentation,Core). - Inside each folder, create subfolders following the structure above, like
EntitiesunderDomainandDataModelsunderData.
If you want to have the same folder order as in example and don't know how to convert folders to groups to rearrange them in Xcode, read this Tutorial.
Clean Architecture Layer-by-Layer Breakdown
Now, let's go through each layer in detail, showing how it works in the context of the Book app.
Step 1: Domain Layer — Core Logic and Entities
The Domain Layer defines the app's core business logic. This layer is free of dependencies on external frameworks, making it easy to test and reuse.
Entities: Book Entity
The Book entity represents the data structure for a book. This model is simple and only includes the properties needed to represent a book's basic information, such as title, author, and publishedDate.
// Clean Architecture in Swift Tutorial by AppMakers.Dev

// Domain/Entities/Book.swift
import Foundation

struct Book: Identifiable {
    let id: UUID
    var title: String
    var author: String
    var publishedDate: Date
}Explanation: Book defines the essential properties of a book. By keeping it independent of any data storage details, it can be reused across various parts of the app without modification.
Repositories: BookRepository Protocol
The BookRepository protocol outlines the data access methods for Book entities, without dictating how the data is stored or retrieved.
// Domain/Repositories/BookRepository.swift
protocol BookRepository {
    func getBooks() async throws -> [Book]
    func addBook(_ book: Book) async throws
    func deleteBook(_ book: Book) async throws
}Explanation: The protocol defines a contract for interacting with Book data, allowing us to switch data storage implementations without modifying the app's core logic.
By marking functions as async throws, we indicate that they may take time to complete and might fail. async keeps the app responsive, while throws ensures errors are handled properly, keeping the code reliable and robust.
UseCases: BookUseCases
BookUseCases defines actions you can take with books, such as fetching, adding, and deleting them. This struct interacts with the BookRepository protocol, which means it doesn't need to know the specifics of data storage.
// Clean Architecture in Swift Tutorial by AppMakers.Dev

// Domain/UseCases/BookUseCases.swift
struct BookUseCases {
    private let repository: BookRepository

    init(repository: BookRepository) {
        self.repository = repository
    }

    func fetchBooks() async throws -> [Book] {
        return try await repository.getBooks()
    }

    func addBook(_ book: Book) async throws {
        try await repository.addBook(book)
    }

    func deleteBook(_ book: Book) async throws {
        try await repository.deleteBook(book)
    }
}Explanation: BookUseCases encapsulates actions related to Book, like fetching, adding, or deleting books. Each action is clearly defined, making the code more modular and easy to test.
Dependency Injection with init: The initializer init(repository: BookRepository) allows us to inject a specific implementation of BookRepository when we create a BookUseCases instance. This setup, known as dependency injection, makes BookUseCases flexible and testable, as it doesn't rely on a particular data source. By passing in any object that conforms to BookRepository, we can swap in new data sources as needed.
Error Handling with try: Since repository functions are marked throws, we use try when calling them in BookUseCases. This usage makes it clear that fetchBooks, addBook, and deleteBook might encounter issues, such as database errors. The try keyword ensures these errors are handled, promoting more robust and safe code.
Async Handling with await: The repository functions are marked async, so we use await when calling them to pause the function until the async task completes. This approach keeps the app responsive, especially during time-consuming operations like fetching or saving data.
Step 2: Data Layer — Managing Data Storage
The Data Layer defines how the app stores and retrieves data, implementing the protocols defined in the domain layer.
DataModels: BookDataModel
The BookDataModel struct is a data model specifically designed for the data storage needs of the app, and it lives in the DataModels folder within the data layer. In Clean Architecture, we create a separation between the domain model (how data is represented in the core logic of the app) and the data model (how data is structured for storage). Here's how BookDataModel fits into this concept.
BookDataModel represents the Book entity specifically for persistence using SwiftData. This model defines how book information is stored in the database, including necessary attributes like id, title, author, and publishedDate. By creating this distinct model for storage, we avoid mixing storage concerns directly into the core Book entity in the domain layer.
// Clean Architecture in Swift Tutorial by AppMakers.Dev

import Foundation
import SwiftData

@Model
class BookDataModel {

    @Attribute(.unique) var id: UUID
    var title: String?
    var author: String?
    var publishedDate: Date

    // Initialize from a domain model instance
    init(from book: Book) {
        self.id = book.id
        self.title = book.title
        self.author = book.author
        self.publishedDate = book.publishedDate
    }

    // Map to the domain model
    func mapToDomain() -> Book {
        return Book(id: id, title: title ?? "", author: author ?? "", publishedDate: publishedDate)
    }

}
Key Components of BookDataModel
- SwiftData Annotations: The
@Modeland@Attribute(.unique)annotations makeBookDataModelcompatible with SwiftData, the persistence framework we're using. The@Modelannotation signals to SwiftData that this class is a model to be stored in the database, and@Attribute(.unique)sets theidas a unique identifier, ensuring each book record is uniquely identifiable in storage. - Mapping to the Domain Entity: One of the key principles of Clean Architecture is separating how data is stored from how it's represented in the core business logic. This is why we have both
Book(in the domain layer) andBookDataModel(in the data layer).
- The
mapToDomain()function convertsBookDataModeltoBook, the core model used throughout the app's logic. This keeps the data representation in storage separate from the app's internal logic, so any changes in how data is stored won't impact the domain layer. - Initializer
init(from:): This initializer converts aBookdomain entity toBookDataModelfor storage. It maps each attribute fromBookto the respective property inBookDataModel. This mapping approach allows us to adapt the model for SwiftData without modifying the coreBookentity. - Separation of Concerns: By creating a dedicated model for data storage, we keep the domain layer focused on business logic rather than on persistence. For example,
Bookin the domain layer doesn't need SwiftData annotations because it doesn't handle storage. This design provides flexibility—if we ever switch to a different database or persistence solution, we would only need to modifyBookDataModel, not the coreBookentity or any business logic in the domain layer. - Testability: In testing, it's often more efficient to use mock data or in-memory databases. By having
BookDataModelhandle storage-specific details, we can test domain logic using plainBookentities without worrying about SwiftData dependencies.
SwiftDataBookDataSource
SwiftDataBookDataSource interacts with SwiftData to handle CRUD (Create, Read, Update, Delete) operations for Book data.
// Clean Architecture in Swift Tutorial by AppMakers.Dev

class SwiftDataBookDataSource {

    private let context: ModelContext

    init(context: ModelContext) {
        self.context = context
    }

    func getBooks() async throws -> [BookDataModel] {

        let descriptor = FetchDescriptor<BookDataModel>()
        let bookDataModels = try context.fetch(descriptor)
        return bookDataModels

    }


    func addBook(_ bookDataModel: BookDataModel) async throws {

        context.insert(bookDataModel)
        try context.save()

    }

    func deleteBook(_ bookDataModel: BookDataModel) async throws {

        let bookDataModelID = bookDataModel.id

        let descriptor = FetchDescriptor<BookDataModel>(
            predicate: #Predicate { $0.id == bookDataModelID }
        )

        // Fetch the first matching record with the specified id
        if let bookDataModel = try context.fetch(descriptor).first {
            // If a match is found, delete it from the context and save the changes
            context.delete(bookDataModel)
            try context.save()
        }
        // If no match is found, this function does nothing, ensuring safe handling.
    }


}
Detailed Explanation
ModelContext and Initialization:
ModelContextis a SwiftData construct that tracks changes to objects and persists them whensave()is called. By passingModelContextas a dependency in the initializer, we allowSwiftDataBookDataSourceto perform data operations within this shared context.
Fetching Books (getBooks):
- Using
FetchDescriptor<BookDataModel>(): AFetchDescriptorwithout additional parameters retrieves allBookDataModelobjects from the storage. This operation is asynchronous, andtryensures any errors during the fetch are handled.
Adding a Book (addBook):
- Creating a Data Model from Domain: The function initializes a
BookDataModelinstance using aBookdomain model, which holds the core data in the app's business logic.
Deleting a Book (deleteBook):
- Filtering with
#Predicate: ThedeleteBookfunction usesFetchDescriptorwith a#Predicateto find the specificBookDataModelthat matches theidof the providedBookinstance. This type-safe predicate checks eachBookDataModelto see if itsidmatchesbook.id, returning only the relevant record. - Checking for a Matching Record: The
if letstatement safely unwraps the first result from the fetch. If no matchingBookDataModelis found, the function exits without any further action, making it idempotent and safe to call multiple times with the sameid. - Deleting and Saving: If a match is found,
context.delete(bookDataModel)removes the record from the context, andtry context.save()commits the deletion to storage. This structure ensures the deletion is permanent oncesave()is called.
BookRepositoryImpl
Implements the BookRepository protocol and interacts with SwiftDataBookDataSource.
// Clean Architecture in Swift Tutorial by AppMakers.Dev

// Data/Repositories/BookRepositoryImpl.swift
import Foundation

class BookRepositoryImpl: BookRepository {
    private let dataSource: SwiftDataBookDataSource

    init(dataSource: SwiftDataBookDataSource) {
        self.dataSource = dataSource
    }

    func getBooks() async throws -> [Book] {
        let bookDataModels = try await dataSource.getBooks()
        return bookDataModels.map { $0.mapToDomain() }
    }

    func addBook(_ book: Book) async throws {
        try await dataSource.addBook(BookDataModel(from: book))
    }

    func deleteBook(_ book: Book) async throws {
        try await dataSource.deleteBook(BookDataModel(from: book))
    }
}
Step 3: Presentation Layer — User Interface and ViewModel
The Presentation Layer is responsible for the app's UI and managing the interaction between the user and the app's data. This layer contains SwiftUI views and view models, keeping the UI logic separate from business logic.
BookListViewModel
The BookListViewModel class prepares data for BookListView and handles actions like adding and deleting books. It interacts with BookUseCases to keep the view updated with current data and to manage any user-initiated actions.
// Clean Architecture in Swift Tutorial by AppMakers.Dev

import Foundation
import SwiftData

@Observable
@MainActor
class BookListViewModel {

    var books: [Book] = []
    private let bookUseCases: BookUseCases

    init(bookUseCases: BookUseCases) {
        self.bookUseCases = bookUseCases
        Task { await loadBooks() }
    }

    // Load all books
    func loadBooks() async {
        do {
            books = try await bookUseCases.fetchBooks()
        } catch {
            print("Error loading books: \(error)")
        }
    }

    // Add a new book and reload
    func addBook(_ book: Book) async {
        do {
            try await bookUseCases.addBook(book)
            await loadBooks()
        } catch {
            print("Error adding book: \(error)")
        }
    }

    // Delete a book and reload
    func deleteBook(_ book: Book) async {
        do {
            try await bookUseCases.deleteBook(book)
            await loadBooks()
        } catch {
            print("Error deleting book: \(error)")
        }
    }
}@Observable: This attribute makesBookListViewModelautomatically observable by SwiftUI, so any changes tobooksare tracked without needing@Published.@MainActor: Ensures all methods and property updates happen on the main thread, meeting SwiftUI's requirement that UI updates occur on the main thread.- Data Loading with
Task: In the initializer, aTaskimmediately callsloadBooks()to load data asynchronously as soon as the view model is created.
BookListView
BookListView displays a list of books and provides options to add or delete items. The view automatically observes changes in BookListViewModel due to @Observable, which updates the UI whenever books changes.
// Clean Architecture in Swift Tutorial by AppMakers.Dev

import SwiftUI
import SwiftData

struct BookListView: View {

    @Bindable var viewModel: BookListViewModel
    @Environment(\.modelContext) private var context: ModelContext

    // State to manage showing the add book sheet
    @State private var isPresentingAddBookSheet = false

    var body: some View {
        NavigationStack {
            List {
                ForEach(viewModel.books, id: \.id) { book in
                    Text(book.title)
                }
                .onDelete(perform: deleteBookFromTheList)
            }            .navigationTitle("Book List")
                .toolbar {
                    ToolbarItem(placement: .navigationBarTrailing) {
                        Button(action: {
                            isPresentingAddBookSheet = true
                        }) {
                            Image(systemName: "plus")
                        }
                    }
                }
                .sheet(isPresented: $isPresentingAddBookSheet) {
                    AddBookSheet(viewModel: viewModel)
                }
        }
    }

    // Separate function to handle deletion
     private func deleteBookFromTheList(at offsets: IndexSet) {
         offsets.forEach { index in
             let book = viewModel.books[index]
             Task {
                 await viewModel.deleteBook(book)
             }
         }
     }
}

// Separate view for adding a new book
struct AddBookSheet: View {
    @Environment(\.dismiss) private var dismiss
    @Bindable var viewModel: BookListViewModel

    // State properties to hold book details
    @State private var title = ""
    @State private var author = ""
    @State private var publishedDate = Date()

    var body: some View {
        NavigationStack {
            Form {
                TextField("Title", text: $title)
                TextField("Author", text: $author)
                DatePicker("Published Date", selection: $publishedDate, displayedComponents: .date)
            }
            .navigationTitle("Add New Book")
            .toolbar {
                ToolbarItem(placement: .confirmationAction) {
                    Button("Save") {
                        Task {
                            // Create a new book with user input
                            let newBook = Book(id: UUID(), title: title, author: author, publishedDate: publishedDate)
                            await viewModel.addBook(newBook)
                            dismiss() // Close the sheet
                        }
                    }
                }
                ToolbarItem(placement: .cancellationAction) {
                    Button("Cancel") {
                        dismiss() // Close the sheet without saving
                    }
                }
            }
        }
    }
}
Understanding MVVM in the Presentation Layer
The MVVM (Model-View-ViewModel) pattern helps to organize the code in a way that separates concerns, making each part of the app responsible for a specific job. In this app, the Model, View, and ViewModel each serve a different purpose:
- Model: This is the core data, representing the information the app needs. For example, the
Bookstructure is our Model, storing properties like the title, author, and published date. The Model doesn't worry about how the data is displayed or where it's stored; it simply defines the data structure. - View: The View is what the user sees and interacts with. In our app,
BookListViewis the View that displays a list of books in SwiftUI. Its job is to present data and handle user input, like button taps or scrolling, without knowing where the data comes from. - ViewModel: The ViewModel connects the View and the Model. Here,
BookListViewModelacts as the ViewModel by fetching and managing the data that the View displays. It also listens for actions from the View (such as adding or deleting a book) and updates the Model through use cases in the domain layer. The ViewModel is where the app's data processing and interaction handling happen, keeping the View free of business logic.
The advantage of using MVVM is that it keeps each part of the app focused on its specific role. This separation makes the code easier to read, test, and maintain. If we need to change how data is displayed or stored, we can do so without affecting the other parts. MVVM also works well with SwiftUI because SwiftUI can automatically respond to changes in the ViewModel, making the UI stay up-to-date with minimal effort.
Step 4. Entry Point Setup
Set up dependency injection and initialize the app components.
// Clean Architecture in Swift Tutorial by AppMakers.Dev

import SwiftUI
import SwiftData

@main
struct CleanArchitectureProjectApp: App {

    let container: ModelContainer

    init() {

        do {
            container = try ModelContainer(for: BookDataModel.self)
        } catch {
            fatalError("Failed to create ModelContainer for Book: \(error)")
        }

    }

    var body: some Scene {

        WindowGroup {

            let context = container.mainContext


            // Initialize the data source with Core Data context
            let dataSource = SwiftDataBookDataSource(context: context)

            // Initialize the repository with the data source
            let bookRepository = BookRepositoryImpl(dataSource: dataSource)

            // Initialize the use cases with the repository
            let bookUseCases = BookUseCases(repository: bookRepository)

            // Initialize the view model with the use cases
            let viewModel = BookListViewModel(bookUseCases: bookUseCases)


            // Pass the view model into the root view, and provide the model context environment

            BookListView(viewModel: viewModel)

        }
        .modelContainer(container)
    }

}
Key Concepts Recap
- Entity: A data model, like
Book, representing core data in the app. - UseCase: A specific action in the app, like "fetch books" or "delete book."
- Repository: An interface for data access. It provides a unified way to interact with data storage, keeping the app flexible and testable.
- DataSource: The layer that directly manages data storage, interacting with databases, APIs, or local files.
- ViewModel: Manages data flow and logic for the View, keeping the UI updated as data changes.
- View: Displays data and handles user interaction in a declarative SwiftUI style.
Conclusion
By using Clean Architecture with MVVM and SwiftData in SwiftUI, we create a clear structure where each part of the code has a specific role. This setup makes our app modular, easy to test, and highly maintainable. Now that you have a strong foundation in place, you're well-equipped to expand this project, add more features, or adapt it for more complex apps.