
UIKit
Let's say you're building a Mail alternative app. You want to support iPhones and iPads. Let's stick to the standard mail app's navigation flow for this app.
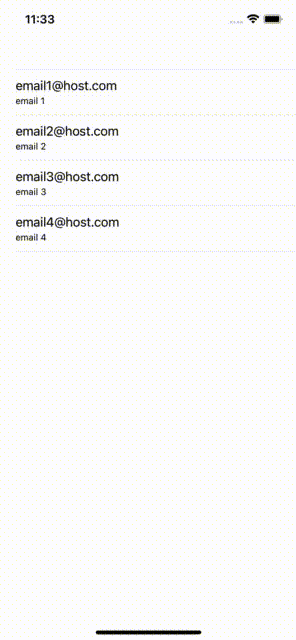
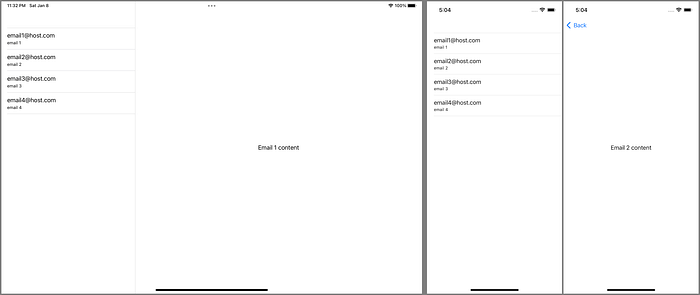
Let's break down the user interface. On iPhone the user sees a list of emails in their inbox. When the user taps on an email they are then shown the full details of the email.
On iPad the user is shown the list of emails on the left side and the email full details on the right side. This layout takes advantage of the iPad's larger screen real estate and enables the user to digest more information at a glance.

One way to achieve these layouts is to have separate user interface code for iPhones and iPads. However there is solution to cater for both with relatively low effort. That is using UISplitViewController.
In this post I will show you how to create and display a UISplitViewController programmatically.
I assume you have basic knowledge in iOS (UIKit) and Swift development.
I have used Swift 5.5.2 and Xcode 13.2.1 for this article.
Getting Started
In this section we'll create an app from scratch. By default when creating an iOS app using UIKit from template Xcode will create a Storyboard and wire it up so that at launch it will show the screen on the Storyboard. We will remove all storyboard references. Then we'll create a UISplitViewController and it's children ViewControllers and wire these up. Finally we'll make our app look like a mail app and wire its navigation.
Here are the steps we'll take:
- Create iOS UIKit based app project
- Remove the Storyboard and all references to it
- Create and wire up UISplitViewController and it's children
- Creating a mail app using UISplitViewController
1. Create iOS UIKit based app project
Let's begin by creating a new project based on the iOS app template. Open Xcode then select File > New > Project…

When prompted "Choose a template for your new project:" select App under the iOS platform tab. Then click next.

When prompted "Choose options for your new project:" type in SplitViewControllerTut for "Product Name:". For "Interface:" select Storyboard. Finally for "Language:" select Swift. Then click Next button.

2. Remove the Storyboard and all references
When creating a UIKit based app from template Xcode will create Storyboard for you and have the app wired up such that at launch it will show the initial view controller of that Storyboard. In this post we want to show a UISplitViewController and we want to do this programmatically. So let's delete the Storyboard and unwire the app from using it.
First delete Main.storyboard file (or just named Main without the extension).

Next open up Info.plist (or just Info). Navigate the property list to Storyboard Name to remove it (Information Property List > Application Scene Manifest > Scene Configuration > Application Session Role > Item 0 > Storyboard Name).

There is one more reference we need to delete before completely unwiring storyboards from the template app. Select SplitViewControllerTut project file (the one with the blue icon in the project navigator). Next select the SplitViewControllerTut iOS app target under the TARGETS list. Then select Build Settings. Next input INFOPLIST_KEY_UIMainStoryboardFile in the search bar.

Remove the value for "UIKit Main Storyboard File Base Name".

Both of these references must be deleted so that at app launch the app won't be looking to load the initial screen from the missing Main.storyboard file.
Let's also delete the autogenerated ViewController.swift file as we won't be using this view controller.

That's all Storyboard related references and files removed.
3. Create and wire up UISplitViewController and it's children
In this step we'll create a UISplitViewController and it's children. A split view controller consists of two separate portions. Let's have a look at them. From the iPads perspective the left portion is known as the primary and the right portion is known as the secondary.

On iPhones the split view controller will first present the secondary by default and upon user action we can then navigate back to the primary. This can be changed however this is out of scope for this tutorial.

The primary and secondary portions on UISplitViewControllers are two separate ViewControllers. We need to specify these ViewControllers. Let's create a ViewController instance for each and add a label to them to allow us to distinguish between them.
In Xcode select File > New > File… and then select Swift File under the iOS tab. Let's name it PrimaryViewController. Next replace the contents of the file with the following:
import UIKit
class PrimaryViewController: UIViewController {
    private let label: UILabel = {
        let view = UILabel()
        view.translatesAutoresizingMaskIntoConstraints = false
        view.text = "Primary"
        return view
    }()
    override func loadView() {
        self.view = UIView()
        self.view.backgroundColor = .white
        self.setupSubviews()
    }
    private func setupSubviews() {
        self.setupLabel()
    }
    private func setupLabel() {
        self.view.addSubview(label)
        NSLayoutConstraint.activate([
            self.label.centerXAnchor.constraint(equalTo: self.view.centerXAnchor),
           self.label.centerYAnchor.constraint(equalTo: self.view.centerYAnchor),
       ])
    }
}
Next let's create another ViewController for the secondary portion. Once again select File > New > File… and then select Swift File under the iOS tab. Let's name the file SecondaryViewController. Then replace the contents of the file with the following:
import UIKit
class SecondaryViewController: UIViewController {
    private let label: UILabel = {
        let view = UILabel()
        view.translatesAutoresizingMaskIntoConstraints = false
        view.text = "Secondary"
        return view
    }()
    override func loadView() {
        self.view = UIView()
        self.view.backgroundColor = .white
        self.setupSubviews()
    }
    private func setupSubviews() {
        self.setupLabel()
    }
    private func setupLabel() {
        self.view.addSubview(label)
        NSLayoutConstraint.activate([
            self.label.centerXAnchor.constraint(equalTo: self.view.centerXAnchor),
            self.label.centerYAnchor.constraint(equalTo: self.view.centerYAnchor),
        ])
    }
}
Lastly let's wire it all up. Open the autogenerated file SceneDelegate and replace the contents of the function scene(_ scene: _, willConnectTo session: _, options connectionOptions: _) with the following:
guard let windowScene = (scene as? UIWindowScene) else { return }
self.window = UIWindow(windowScene: windowScene)
let splitVC = UISplitViewController()
let primaryViewController = PrimaryViewController()
let navigationController = UINavigationController(rootViewController: primaryViewController)
let secondaryViewController = SecondaryViewController()
splitVC.viewControllers = [navigationController, secondaryViewController]
self.window!.rootViewController = splitVC
self.window!.makeKeyAndVisible()
Run the app on an iPad and iPhone simulator and see it working.

4. Creating a mail app using UISplitViewController
In the previous section we covered the basics of a UISplitViewController and how to display it programmatically. In this section let's start building the alternative to the mail app.
First let's create a model for an email. In Xcode from menu select File > New > File… and then select Swift File under the iOS tab. Let's call this file Email.
Replace the contents of the file with the following:
import Foundation
struct Email {
    let from: String
    let subject: String
    let contents: String
}
Next we'll make the PrimaryViewController show a list of emails. Then we'll make the SecondaryViewController the portion on which to display the email contents. Open PrimaryViewController.swift and change the contents to the following:
import UIKit
protocol PrimaryViewControllerDelegate: AnyObject {
    func didSelectEmail(_ email: Email)
}
class PrimaryViewController: UIViewController, UITableViewDataSource, UITableViewDelegate {
    var delegate: PrimaryViewControllerDelegate?
    private var emails: [Email] = []
    private let tableView: UITableView = {
        let view = UITableView()
        view.translatesAutoresizingMaskIntoConstraints = false
        view.register(UITableViewCell.self, forCellReuseIdentifier: "cell")
        return view
    }()
    override func loadView() {
        self.view = UIView()
        self.view.backgroundColor = .white
        self.setupSubviews()
    }
    func show(emails: [Email]) {
        self.emails = emails
        self.tableView.reloadData()
    }
    func tableView(_ tableView: UITableView, cellForRowAt indexPath: IndexPath) -> UITableViewCell {
        let email = self.emails[indexPath.row]
        let cell = tableView.dequeueReusableCell(withIdentifier: "cell")!
        var content = cell.defaultContentConfiguration()
        content.text = email.from
        content.secondaryText = email.subject
        cell.contentConfiguration = content
        return cell
    }
    func tableView(_ tableView: UITableView, numberOfRowsInSection section: Int) -> Int {
        return self.emails.count
    }
    func tableView(_ tableView: UITableView, didSelectRowAt indexPath: IndexPath) {
        tableView.deselectRow(at: indexPath, animated: true)
        let email = self.emails[indexPath.row]
        self.delegate?.didSelectEmail(email)
    }
    private func setupSubviews() {
        self.setupTableView()
    }
    private func setupTableView() {
        self.view.addSubview(tableView)
        self.tableView.dataSource = self
        self.tableView.delegate = self
        NSLayoutConstraint.activate([
            self.tableView.leftAnchor.constraint(equalTo: self.view.leftAnchor),
            self.tableView.topAnchor.constraint(equalTo: self.view.topAnchor),
            self.tableView.rightAnchor.constraint(equalTo: self.view.rightAnchor),
            self.tableView.bottomAnchor.constraint(equalTo: self.view.bottomAnchor),
        ])
    }
}
Then open SecondaryViewController.swift and change the contents to the following:
import UIKit
class SecondaryViewController: UIViewController {

    private let label: UILabel = {
        let view = UILabel()
        view.translatesAutoresizingMaskIntoConstraints = false
        view.text = "Secondary"
        return view
    }()
    override func loadView() {
        self.view = UIView()
        self.view.backgroundColor = .white
        self.setupSubviews()
    }
    func showEmail(_ email: Email) {
        self.label.text = email.contents
    }
    private func setupSubviews() {
        self.setupLabel()
    }
    private func setupLabel() {
        self.view.addSubview(label)
        NSLayoutConstraint.activate([
            self.label.centerXAnchor.constraint(equalTo: self.view.centerXAnchor),
            self.label.centerYAnchor.constraint(equalTo: self.view.centerYAnchor),
        ])
    }
}
In this post I won't be covering UITableViewControllers and other UI elements. That is out of scope from this article. In this post we will cover how to change the SecondaryViewController content based on the email selected by the user. For such we'll subclass UISplitViewController and control the secondary view contents from within based on the user email selection.
In Xcode from menu select File > New > File… and then select Swift File under the iOS tab. Let's call this file EmailSplitViewController.
Next change the contents of the file to the following:
import UIKit
class EmailSplitViewController: UISplitViewController, PrimaryViewControllerDelegate {
    private var emails: [Email] = [
        Email(from: "[email protected]", subject: "email 1", contents: "Email 1 content"),
        Email(from: "[email protected]", subject: "email 2", contents: "Email 2 content"),
        Email(from: "[email protected]", subject: "email 3", contents: "Email 3 content"),
        Email(from: "[email protected]", subject: "email 4", contents: "Email 4 content"),
    ]
    private var primaryViewController: PrimaryViewController!
    override func viewDidLoad() {
        super.viewDidLoad()
        self.loadViewControllers()
        self.primaryViewController.show(emails: self.emails)
    }
    func didSelectEmail(_ email: Email) {
        let vc = SecondaryViewController()
        vc.showEmail(email)
        self.showDetailViewController(vc, sender: nil)
    }
    private func loadViewControllers() {
        self.primaryViewController = PrimaryViewController()
        self.primaryViewController.delegate = self
        let navController = UINavigationController(rootViewController: self.primaryViewController)
        let detail = SecondaryViewController()
        detail.showEmail(emails.first!)
        self.viewControllers = [navController, detail]
    }
}
Here we are subclassing UISplitViewController and setting the children view controllers when views are loaded. Why subclass? For convenience of controlling the navigation or contents between the primary and secondary view controllers. Mainly notice that when an email is selected by the user we present a new secondary screen with the selected emails content:
func didSelectEmail(_ email: Email) {
    let vc = SecondaryViewController()
    vc.showEmail(email)
    self.showDetailViewController(vc, sender: nil)
}
Note I have used the delegate pattern to communicate the email selection in PrimaryViewController and it's parent EmailSplitViewController. To find out more on delegate pattern check out my article "Design Patterns in iOS: Delegation".
Finally let's display EmailSplitViewController instead of a standard instance of UISplitViewController. Open SceneDelegate.swift and change the contents of scene(_ scene: _, willConnectTo session: _, options connectionOptions: _):
guard let windowScene = (scene as? UIWindowScene) else { return }
self.window = UIWindow(windowScene: windowScene)
let splitVC = EmailSplitViewController()
self.window!.rootViewController = splitVC
self.window!.makeKeyAndVisible()
That's it! Run the app and see the mail alternative app in action.
Summary
In this post we learnt:
- what UISplitViewControllers are
- how to remove default storyboards from a new UIKit based iOS app
- how to create and wire a split view controller
Final Thoughts
You can find the source code for this post in my public Github repo:
I have hesitated these past few years in writing about UIKit with the advent of SwiftUI. However it's nice to see that Apple continues to invest in UIKit. For example in WWDC 21 Apple introduced some features and upgrades to UIKit's button system which is only available from iOS 15 onwards. I will be covering that in a future post.