
Typically, as .NET developers using Keycloak, we need access tokens from our Client we created to access our endpoints protected behind authentication. In a previous article, I showed how we can use Keycloak to authenticate our application. However, we were using Postman to send a request to Keycloak to retrieve our access token, which we could then use to access our authenticated endpoints.
With Swagger, we can easily integrate with Keycloak and start testing our endpoints extremely fast. Let's see how!
Adding Swagger to your .NET application
If you already have a .NET project with Swagger, or created one using the ASP.NET Core Web Application Empty template, you don't need to do this, as you'll already have it.
In the previous article referenced earlier, we have the following .NET application.
using Keycloak.AuthServices.Authentication;

var builder = WebApplication.CreateBuilder(args);
var services = builder.Services;

services.AddKeycloakAuthentication(builder.Configuration);
services.AddAuthorization();

var app = builder.Build();
app.UseAuthentication();
app.UseAuthorization();

app.MapPost("/", () => "Hello World!").RequireAuthorization();

app.Run();
Let's add Swagger! Add the SwashBuckle.AspNetCore package to your application. Then add the following code to your Program.cs file. I'll explain what we're doing afterwards.
using System.Reflection;
using Keycloak.AuthServices.Authentication;
using Microsoft.OpenApi.Models;

var builder = WebApplication.CreateBuilder(args);
var services = builder.Services;

services.AddKeycloakAuthentication(builder.Configuration);
services.AddAuthorization();

// New code here
services.AddEndpointsApiExplorer();
services.AddSwaggerGen(options =>
{
    options.SwaggerDoc("v1", new OpenApiInfo{ Title = "My API", Version = "v1" });
    options.AddSecurityDefinition("Keycloak", new OpenApiSecurityScheme
    {
        Type = SecuritySchemeType.OAuth2,
        Flows = new OpenApiOAuthFlows
        {
            Implicit = new OpenApiOAuthFlow
            {
                AuthorizationUrl = new Uri("https://your-keycloak-server/realms/your-realm/protocol/openid-connect/auth"),
                Scopes = new Dictionary<string, string>
                {
                    { "openid", "openid" },
                    { "profile", "profile" }
                }
            }
        }
    });

    OpenApiSecurityScheme keycloakSecurityScheme = new()
    {
        Reference = new OpenApiReference
        {
            Id = "Keycloak",
            Type = ReferenceType.SecurityScheme,
        },
        In = ParameterLocation.Header,
        Name = "Bearer",
        Scheme = "Bearer",
    };

    options.AddSecurityRequirement(new OpenApiSecurityRequirement
    {
        { keycloakSecurityScheme, Array.Empty<string>() },
    });

    var xmlFile = $"{Assembly.GetExecutingAssembly().GetName().Name}.xml";
    var xmlPath = Path.Combine(AppContext.BaseDirectory, xmlFile);
    options.IncludeXmlComments(xmlPath);
});

var app = builder.Build();
app.UseAuthentication();
app.UseAuthorization();

// New code here
if (app.Environment.IsDevelopment())
{
    app.UseSwagger();
    app.UseSwaggerUI(options =>
    {
        options.SwaggerEndpoint("/swagger/v1/swagger.json", "API v1");
        options.OAuthClientId("your-client");
    });
}

app.MapPost("/", () => "Hello World!").RequireAuthorization();

app.Run();
In your Properties/launchSettings.json file, for your convenience, add the following line to the profiles you use, most likely just https.
"launchUrl": "swagger"
All this does is open up the Swagger page when you run your project.
Finally, in your csproj file for your project, add the following in the <PropertyGroup> tag.
<GenerateDocumentationFile>true</GenerateDocumentationFile>Now about that new C# code. Firstly, we set up some Swagger Generation in our services. We use the OpenApi specification, which is a standardised configuration for web APIs. Most importantly, we add a Security Definition. It's here where we enable our API to communicate with Keycloak and get access tokens. Pay attention to the AuthorizationUrl , replace the scheme with your server URL and the realm with your realm.
We also enable the SwaggerUI when in Development, as we don't need this in Production, though some projects will have a public Swagger page. Be sure to change the OAuthClientId here to the Client you wish to use in your Keycloak server.
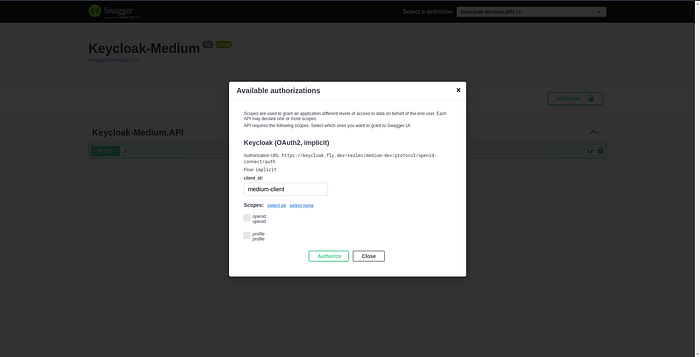
Now run your application, you should be taken to your Swagger page.

Great! We no longer have to deal with Postman to make our requests, and we can authenticate by clicking the padlock icons!
However, we haven't set up Keycloak to allow our API to exchange tokens with yet. Let's do that now. You don't need to stop your API.
Configuring Keycloak
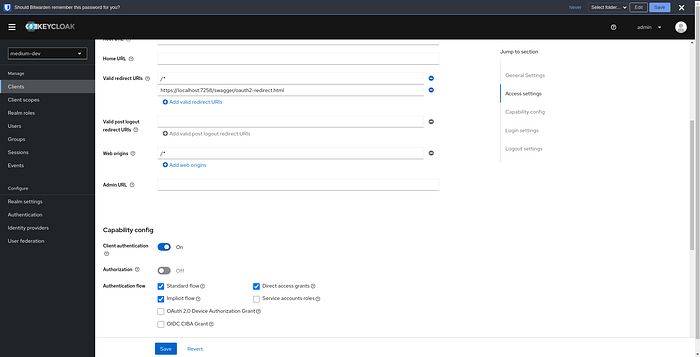
Fortunately it's really simple. All we need to do is give Keycloak the redirect URI of our API.
Go to your Client you wish to authenticate with. Add the following redirect URI:
https://your-url/swagger/oauth2-redirect.html
You might want to add two of these, where 'your-url' is the localhost:1234 or whatever port you use when you run your application from your IDE, and then possibly another where it's the URL of your deployed API. However, I'd recommend only using localhost in a dev realm, and then using your deployed API url in a production realm.
Finally, we need to allow the implicit flow for our client. It's underneath where you put the redirect URIs.
And you're done! Try to sign in using Swagger now. You'll need to have a user you can sign into. If you haven't already, go to the Users tab on the left and add a user, and then set credentials for that user by clicking into it.
Try and access your endpoint protected by authentication, you should get a 200!
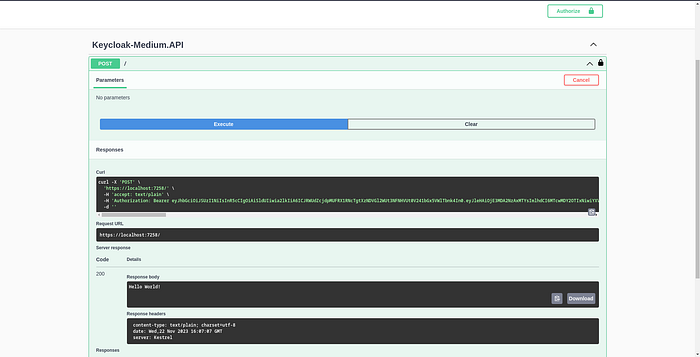
You can see we have our JWT. Another great thing is that Keycloak remembers our log in for a while, so if we restart our API, we can click login and we don't even need to enter the username and password for a while, it'll just let us straight in! Super fast!
In my previous article, I enabled Client authentication and Direct Access Grants in Keycloak, so I could use Postman to sign into my user and get a token. I don't need that anymore, so I'm going to turn those back off.
Conclusion
You have successfully used Keycloak and Swagger to enable amazingly fast authentication in our .NET application. We spent maybe 10 minutes setting this up, so that we can save hours of development time in the future. We no longer need to use Postman or some front end to log into Keycloak and retrieve our access tokens, we can just do it all from our favourite development tool, Swagger!
Well done!
About the author
I'm a software engineer, primarily using the .NET stack but I'm also a keen Flutter developer and budding Elixir enthusiast. Check out my website at www.stefanalexnovak.com where you can find the rest of my articles and other stuff I'm working on.