
How a single line of Python code and Integromat can substitute this whole AWS IoT Core / Azure IoT Hub nightmare…
I consider myself reasonably tech-savvy. Bwah, I would say, I really like computers and tinkering with technology. However, my background was purely commercial and until last year I have never touched a line of code.
Out of nowhere a few months ago, as a newly born tech entrepreneur (adding "tech" gives the title far more flair), I was all of a sudden facing a new scenario. I needed to send data from my edge device (another "edgy" word that likes to be sprinkled with crumbles of "IoT" for more flavor) to… hmm, to the cloud, I guess?
How difficult can it be to send sensor data from Raspberry Pi to somewhere in the cloud? Should I hire an IoT consultant (likely expensive) or give it a go myself? What followed after was a 3-month long exploration of AWS / Azure and IoT solutions offered by these providers. In the end I have built a working solution with Azure, only to find out afterward, that it was a giant overkill. There was a much simpler and faster way of achieving the same objective.
The hard way
AWS
Having been noticed on one of the start-up competitions, I had some spare Amazon credits in my pocket and even a connection to an Amazon tech adviser. Unfortunately at that stage I was so technically clueless, that talking to my advisor I felt like a Stone Age man learning about fire. Nevertheless, AWS IoT Core felt like the right way to go.
Marketing materials on their website certainly convinced me that AWS IoT Core is a comprehensive tool for the job. Message Broker to execute commands on the device sounded certainly useful. Device Shadows allowing to set the state of your device even if it is offline (syncing back when the connection is restored), seemed to be an ingenious solution, especially when my devices had issues with consistent electricity access.
I have waged my war with AWS IoT SDK for 2 weeks. Setting up the access permissions in JSON format in elaborate Resource/Policy/Identity management conundrum has exploded my head. I was building a car, by learning how to vulcanize rubber for the tires. It was time to move on.
Microsoft Azure
Azure was offering a limited incentive for start-ups (200 USD credits for a trial, but which was not available in my region), but the whole Azure Portal looked much friendlier to use. I have also managed to find a great tutorial about connecting devices to Azure, which certainly helped. I highly recommend visiting www.taygan.co for a detailed description.
Setting up Azure SDK on Raspberry Pi was a breeze. The way to authenticate my device was also fairly straightforward (no JSON magic policies bullshit). With the help of the tutorial and copy/paste/amend/test/pray method I had a neat little python script that sending my data to Azure IoT Hub.
The challenge came when I needed to store my data somewhere for further analysis. After much exploration of the database landscape (people make careers out of this and here I am trying to figure out databases in 2 days…), I have settled on Azure SQL. It was pricy (in light of my budget expectations) but seemed to be working seamlessly with the rest of the setup.
The Azure SQL database was ready, but wait, what? Do I need to type the actual SQL code itself to be able to create a bloody table with columns? There is no dropdown selection or some neat graphic interface? Oh wait, I can download a 0.5 GB file with free Microsoft SQL Server Management Studio, to create a table. It looked like the car was there, but I still need to learn how to drive it.
I have brushed up on my SQL and the data was finally neatly flowing into my database. I was though still using MS Excel (such a low tech ending to my elaborate edge/cloud solution) to download and analyze the data from the SQL database, but at least I got to the place where I needed to be.
The easy way
Now, even though the above set up has worked out, sometimes it might be just easier to take an Uber to go somewhere, rather than build and operate your own car…
The single line of Python code you need
r = requests.post("https://your.webhook.url", json = data_to_send)Requests is a Python library that allows making HTTP requests in a human-friendly way. Yes, you need to add "import requests" on top of your code and have some data ready to send in a dictionary variable, so this is more like 3 lines of code. Example of a simple dictionary:
data_to_send = { "DeviceID" : "My RaspPi Sensor", "temperature" : 55}In case you do not have any sensor attached to your board, that would provide data for your dictionary, here is a sample code that takes readings of some in-built key parameters for your Raspberry Pi:
The final point missing is the URL of a webhook to send the data to. What is a webhook and how do we get one?
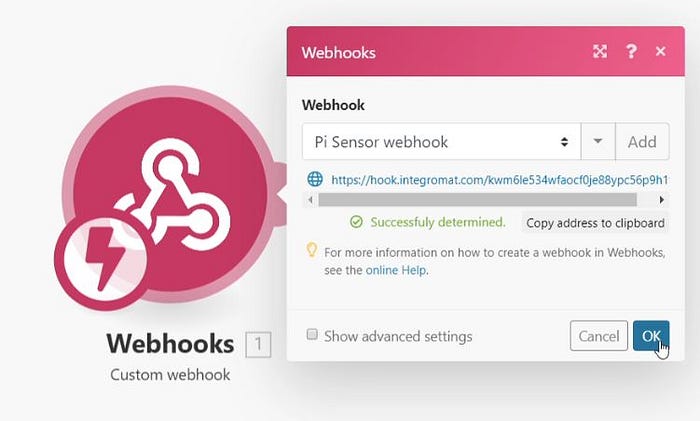
Creating webhook in Integromat
Integromat is a platform allowing you to connect together various third party services. It is similar to Zapier, but in my view Integromat allows you to handle your data in a more deliberate way. Integromat offers a fully functional free trial account that allows for up to 1000 operations, which should be sufficient to keep sending your data every few hours, without a need to pay for anything.
First let us create a webhook URL using the Webhooks module.
Once you have the webhook, you need to insert it into the code.

The next step is to send a sample of your data to Integromat so it can automatically recognize the structure of your data. Once we run the script, printing "r.status_code" will tell us if the request was successful("200").

In the Integromat we can see, the data has been received successfully.
Linking to Google Sheets
After receiving data via the Integromat webhook, we can send it to any other service that links with Integromat. We could send the data for example to Airtable or have them emailed to us via Gmail or Office365 at regular intervals.
For simplicity, we will create a Google Sheets spreadsheet with corresponding columns for our data. Once we link Integromat with our Google Sheets, we have an option to "Add a Row". We will be able to find spreadsheet we have created in the dropdown menu. Next, via the visual interface, we need to assign which blocks of data go into which column in our spreadsheet.
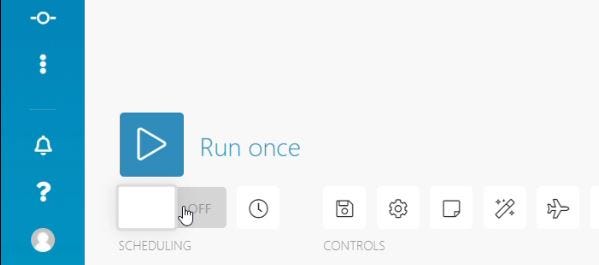
After clicking "Run once" our scenario will start listening for data being sent to the webhook. We need to run one more time our Python script on the Raspberry Pi and we will see the data has been captured in our Integromat scenario and is visible inside of Google Sheets.
Final automation of Raspberry Pi set up
To fully automate the sending of our data we need to turn "On" the scheduling in the Integromat scenario. From now on Integromat will keep listening to the webhook in this scenario.
To have the Python script run automatically, we will use Cron — a scheduling utility built into Linux. To set a schedule for our job run "crontab -e" in the command line.
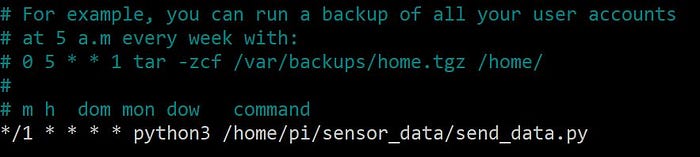
In the above example, we have set Cron to execute our script every 1 minute. For more details on setting crontabs check out this blog.
Here is the result:
Conclusion
AWS and Azure are certainly powerhouses that allow you to build up a full monty solution. Trying to deploy IoT frameworks on these platforms, gave me an understanding and appreciation of the level of complexity behind. However if all you want to do is to build a top-level MVP, then going for tools that allow you abstract that complexity, will certainly save your time, if not sanity.
Finally here is a video summary of the whole process.
Kudos to AWS for supporting startup via various initiatives such as StartupSchool, which have provided me with spare credits to explore AWS. I have also included my affiliate link to Integromat, you can try Integromat for free, I will receive an incentive if you switch to one of the paid plans. Visit us at www.business-automated.com for any personalized advice in this area.