
I tried using the GLM 4.5 model on Claude Code and discovered it's easier to set up compared to Qwen3-Coder, as I tried in my last tutorial here.
GLM-4.5 paired with Claude Code is an insane power combination that gives you access to a 355B parameter Chinese AI model with native agentic reasoning through the best terminal coding tool.
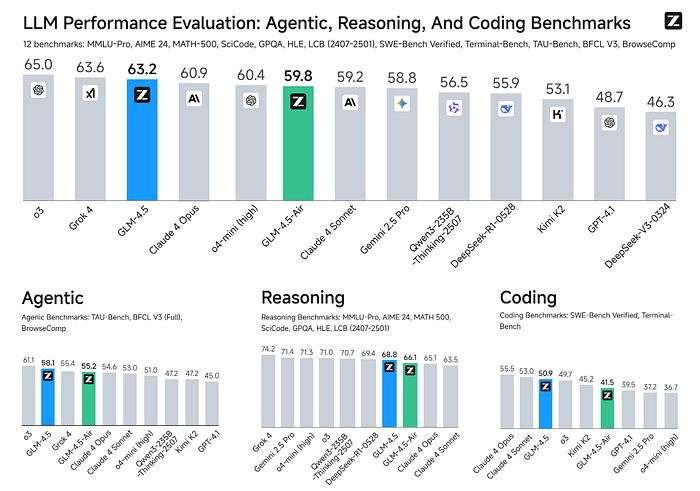
You get the best of both worlds: GLM-4.5's exceptional performance on coding tasks (matching Claude 4 Sonnet on function calling benchmarks) and Claude Code's smooth terminal integration for real development workflows.
But here's the catch,
If you're routing your code through a Chinese AI model, you need to think carefully about data privacy and compliance, especially if you're working on proprietary codebases or handling sensitive data.
GLM-4.5 processes requests through Z.ai's infrastructure, which means your code and project context will touch Chinese servers.
That said, for open-source projects, learning, or when data locality isn't a concern, this setup delivers remarkable coding assistance at a fraction of the cost of premium models.
You can also try this approach with other Chinese AI models that I shared in this post — the best Chinese AI models.
GLM-4.5 costs $0.96 per million tokens (blended) compared to Claude's higher pricing, while delivering comparable performance on coding benchmarks.
But is the setup on Claude Code complicated?
A quick answer is no, the following sections will show you exactly how you can set up GLM 4.5 on Claude Code using one of these methods. Though it was not without the usual dependencies issues, and conflicts that I managed to fix.
As we start,
A quick reminder, if you enjoy this kind of guide, tutorials, and articles, you should consider joining our actively growing community by following me here on Medium so that you don't miss new updates. Thank you!
Claude Code Router Integration
Claude Code Router is a powerful middleware tool that acts as an intelligent proxy between Claude Code (Anthropic's command-line coding assistant) and various AI model providers.
Claude Code Router allows you to use models from multiple providers, including:
- OpenRouter (accessing Claude, GPT, Gemini, and other models)
- DeepSeek (specialized coding models)
- Zhipu AI (GLM models with Chinese support)
- Ollama (local models)
- Google Gemini
- And many more
The router can select different models for different tasks:
- Use a powerful model for complex reasoning
- Use a faster, cheaper model for background tasks
- Use specialized models for long context or web search
- Switch models based on custom logic you define
Cost Optimization: By routing different types of requests to appropriate models, you can reduce API costs while maintaining quality.
Request Transformation: The router handles the technical complexity of adapting requests between different API formats so that Claude Code can work with any provider.
Step 1: Install Required Tools
First, install both Claude Code (Anthropic's official tool) and the Claude Code Router:
npm install -g @anthropic-ai/claude-code
npm install -g @musistudio/claude-code-router
Step 2: Get Your Zhipu AI API Key
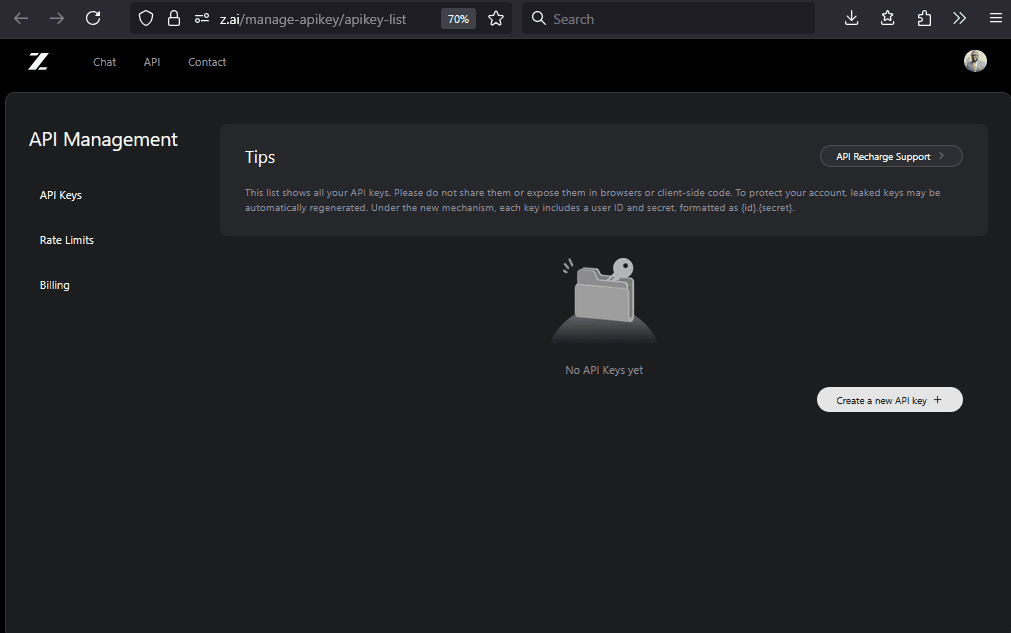
- Visit https://z.ai/manage-apikey/apikey-list
- Register/log in to your account
- Navigate to the API section and generate your API key
- Important: Add credits to your account — the API requires a positive balance
Step 3: Create Configuration File

The configuration file is the heart of Claude Code Router — it defines which models to use and when to use them.
Windows (PowerShell):
mkdir "$env:USERPROFILE\.claude-code-router" -Force
notepad "$env:USERPROFILE\.claude-code-router\config.json"
macOS/Linux:
mkdir -p ~/.claude-code-router
nano ~/.claude-code-router/config.json
Step 4: Configure GLM-4.5 Models
Add this configuration to your config.json file:
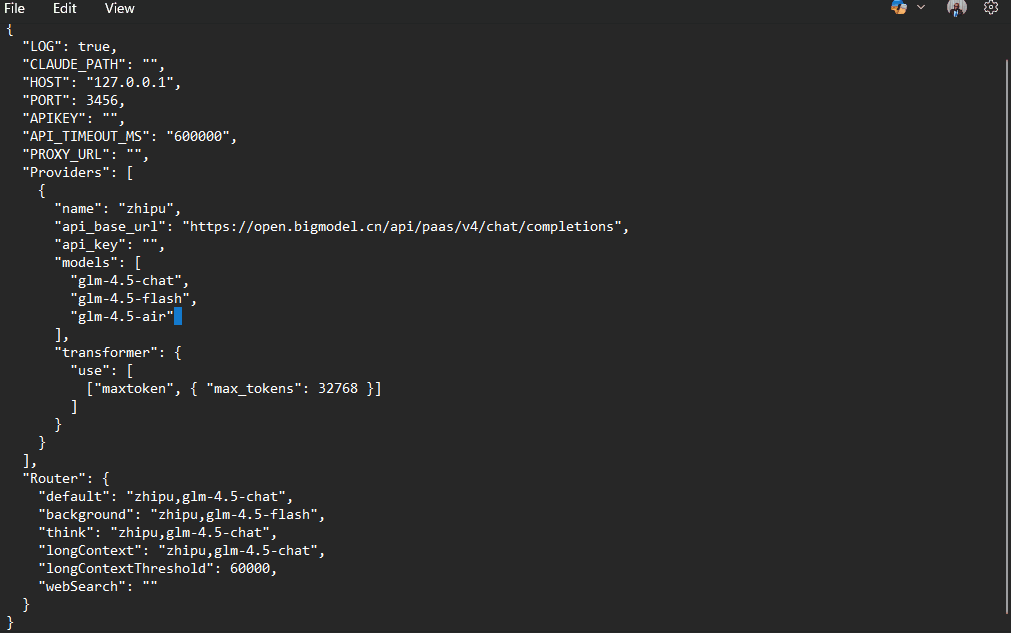
{
  "LOG": true,
  "HOST": "127.0.0.1",
  "PORT": 3456,
  "API_TIMEOUT_MS": "600000",
  "Providers": [
    {
      "name": "zhipu",
      "api_base_url": "https://open.bigmodel.cn/api/paas/v4/chat/completions",
      "api_key": "YOUR_ZHIPU_API_KEY_HERE",
      "models": [
        "glm-4.5",
        "glm-4.5-air"
      ],
      "transformer": {
        "use": []
      }
    }
  ],
  "Router": {
    "default": "zhipu,glm-4.5",
    "background": "zhipu,glm-4.5-air",
    "think": "zhipu,glm-4.5",
    "longContext": "zhipu,glm-4.5",
    "longContextThreshold": 60000
  }
}
Step 5: Verify Available Models
Before proceeding, verify which models your API key has access to:
Windows (PowerShell):
$models = Invoke-RestMethod -Uri "https://open.bigmodel.cn/api/paas/v4/models" -Headers @{"Authorization" = "Bearer YOUR_API_KEY"}
$models.data | ForEach-Object { $_.id }
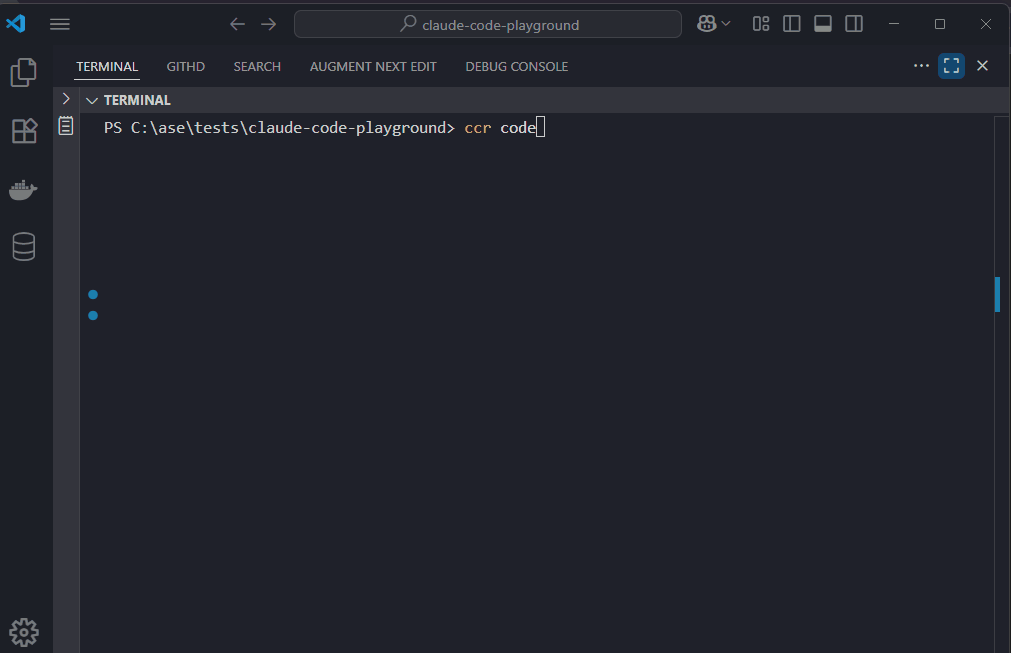
Step 6: Start Claude Code with Router
# Start the router service
ccr restart

# Launch Claude Code
ccr code
What happens here:
ccr restart: Starts the Claude Code Router service using your configurationccr code: Launches Claude Code, which will now route requests through your router instead of directly to Anthropic
Troubleshooting Common Issues
Error 1113 — Insufficient Balance
- Cause: Your Zhipu AI account doesn't have enough credits
- Solution: Add credits to your Zhipu AI account
- Check: Verify your account balance in the dashboard
Error 1211 — Unknown Model
- Cause: Using model names that don't exist or aren't accessible to your API key
- Solution: Verify model names using the API call in Step 5
- Check: Ensure you're using exact model names from the API response
Connection Issues
- Network: Check your internet connection and firewall settings
- Authentication: Verify API key is correct and active
- Service: Ensure the router service is running with
ccr status - Ports: Make sure port 3456 (or your configured port) isn't blocked
Configuration Issues
- JSON Syntax: Validate your JSON configuration using an online JSON validator
- File Location: Ensure config.json is in the correct directory
- Permissions: Check that the file is readable by the router process
2) OpenRouter Integration
OpenRouter is the second GLM-4.5 integration that handles all the API translation for you.
It gives you a single endpoint that routes different models.
Setting Up OpenRouter
First, create an OpenRouter account at openrouter.ai.
The free tier gives you $5 in credits, which is plenty for testing GLM-4.5 integration.
Once you're in, grab your API key from the dashboard. You'll need this for the proxy configuration.
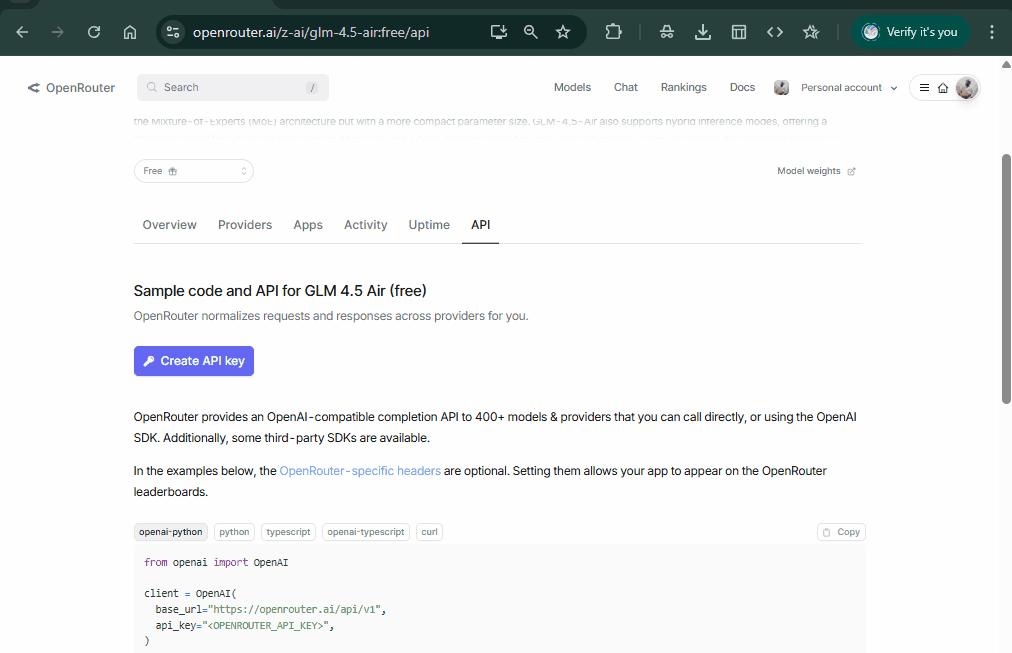
Verify GLM-4.5 is available by checking OpenRouter's model list:
For Linux/macOS:
curl -X GET "https://openrouter.ai/api/v1/models" \
  -H "Authorization: Bearer $OPENROUTER_API_KEY" | \
  grep -i "glm-4"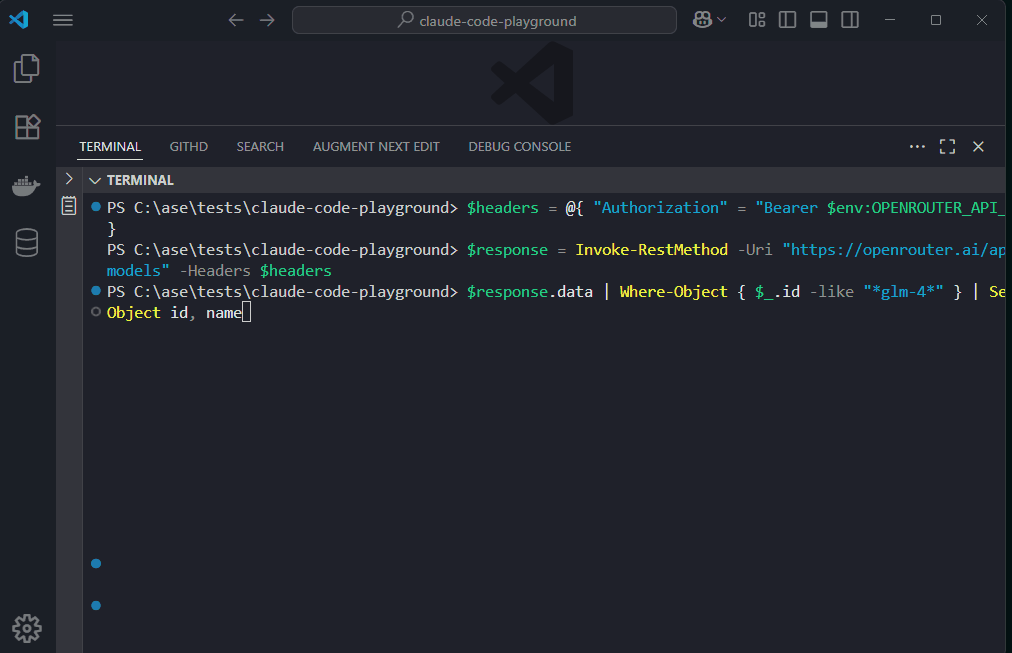
For Windows PowerShell:
In my example here, I am using VS Code terminal on Windows, so this is what will work:
$headers = @{ "Authorization" = "Bearer $env:OPENROUTER_API_KEY" }
$response = Invoke-RestMethod -Uri "https://openrouter.ai/api/v1/models" -Headers $headers
$response.data | Where-Object { $_.id -like "*glm-4*" } | Select-Object id, name
You should see z-ai/glm-4.5, z-ai/glm-4.5-air, and z-ai/glm-4.5-air:free in the response.
The "air" variant is the lighter 106B parameter version with a free tier option, while the full version is the 355B parameter model.
Installing claude-code-proxy
The claude-code-proxy tool intercepts Claude Code's API requests and redirects them to OpenRouter. Clone and set it up:
git clone https://github.com/fuergaosi233/claude-code-proxy
cd claude-code-proxy
Create a .env file with your configuration:
ANTHROPIC_API_KEY=sk-ant-your-fake-key-here
OPENROUTER_API_KEY=sk-or-v1-your-real-openrouter-key
TARGET_MODEL=z-ai/glm-4.5
PROXY_PORT=8080
Notice my fake Anthropic key, which is intentional — the proxy intercepts requests before they reach Anthropic's servers.
Configuring Claude Code
Now we need to point Claude Code at our proxy instead of Anthropic's API. There are two ways to do this:
Method A: Environment Variable Override
export ANTHROPIC_BASE_URL=http://localhost:8080
export ANTHROPIC_API_KEY=sk-ant-your-fake-key-here
For PowerShell:
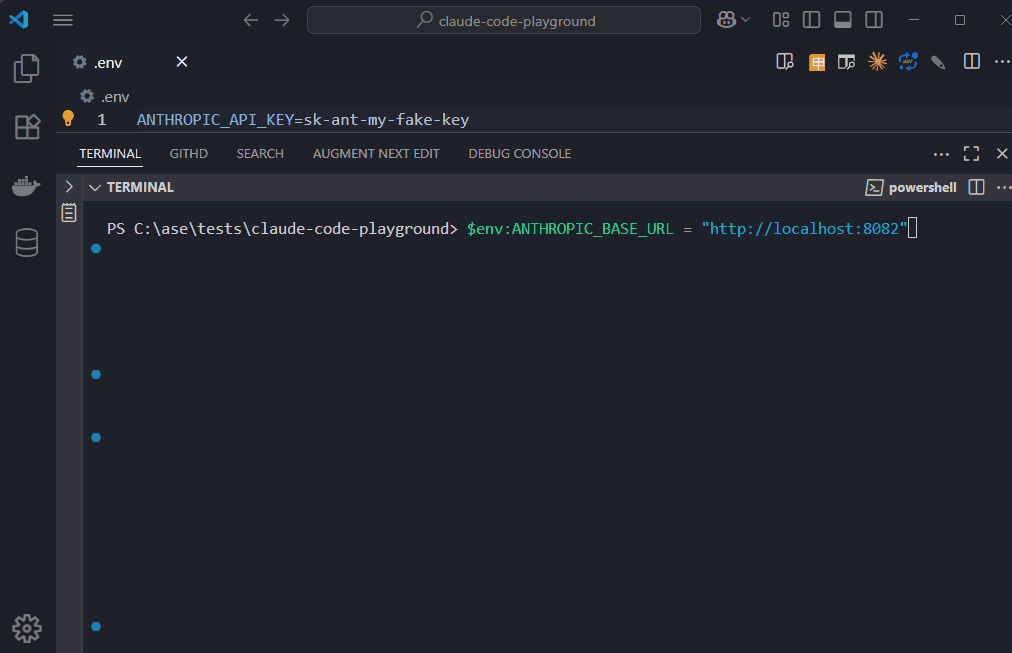
$env:ANTHROPIC_BASE_URL = "http://localhost:8080"
$env:ANTHROPIC_API_KEY = "sk-ant-my-fake-key-here" # This can be anything
$env:OPENAI_API_KEY = "sk-or-xxxxxxxxxxxxxxxxxxxxxxxxx" #Change to you key
$env:OPENAI_BASE_URL = "https://openrouter.ai/api/v1"
$env:BIG_MODEL = "z-ai/glm-4.5"
$env:MIDDLE_MODEL = "z-ai/glm-4.5-air"
$env:SMALL_MODEL = "z-ai/glm-4.5-air:free"
$env:PORT = "8080"
$env:HOST = "0.0.0.0"
$env:LOG_LEVEL = "INFO"
After setting these, verify they're all there:
dir env: | Where-Object { $_.Name -match "OPENAI|ANTHROPIC|MODEL|PORT|HOST|LOG" }
$env:ANTHROPIC_BASE_URL = "http://localhost:8080"
Method B: Hosts File Modification (more permanent)
Add this line to your /etc/hosts File:
127.0.0.1 api.anthropic.comThis redirects all Anthropic API calls to your local proxy.
Dependency Installation Headache
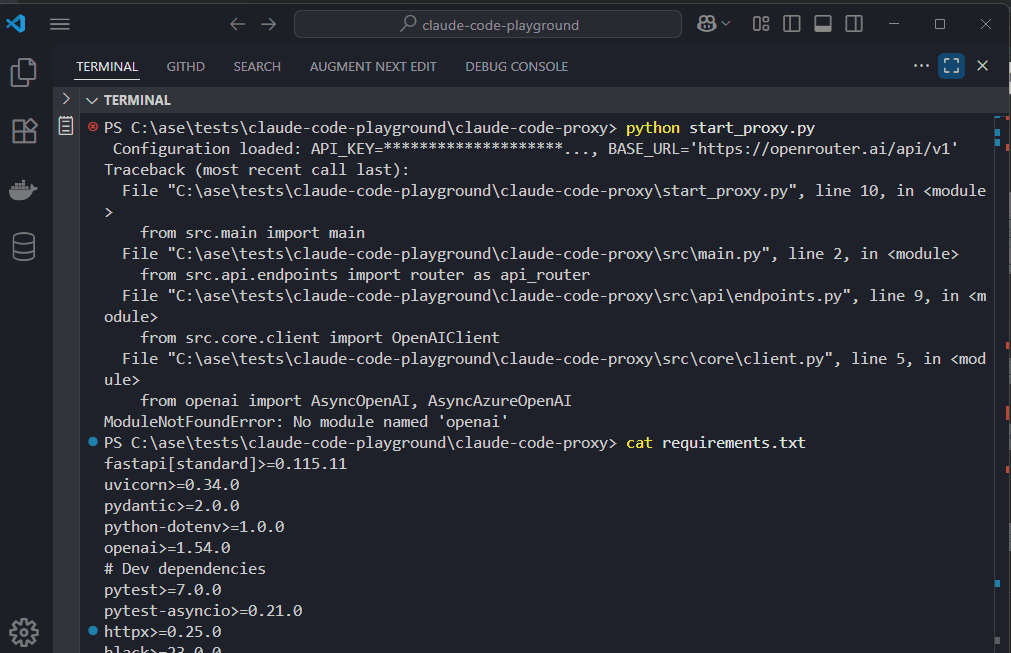
Setting up the Claude-code-proxy: the Python dependencies can be frustrating.
In my testing, running pip install -r requirements.txt appeared to install everything successfully, but when I tried to start the server, it failed with ModuleNotFoundError: No module named 'openai'.
Configuration loaded: API_KEY=********************...,
 BASE_URL='https://openrouter.ai/api/v1'
Traceback (most recent call last):
  File "\claude-code-proxy\start_proxy.py", line 10, in <module>
    from src.main import main
  File "\claude-code-proxy\src\main.py", line 2, in <module>
    from src.api.endpoints import router as api_router
  File "\claude-code-proxy\src\api\endpoints.py", line 9, in <module>
    from src.core.client import OpenAIClient
  File "\claude-code-proxy\src\core\client.py", line 5, in <module>
    from openai import AsyncOpenAI, AsyncAzureOpenAI
ModuleNotFoundError: No module named 'openai'
What happened:
- The installation log showed packages being downloaded and "installed."
- But
pip show openaireturned "Package(s) not found" - Multiple warning messages about invalid distributions cluttered the output
- The installation process failed silently for some packages
The working solution: Instead of relying on the requirements.txt file, install the core dependencies manually:
# Install essential packages one by one
python -m pip install openai
python -m pip install fastapi
python -m pip install uvicorn
python -m pip install python-dotenv
This manual approach bypasses the bulk installation issues and gives you clear feedback on what's installed.
It's not elegant, but it works when the standard approach fails.
Don't assume pip install -r requirements.txt worked just because it didn't throw an obvious error.
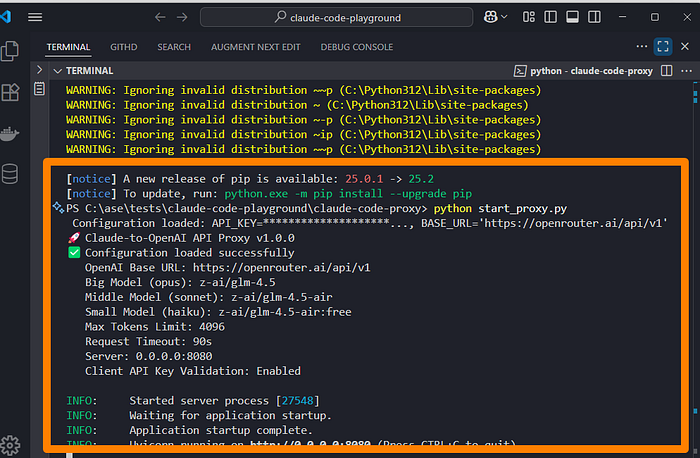
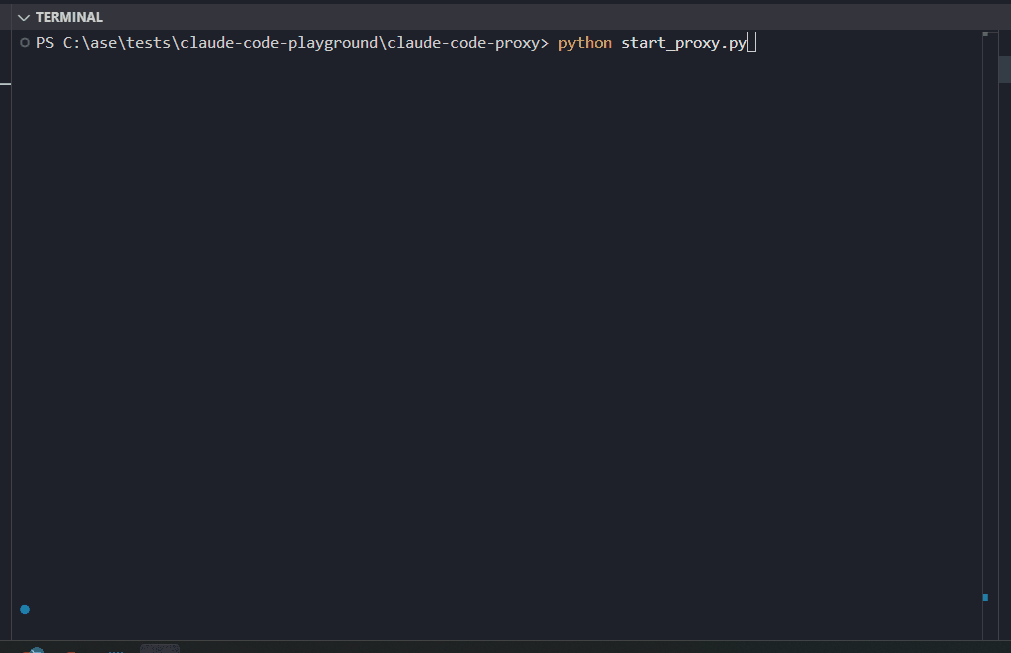
Finally, the server runs as you can see here :
Testing the Integration
Start the Python proxy server:
Using the startup script:
python start_proxy.pyUsing UV:
source .env  # Load environment variables
uv run claude-code-proxy
For Windows PowerShell:
python start_proxy.pyThe server will start on port 8080 by default. In another terminal, configure Claude Code to use the proxy:
In another terminal, test Claude Code with a simple request.
Final Thoughts
GLM-4.5 paired with Claude Code is a good testing and experimenting combination. This 355B parameter model can be your go-to model for those non-sensitive tasks.
I will be testing this for a whole project to see how it performs. My coding test with the Claude Code proxy was slow, and I needed to keep logging out of Claude Code to make it work.
More testing is needed to see if this combination can be adapted for serious coding. I would like to hear your experience with this. Let us know in the comments.
Let's Connect!
If you are new to my content, my name is Joe Njenga
Join thousands of other software engineers, AI engineers, and solopreneurs who read my content daily on Medium and on YouTube where I review the latest AI engineering tools and trends.
If you would like to connect directly, you can reach out here:
Follow me on Medium | YouTube Channel | X | LinkedIn