

🧭 Index 1. What Is CrowdSec? 2. How to Install CrowdSec on Ubuntu 3. What Are CrowdSec Bouncers? 4. How to Install the iptables Bouncer 5. Official Documentation 6. How CrowdSec Detects Threats: Parsers, Scenarios & Collections 7. Understanding acquis.yaml in CrowdSec 8. How to View and Manage Ban Durations in CrowdSec 9. Understanding Alerts in CrowdSec 10. How to Whitelist an IP in CrowdSec
What Is CrowdSec?
CrowdSec is a free, open-source Intrusion Prevention System (IPS) designed to protect your servers and infrastructure from cyber attacks. It works by analyzing your system and application logs to detect suspicious behavior such as brute-force attempts, port scans, or other malicious activities.
Unlike traditional tools that only alert you, CrowdSec automatically blocks harmful IP addresses in real-time using bouncers — software components that enforce decisions on your firewall, proxy, or other network layers.
One unique feature of CrowdSec is its community-driven threat intelligence: when one user detects and blocks a malicious IP, that information is shared anonymously with the entire CrowdSec network, helping everyone stay protected against new and emerging threats.
Built for scalability and automation, CrowdSec is ideal for DevOps teams who want to secure their infrastructure without manual intervention.
Customizing CrowdSec for Your Environment
CrowdSec is designed to be highly adaptable, letting you customize its behavior beyond just IP whitelisting. You can tailor detection scenarios to focus on threats relevant to your infrastructure, adjust ban durations to fit your security policy, or even create custom parsers to analyze unique log formats. This flexibility ensures that CrowdSec not only protects you effectively but also reduces false positives, providing a security solution that's perfectly aligned with your specific needs.
How to Install CrowdSec on Ubuntu
To start detecting attacks on your Linux server, you first need to install the CrowdSec Security Engine (the main agent).
Here's how to do it on Ubuntu/Debian:
- Download and add the CrowdSec repository
Run the following command to download the installation script and add the CrowdSec repository:
curl -s https://install.crowdsec.net | sudo sh2. Install CrowdSec agent
Once the repository is added, install CrowdSec with:
sudo apt install crowdsec3. Verify CrowdSec is running
Check if the CrowdSec service is active:
sudo systemctl status crowdsecWhat Are CrowdSec Bouncers?
After CrowdSec detects suspicious IPs through its analysis engine, it needs a way to enforce the decisions and block those malicious IP addresses. This is where bouncers come in.
Bouncers are enforcement agents that receive decisions from CrowdSec and take action, such as blocking or allowing traffic based on those decisions.
Types of CrowdSec Bouncers
CrowdSec supports many bouncer types to fit different environments and technologies, including:
- Firewall/IP bouncers (like iptables, nftables, Windows Firewall) — block IPs at the network level.
- Web server bouncers (such as Nginx, Traefik) — block attacks at the HTTP layer.
- Cloud bouncers (Cloudflare, AWS WAF) — block IPs at the cloud or CDN edge.
- API and webhook bouncers — allow custom integrations or alerting systems.
Using the iptables Firewall Bouncer
For this guide, we'll focus on the iptables firewall bouncer, which is widely used on Linux servers.
The iptables bouncer blocks IP addresses by modifying your server's firewall rules based on CrowdSec's decisions, effectively preventing malicious IPs from accessing your system.
How to Install the iptables Bouncer
Once CrowdSec is installed, add the iptables bouncer with:
sudo apt install crowdsec-firewall-bouncer-iptablesCheck if the bouncer is running:
sudo systemctl status crowdsec-firewall-bouncerAnd to see the installed bouncers:
sudo cscli bouncers listExplore Official Documentation
CrowdSec supports many distributions and various bouncers (enforcement agents). For detailed installation guides, including other Linux versions and bouncer options, visit the official CrowdSec setup page here:
https://app.crowdsec.net/security-engines/setup?distribution=linux
This page is regularly updated and helps you choose the best configuration for your environment.
🛠 How CrowdSec Detects Threats: Parsers, Scenarios & Collections
CrowdSec doesn't rely on a single signature or rule to detect malicious behavior. Instead, it uses a modular detection pipeline made up of:
🔍 1. Parsers — Understanding Your Logs
Parsers are responsible for extracting structured data from your raw logs (like SSH logs, NGINX access logs, syslog, etc.). They transform unstructured lines into JSON-like objects that can be processed further.
For example:
sshd-logs parserextracts usernames, IP addresses, and login status from SSH logs.nginx-logs parserhandles web server logs.
To see all installed parsers:
sudo cscli parsers listYou can also inspect which ones are active and which logs they're watching.
🎯 2. Scenarios — The Detection Rules
Scenarios are YAML-based behavior detection rules. They define what kind of activity is considered malicious.
CrowdSec includes many built-in scenarios. Some popular examples include:
Common CrowdSec Scenarios
🛡️ SSH Protection
crowdsecurity/ssh-bf— Detects brute-force SSH login attempts.crowdsecurity/ssh-slow-bf— Detects slow, stealthy SSH brute-force attacks.
🌐R We & HTTP Attacks
crowdsecurity/http-bad-user-agent— Detects suspicious or known malicious user agents (e.g., scrapers, bots).crowdsecurity/http-probing— Identifies scanning and probing activity via HTTP requests.crowdsecurity/http-xss-probing— Detects cross-site scripting (XSS) probes.crowdsecurity/http-path-traversal-probing— Blocks directory traversal attacks.crowdsecurity/http-cve-2021-41773— Detects CVE-2021-41773 Apache exploit attempts.crowdsecurity/http-cve-2021-42013— Blocks Apache CVE-2021-42013 exploitation attempts.crowdsecurity/http-wordpress-scan— Detects WordPress-specific scanning activity.crowdsecurity/wordpress-bruteforce— Identifies brute-force attacks on WordPress login pages.crowdsecurity/apache-bf— Detects brute-force attacks against Apache-protected endpoints.
🧠 Database Protection
crowdsecurity/mysql-bf— Brute-force attempts against MySQL.crowdsecurity/mssql-bf— Brute-force attacks on Microsoft SQL Server.
🖥️ Remote Access Attacks
crowdsecurity/rdp-bf— Detects brute-force RDP login attempts.crowdsecurity/smb-bf— Blocks brute-force attempts on SMB services.crowdsecurity/ftp-bf— Detects brute-force attacks via FTP.crowdsecurity/asterisk-bf— Brute-force detection for Asterisk VoIP servers.
📡 Port Scanning Detection
crowdsecurity/scan-multi_ports— Detects scanning across multiple ports.crowdsecurity/iptables-scan-multi_ports— Port scan detection based on iptables logs.
👉 To list all scenarios:
ls /etc/crowdsec/scenarios/

sudo cscli scenarios list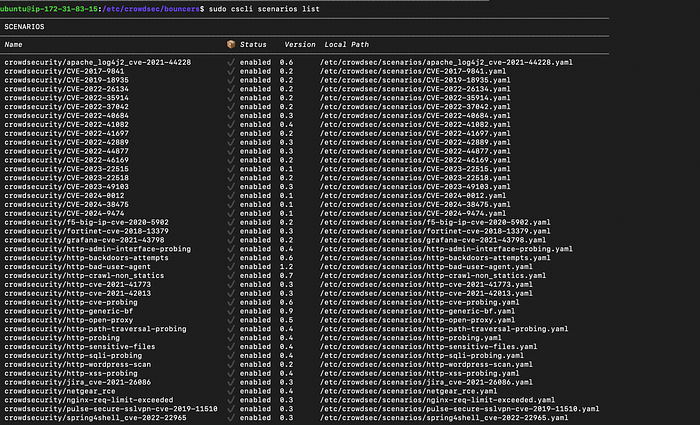
And to see details of a specific one:
sudo cscli scenarios inspect crowdsecurity/ssh-bf📦 3. Collections — Bundles for Specific Services
Instead of manually installing parsers and scenarios, CrowdSec provides collections — prebuilt packs for specific services like:
crowdsecurity/sshd– all you need to protect SSHcrowdsecurity/nginx– web server protectioncrowdsecurity/linux– common Linux logs and behaviorscrowdsecurity/wordpress– detects WordPress-specific attackscrowdsecurity/mysql– protects MySQL services
To install a collection:
sudo cscli collections install crowdsecurity/sshdList all available collections:
sudo cscli collections list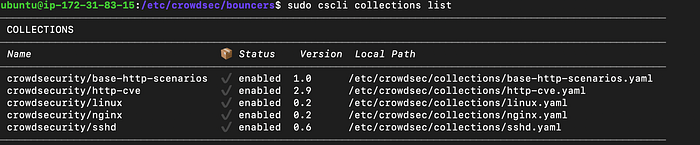
You can also update everything at once:
sudo cscli hub update
sudo cscli hub upgrade
🧩 Understanding acquis.yaml in CrowdSec
The acquis.yaml file is the entry point for log ingestion in CrowdSec. It tells the CrowdSec engine where to find logs, what kind of logs they are, and how to parse them.
This is where the pipeline begins — before CrowdSec can analyze, detect, and block anything, it first needs log data. That's exactly what acquis.yaml provides.
📥 What Is acquis.yaml?
Located at:
/etc/crowdsec/acquis.yamlThis file defines:
- The log source (e.g.,
/var/log/auth.log,/var/log/nginx/access.log) - The log format (e.g.,
syslog,json) - The type of logs (which maps to a parser and scenario chain)
🛠 Example acquis.yaml Entries
#Generated acquisition file - wizard.sh (service: nginx) / files : /var/log/nginx/error.log /var/log/nginx/access.log
filenames:
  - /var/log/nginx/error.log
  - /var/log/nginx/access.log
labels:
  type: nginx
---
#Generated acquisition file - wizard.sh (service: ssh) / files : /var/log/auth.log
filenames:
  - /var/log/auth.log
labels:
  type: syslog
---
#Generated acquisition file - wizard.sh (service: linux) / files : /var/log/syslog /var/log/kern.log
filenames:
  - /var/log/syslog
  - /var/log/kern.log
labels:
  type: syslog
---
🔗 How It Connects to Parsers and Scenarios
Here's the full flow:
acquis.yamltells CrowdSec where the logs are and what type they are.- The CrowdSec engine uses the
type(e.g.,nginx,syslog) to decide which parsers to apply. - After parsing, CrowdSec feeds the normalized events into the scenarios, which look for patterns like brute-force, XSS, port scans, etc.
- If a scenario is triggered, a decision is made — such as banning the offending IP.
- That decision is passed to bouncers, which then block or mitigate the threat.
🧠 Final Note
If your logs are not listed in acquis.yaml, CrowdSec won't see them, which means:
- No parsing
- No detection
- No protection
So keeping acquis.yaml properly configured is critical to the success of your CrowdSec setup.
⏱️ How to View and Manage Ban Durations in CrowdSec
When CrowdSec detects an attack, it issues a decision — usually a temporary ban on the IP address. These bans don't last forever (by default), but you can view, extend, or reduce the block time.
🔍 View Active Bans
To see which IPs are currently banned and for how long:
sudo cscli decisions listYou'll see columns like:
- IP Address
- Reason (e.g., ssh-bf)
- Duration (e.g., 4h)
- Scenario
- Until (ban expiry time)
You can also view all historical decisions (expired + active):
sudo cscli decisions list --all🔧 How to Change Ban Duration (Globally)
To modify the default ban time, edit the main configuration file:
sudo nano /etc/crowdsec/profiles.yamlLook for:
decisions:
 - type: ban
   duration: 4h
Change it to your preferred value:
decisions:
 - type: ban
   duration: 4m or 4s or 48h # for second ,minutes,hours
Save and restart the service:
sudo systemctl restart crowdsec.service📝 You can use time units like
s(seconds),m(minutes),h(hours), ord(days).
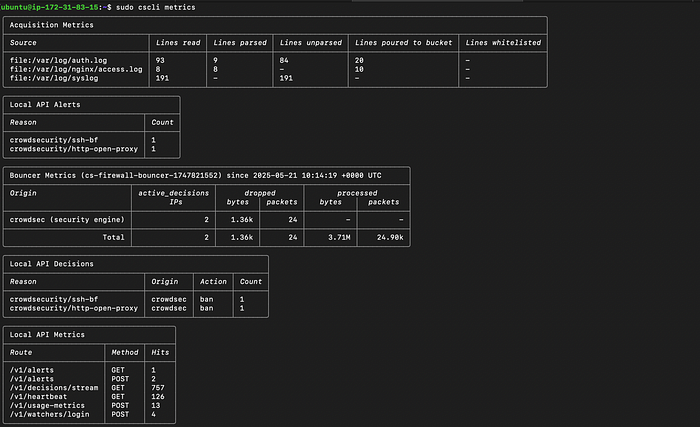
📊 View CrowdSec Metrics
To view real-time stats and metrics:
sudo cscli metricsYou'll see:
- Number of logs processed
- Number of alerts
- Scenario matches
- Decisions taken
- Bouncers connected
This helps ensure everything is running correctly.
📁 Bonus: Check Logs for Debugging
If you want to debug why something is or isn't getting banned:
sudo journalctl -u crowdsec -fThis will tail the CrowdSec service logs.
🚨 Understanding Alerts in CrowdSec
Alerts are internal events generated when a scenario is triggered. They represent suspicious or malicious behavior detected on your system — such as a brute-force attempt or port scan.
You can list recent alerts with:
sudo cscli alerts listThis helps you understand why certain decisions (like bans) were made.
How to Whitelist an IP in CrowdSec
Sometimes, you may want to ensure that certain trusted IP addresses or ranges are never blocked by CrowdSec — even if they trigger suspicious activity. This is where whitelisting comes in handy.
What Is Whitelisting?
Whitelisting means explicitly allowing specific IP addresses or networks to bypass CrowdSec's detection and blocking mechanisms. Whitelisted IPs will not be banned or blocked.
Whitelist Using the whitelists.yaml Parser File
CrowdSec includes a built-in whitelist parser where you can define IPs or CIDR ranges to exclude from bans.
- Navigate to the whitelist parser directory:
cd /etc/crowdsec/parsers/s02-enrich/- Edit or create the
whitelists.yamlfile:
name: crowdsecurity/whitelists
description: "Whitelist events from private ipv4 addresses"
whitelist:
  reason: "trusted ip"
  ip:
    - "231.123.123.123"   # Add the IP you want to whitelist here
  cidr:
    - "127.0.0.0/8"       # Example CIDR whitelist ranges
    - "192.168.0.0/16"
    - "10.0.0.0/8"
- "172.16.0.0/12"- Save the file and restart CrowdSec:
sudo systemctl restart crowdsec.service✅ Unban a specific IP Run:
sudo cscli decisions delete --ip <IP_ADDRESS>🔐 Final Thoughts
CrowdSec is more than just an intrusion prevention tool — it's a modern, collaborative approach to cybersecurity. From basic IP whitelisting to building custom parsers and scenarios, it empowers you to shape your defenses to match your exact needs. Whether you're defending a small server or scaling up protection for a complex infrastructure, CrowdSec adapts with you.
The best part? You're not doing it alone. With shared intelligence from a global community and the freedom to tailor configurations, you stay ahead of evolving threats without compromising on control.
In the end, security isn't about blocking everything — it's about knowing what to block, when, and why. CrowdSec gives you that clarity.
🔗 Connect With Me
If you found this guide helpful or want to chat more about server security, DevOps tools, or CrowdSec, feel free to connect with me on LinkedIn.