

Constraints go down, sizes go up. Parent sets positions. We all know (should know) this rule. However, different kinds of widgets apply different constraints and react differently to incoming constraints.
If you are a member, please continue; otherwise, read the full story here.
Content
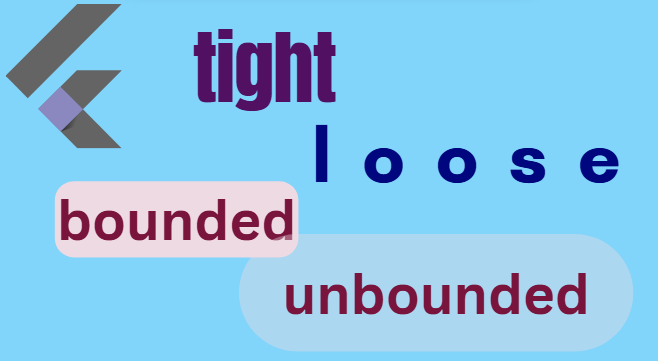
· The box layout model · Tight constraints · Loose constraints · Bounded constraints · Unbounded constraints · Infinite constraints · Constrained size/dimension/axis · Screen (MaterialApp, CupertinoApp, or WidgetApp) · SafeArea · Scaffold · Container · Center and Align · Column, Row, and Flex · ListView and SingleChildScrollView · UnconstrainedBox · ConstrainedBox · SizedBox · FittedBox
I am reading (once again) the most-read Flutter article on Medium, which has more claps than all my articles combined. The article is great, but there is some missing information that prevents me from completely understanding some of the provided examples.
Here is the quote from the article itself:
So, that's what I am going to do — read Flutter docs on Container, Center, Align, Row, Column, etc., and make some experiments to see how they behave depending on incoming constraints.
The first thing to read while starting learning Flutter layouts is the BoxConstraint class page. It contains necessary terminology.
The box layout model
Render objects in the Flutter framework are laid out by a one-pass layout model which walks down the render tree passing constraints, then walks back up the render tree passing concrete geometry.
For boxes, the constraints are
BoxConstraints, which, as described herein, consist of four numbers: a minimum widthminWidth, a maximum widthmaxWidth, a minimum heightminHeight, and a maximum heightmaxHeight.
The geometry for boxes consists of a
Size, which must satisfy the constraints described above.
Each
RenderBox(the objects that provide the layout models for box widgets) receivesBoxConstraintsfrom its parent, then lays out each of its children, then picks aSizethat satisfies theBoxConstraints.
Render objects position their children independently of laying them out. Frequently, the parent will use the children's sizes to determine their position. A child does not know its position and will not necessarily be laid out again, or repainted, if its position changes.
Tight constraints
When the minimum constraint and the maximum constraint on an axis are the same (i.e.
minWidth == maxWidth), that axis is tightly constrained.
When the parent widget applies a tight constraint on its child, the child has no choice. It must be exactly the size as specified by the constraint, i.e. width == minWidth == maxWidth or height == minHeight == maxHeight.
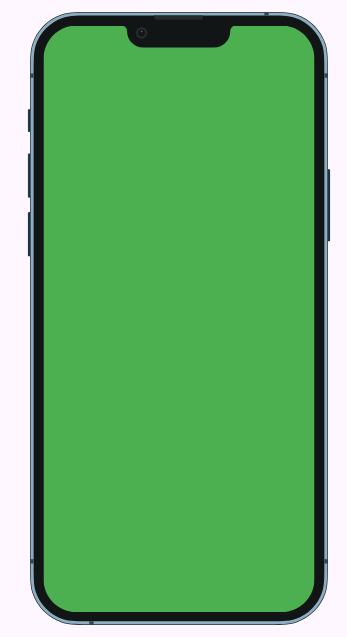
 Widget build(BuildContext context) {
    return  Center(
      child: ConstrainedBox(
          constraints: BoxConstraints(
            minWidth: 100,
            minHeight: 100,
            maxWidth: 100,
            maxHeight: 100,
          ),
          child: Container(
            color: Colors.green,
            width: 200,
            height: 200,
          ),
      ),
    );
  }
Despite the green container having its size defined as 200 x 200, the parent applied the tight constraints of 100 x 100, and the green container was forced to be 100 x 100.
The BoxConstraints class also has the tight constructor, so the above can be rewritten as:
...
constraints: BoxConstraints.tight(Size(100, 100)),
...
Loose constraints
An axis with a minimum constraint of 0.0 (i.e.
minWidth == 0) is loose (regardless of the maximum constraint; if it is also 0.0 (maxWidth == 0), then the axis is simultaneously tight and loose!)
Purely logically, if minWidth < maxWidth, it is a loose constraint, since there is some room for the child to vary his size, but in Flutter, the loose constraint is defined as above, so I am a bit confused.
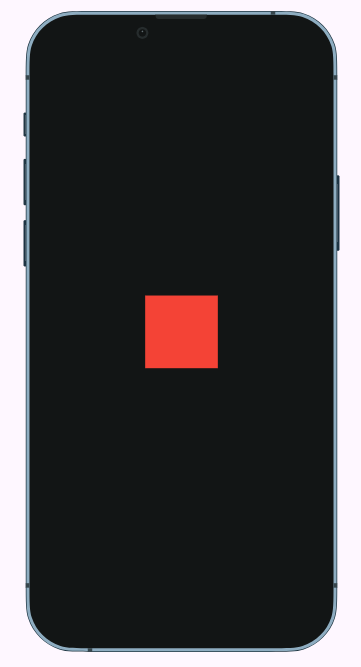
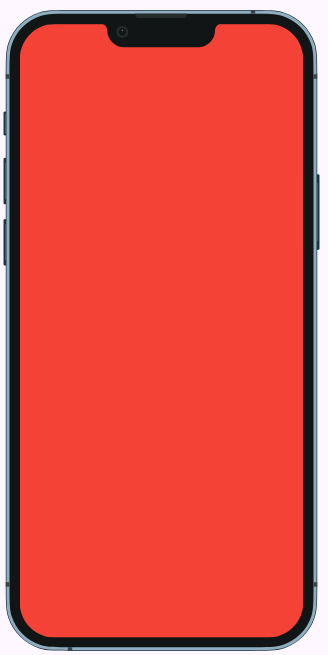
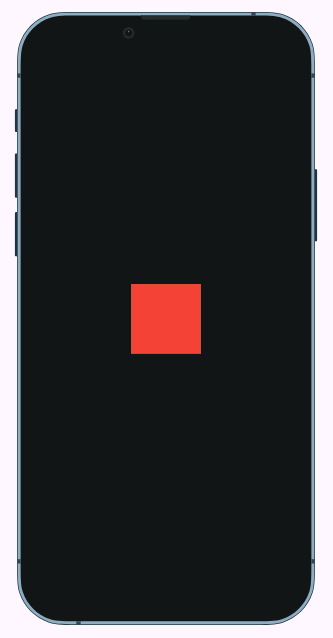
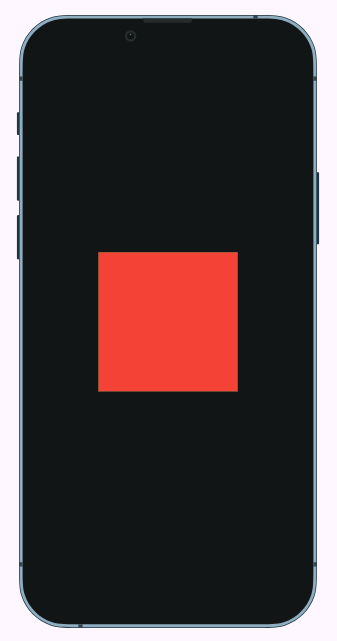
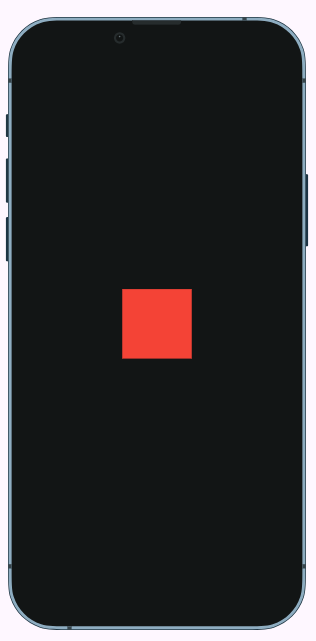
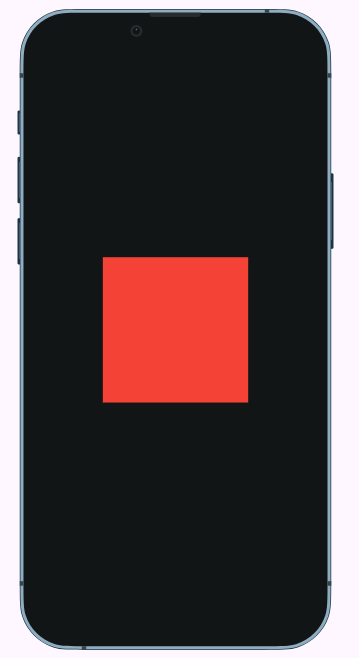
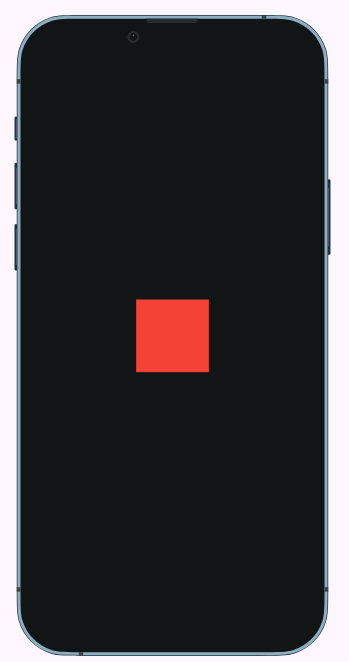
Widget build(BuildContext context) {
    return Center(
      child: Container(
        color: Colors.red,
        width: 50,
        height: 50,
      ),
    );
  }
The Center takes the whole screen. It provides a loose constraint for the child (the child can be any size between 0 and screen size). The red container wants to be 50 x 50, so this is the size it gets.
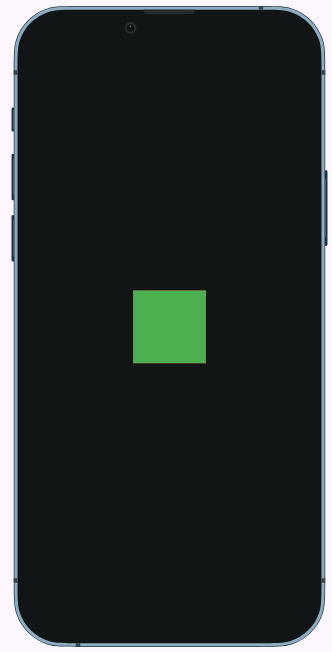
In Flutter, loose means that the child is able to shrink down to 0 size.
  Widget build(BuildContext context) {
    return Center(
      child: ColoredBox(
        color: Colors.red,
      ),
    );
  }
In the above example, the Center provides a loose constraint; ColoredBox doesn't have a child, so it shrinks to 0 size.
Why did we not use the Container for the above example? Because the Container is a convenience widget that consists of many widgets and its behavior is very complicated. (Read below.) Specifically for the above example, the Container will occupy all the space instead of being shrunk to nothing.
Bounded constraints
An axis whose maximum constraint is not infinite (i.e.
maxWidth != double.infinity) is bounded.
My guess: tight constraints are also bounded (cannot be unbounded), since the parent cannot tell the child to be exactly infinite size. (The opposite is not true; bounded can be tight or loose. )
Therefore, our first example of tight constraints (with a green container) can be applied here.
Unbounded constraints
An axis whose maximum constraint is infinite (i.e.
maxWidth == double.infinity) is unbounded.
The unbounded constraints are also loose (cannot be tight), for the very same reason: the parent cannot force the child to be exactly infinite size. The opposite is not true: loose can be either bounded or unbounded.
So, practically instead of 4 possible combinations (tight-bounded, tight-unbounded, loose-bounded, and loose-unbounded), we have only 3: 1. tight (they are always bounded) 2. loose-bounded 3. unbounded (they are always loose)
ListView, SingleChildScrollView, and PageView have unbounded constraints for the scroll direction axis.
Flex, Column, and Row pass unbounded constraints for their children on their main axis.
UnconstrainedBox by default provides unbounded constraints for both axes.
Putting unbounded constraints inside unbounded constraints like this:
    return Column(
      children: [
        ListView(
        ),
      ],
    );
or like this:
return ListView(
      children: [
        Column(
          children: [
            Expanded(child: Container(color: Colors.red, height: 100)),
          ],
        ),
      ],
    );
or this way:
   return UnconstrainedBox(
      child: ListView(
        children: [
        ],
      ),
    );
Will result in an exception: "Vertical viewport was given unbounded height."
Infinite constraints
An axis whose minimum constraint is infinite (
minWidth == double.infinity) is just said to be infinite (since by definition the maximum constraint must also be infinite in that case).
Flutter docs provide this definition, but I haven't yet found the use for it.
Constrained size/dimension/axis
A size is constrained when it satisfies a
BoxConstraintsdescription.
Flutter's docs use this definition a lot, so it is important to understand the meaning.
The constrained dimension means that the parent applies some constraints to it. For example, tight constraints (minWidth == maxWidth).
The unconstrained dimension means that the parent does not apply any constraint, and the child has complete freedom in choosing its size (minWidth == 0, maxWidth == double.infinity). Practically, in Flutter, unconstrained means loose-unbounded, and constrained means everything else.
Incoming constraints The incoming constraints are constraints applied by the parent.
Screen (MaterialApp, CupertinoApp or WidgetApp)
The screen provides tight constraints to its child. As a result, the child always takes up the entire screen.
Widget build(BuildContext context) {
    return SizedBox(
      width: 100,
      height: 100,
      child: ColoredBox(
        color: Colors.red,
      ),
    );
  }
Although SizedBox gives tight constraints to its child, those constraints are ignored, and ColoredBox fills the screen.
SafeArea
The SafeArea behaves the same as the screen (applies tight constraints), with only the difference that it adds some padding around the child.
  Widget build(BuildContext context) {
    return SafeArea(
      child: SizedBox(
        width: 100,
        height: 100,
        child: ColoredBox(
          color: Colors.red,
        ),
      ),
    );
  }
Scaffold
Scaffold takes the whole screen (because of tight constraints applied by the screen) and applies loose-bounded constraints to its body (child) widget.
 Widget build(BuildContext context) {
    return Scaffold(
      body: SizedBox(
        width: 100,
        height: 100,
        child: ColoredBox(
          color: Colors.red,
        ),
      ),
    );
  }
Because incoming constraints are loose and the size of the SizedBox < screen size, the SizedBox is allowed to take its natural size 100 x 100.
Looks like the implicit alignment of Scaffold is topLeft.
Container
Layout behavior
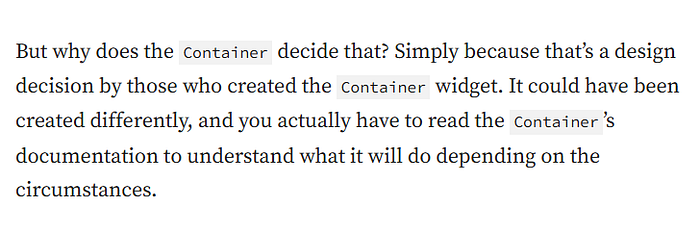
Since
Containercombines a number of other widgets each with their own layout behavior,Container'slayout behavior is somewhat complicated.
Summary:
Containertries, in order: to honor alignment, to size itself to the child, to honor thewidth,height, and constraints, to expand to fit the parent, to be as small as possible.
Flutter docs rules with examples.
Rule 1
If the
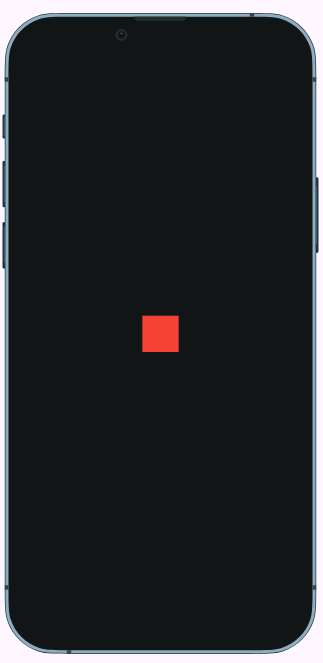
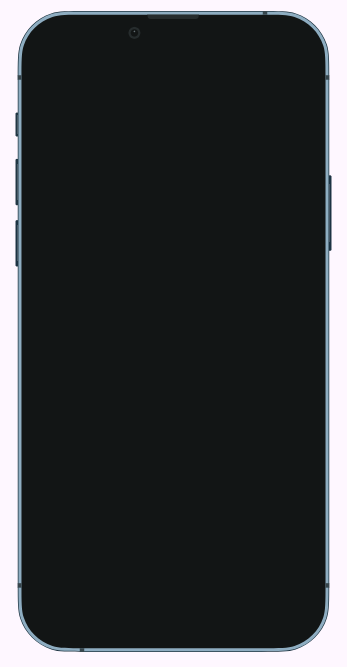
Containerhas no child, noheight, nowidth, no constraints, and the parent provides unbounded constraints, thenContainertries to size as small as possible.
I tried to accomplish the above, and the only way I succeeded was:
  Widget build(BuildContext context) {
    return UnconstrainedBox(
     child: Container(color: Colors.red, ),
    );
  }
The Container width and height became 0.0; therefore, nothing appears on the screen. (If I got the things right.)
Rule 2
If the
Containerhas nochildand noalignment, but aheight,width, or constraints are provided, then theContainertries to be as small as possible given the combination of those constraints and the parent's constraints.
Same as the above, but with width and height:
  Widget build(BuildContext context) {
    return UnconstrainedBox(
      child: Container(
        color: Colors.red,
        width: 100,
        height: 100,
      ),
    );
  }
Rule 3
If the
Containerhas nochild, noheight, nowidth, no constraints, and noalignment, but the parent provides bounded constraints, thenContainerexpands to fit the constraints provided by the parent.
Same as first, but Center instead of UnconstrainedBox:
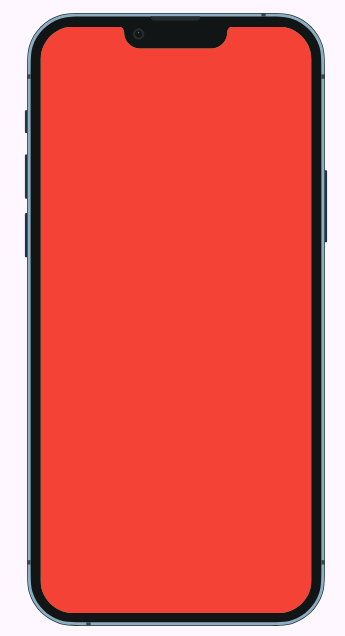
Widget build(BuildContext context) {
    return Center(
      child: Container(
        color: Colors.red,
      ),
    );
  }
The Center takes up the whole screen and provides bounded constraints; therefore, the Container fills the Center.
Rule 4
If the
Containerhas analignment, and the parent provides unbounded constraints, then theContainertries to size itself around thechild.
  Widget build(BuildContext context) {
    return UnconstrainedBox(
      child: Container(
        color: Colors.red,
      //  alignment: Alignment(1, 1),
        child: Container(color: Colors.green, width: 100, height: 100,)
      ),
    );
  }
It works like this with and without alignment. Red container sized itself around the green one, and only the green one is displayed.
Rule 5
If the
Containerhas analignment, and the parent provides bounded constraints, then theContainertries to expand to fit the parent, and then positions thechildwithin itself as per thealignment.
  Widget build(BuildContext context) {
    return Center(
      child: Container(
        alignment: Alignment(1, 1),
        color: Colors.red,
        child: Container(color: Colors.green, width: 100, height: 100,)
      ),
    );
  }
More examples for better understanding, with highlighting the impact of tight/loose constraints.
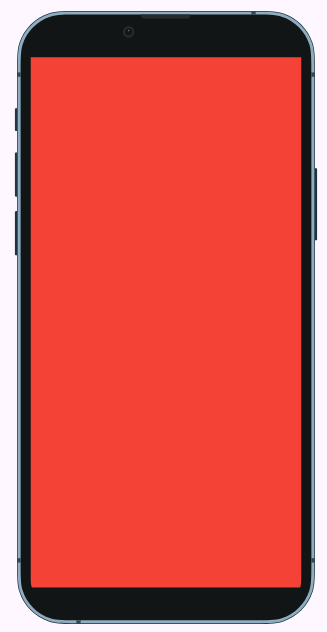
The Container without size takes the entire screen (screen applies tight constraints) and provides tight constraints to its child.
  Widget build(BuildContext context) {
    return Container(
      color: Colors.green,
      child: SizedBox(
        width: 100,
        height: 100,
        child: ColoredBox(
          color: Colors.red,
        ),
      ),
    );
  }
So, the child takes the entire screen as well.
The Center provides loose constraints, then the Container without size shrink-wraps its child.
  Widget build(BuildContext context) {
    return Center(
      child: Container(
        color: Colors.green,
        child: SizedBox(
          width: 100,
          height: 100,
          child: ColoredBox(
            color: Colors.red,
          ),
        ),
      ),
    );
  }
The screen provides tight constraints, so the Container's size is ignored.
  Widget build(BuildContext context) {
    return Container(
      color: Colors.green,
      width: 200,
      height: 200,
    );
  }
And the Container fills the entire screen.
The screen provides tight constraints, Container fills the screen, and provides tight constraints to its child.
  Widget build(BuildContext context) {
    return Container(
      color: Colors.green,
      width: 200,
      height: 200,
      child: SizedBox(
        width: 100,
        height: 100,
        child: ColoredBox(
          color: Colors.red,
        ),
      ),
    );
  }
So, the SizedBox also fills the screen and provides tight constraints toColoredBox, which also fills the screen.
The Center provides loose constraints to the green Container, so it grows to its natural size 200 x 200. The green Container provides tight constraints to the red one, therefore, the size of the red Container is ignored, and it fills the parent.
  Widget build(BuildContext context) {
    return Center(
      child: Container(
        color: Colors.green,
        width: 200,
        height: 200,
        child: Container(
          width: 100,
          height: 100,
          color: Colors.red,
        ),
      ),
    );
  }
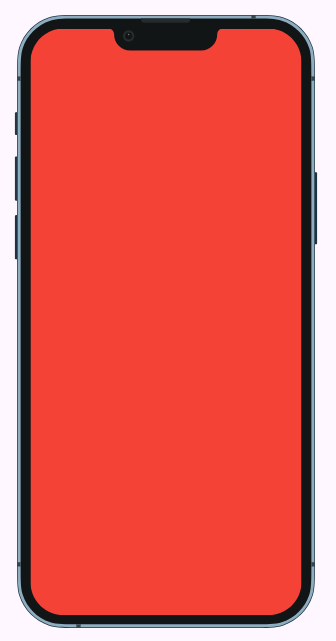
Center and Align
This widget will be as big as possible if its dimensions are constrained. If a dimension is unconstrained then the widget will match its child's size in that dimension.
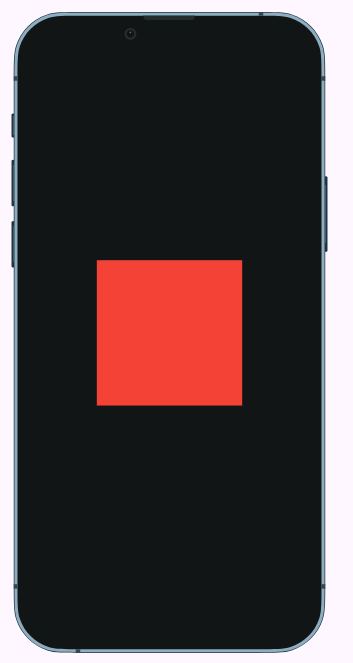
Widget build(BuildContext context) {
    return Center(
      child: Container(
        width: 100,
        height: 100,
        color: Colors.red,
      ),
    );
  }
The Center takes the entire screen, because the screen provides tight constraints. It will provide loose-bounded constraints to the child. A child can be any size from 0 to the screen size, so the Container took its natural size.
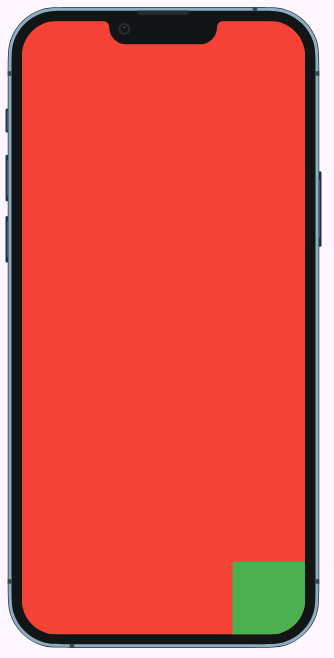
Widget build(BuildContext context) {
    return ListView(
      children: [
        Center(
          child: Container(
            color: Colors.red,
            width: 100,
            height: 100,

          )
        ),
      ],
    );
  }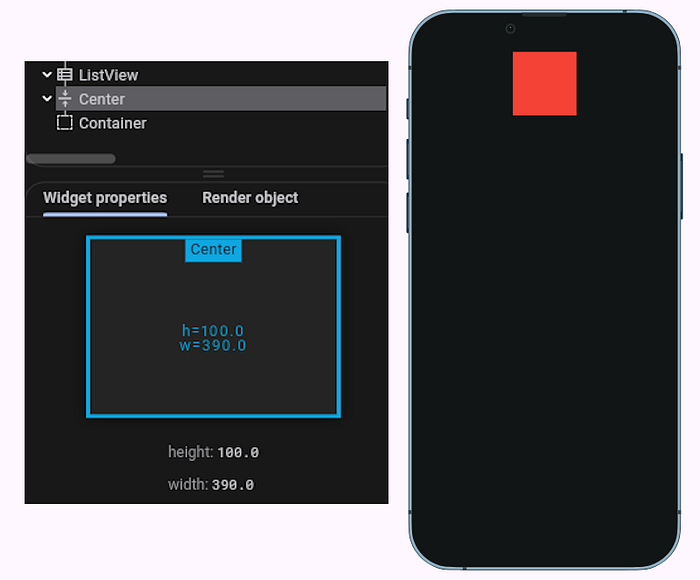
Because the ListView provides an unconstrained y dimension, the Center became 100 tall same as its child. In axis x, the constraints are loose-bounded (the child can have a width from 0 to screen width). In axis y, the constraints are loose-unbounded, ie, the dimension is unconstrained. A child can be any height it wants.
The Center is practically an Align widget with implicit alignment set to center. Therefore, in the context of layout, all the above can be applied to the Align widget as well.
Column, Row, and Flex
I will talk about Column here, but everything is applied to Row and Flex since the Row is just a horizontal Column and Flex is a widget which can be Row or Column, depending on the direction property value.
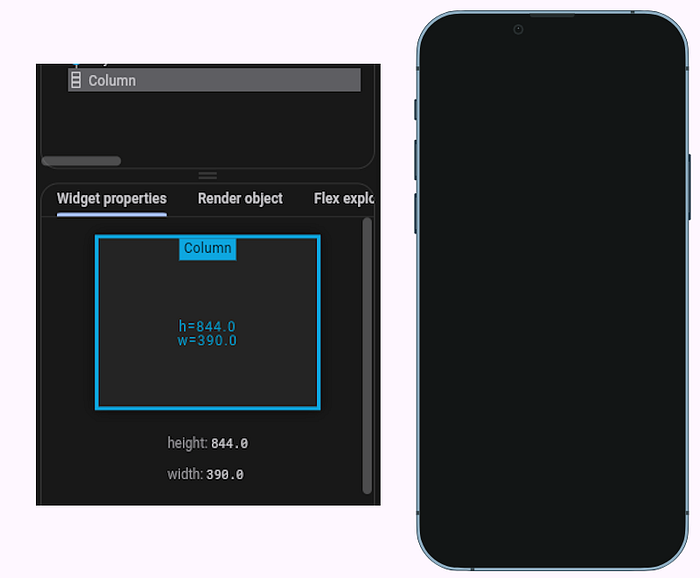
If the incoming constraints are tight, the Column will occupy all available space (even if it has no children).
  Widget build(BuildContext context) {
    return Column();
  }
On its cross-axis (horizontal), Column applies to the child incoming tight constraints.
Widget build(BuildContext context) {
    return Column(
      children: [
        Container(
          color: Colors.red,
          width: 500,
          height: 100,
        )
      ],
    );
  }
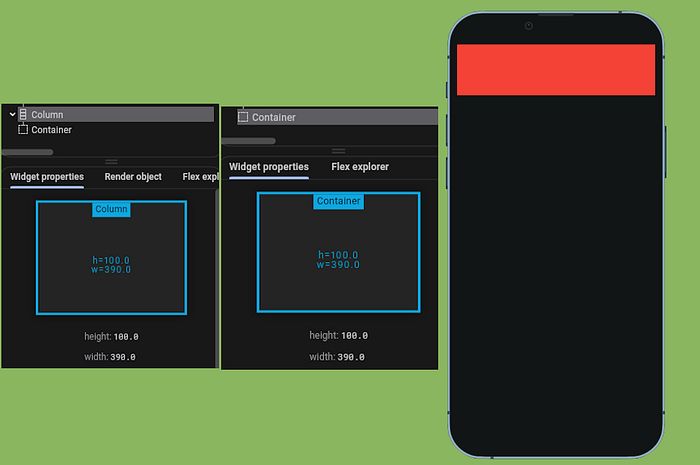
Despite the Container having a width of 500, it cannot be wider than the screen, and becomes 390 pixels wide.
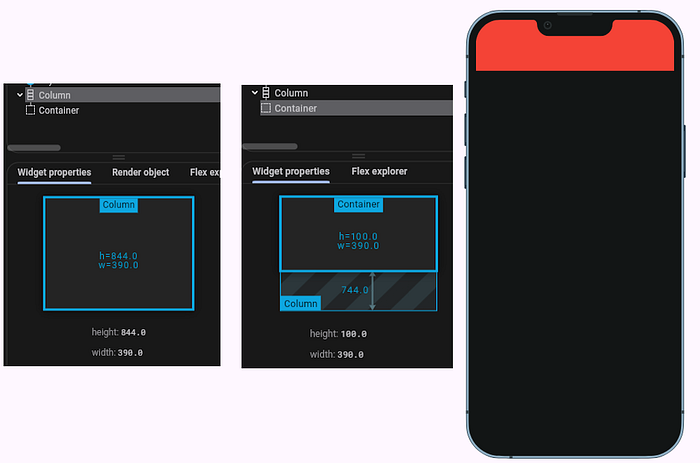
On its main axis (vertical) Column applies loose-unbounded constraints to its children, while the Column itself has a finite height (because of tight constraints applied by the parent).
  Widget build(BuildContext context) {
    return Column(
      children: [
        Container(
          color: Colors.red,
          width: 500,
          height: 1000,
        )
      ],
    );
  }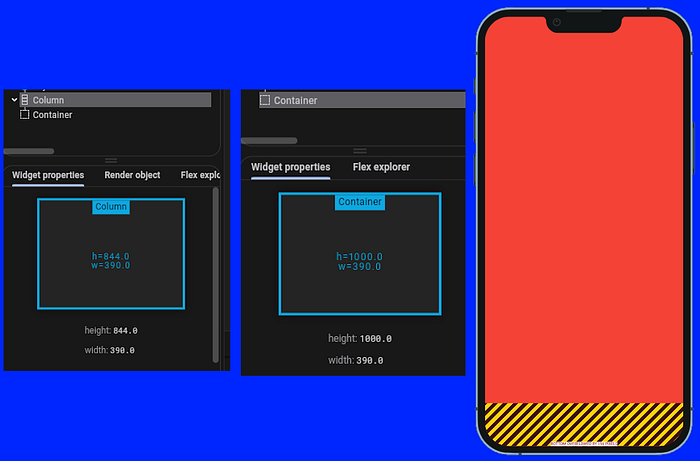
The Container has height=1000, and since constraints are unbounded, it becomes 1000 pixels tall.
But the Column remains 844 pixels tall, and we got an exception: A RenderFlex overflowed by 156 pixels on the bottom.
A big question: why was the Column designed like that?
The above example with a single child does not give any clue.
Let's make a simple example with many children.
  Widget build(BuildContext context) {
    return Column(
      children: _makeChildren(),
    );
  }

  List<Widget> _makeChildren() {
    List<Widget> children = [];
    for (int i = 0; i < 10; i++) {
      children.add(Container(
        color: Colors.red,
        padding: EdgeInsets.all(10),
        height: 100,
      ));
    }

    return children;
  }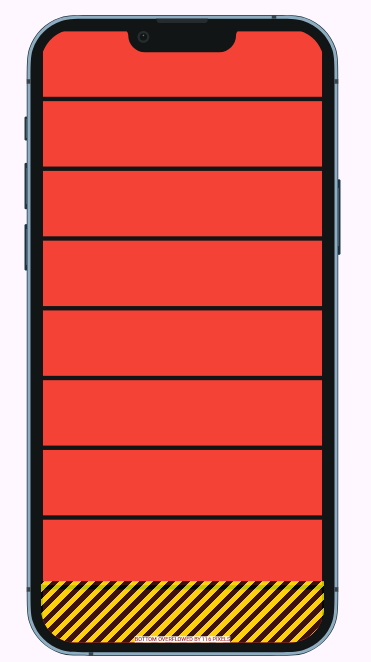
Without exception, we wouldn't know that some widgets (children) were not rendered on the screen.
So the answer is: the Column was designed this way to inform us (developers) occasionally that some information would be lost, our designs are wrong, and should be fixed.
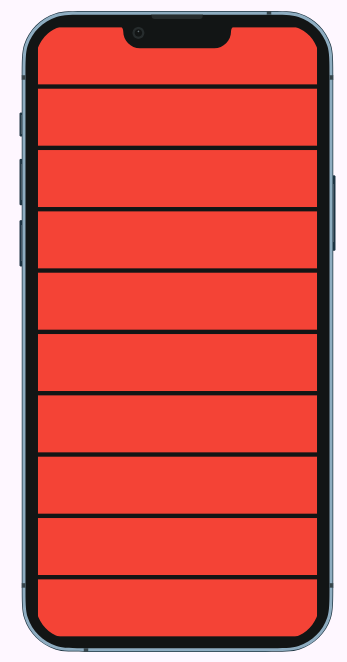
The above code could be fixed in two ways.
- Wrap every child (or some of them) in a
FlexibleorExpandedwidget
  List<Widget> _makeChildren() {
    List<Widget> children = [];
    for (int i = 0; i < 10; i++) {
      children.add(Flexible(  //here
        child: Container(
          color: Colors.red,
          margin: EdgeInsets.all(3),
          height: 90,
        ),
      ));
    }

    return children;
  }
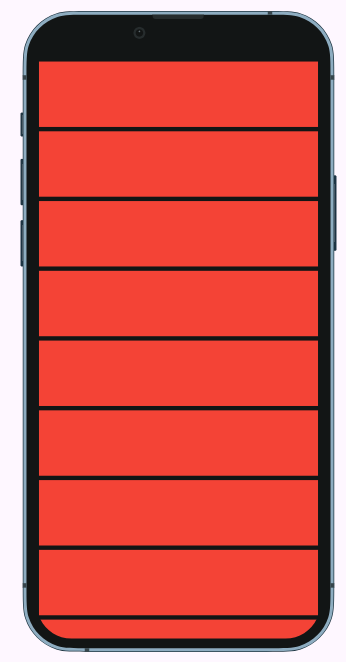
2. Use the ListView instead of the Column to make the view scrollable.
 Widget build(BuildContext context) {
    return ListView(
      children: _makeChildren(),
    );
  }
As we learned before, putting any scrollable widget inside a Column like this:
  Widget build(BuildContext context) {
    return Column(
      children: [
        ListView(),
      ],
    );
  }
will cause an exception: Vertical viewport was given unbounded height.
The reason is that ListView has infinite height, and Column applies an unbounded vertical constraint to children. As a result, Flutter tries to render a widget with infinite(unbounded) height, fails, and throws an exception.
The fix is easy; we need to apply bounded constraints to the ListView. For example, using Expanded or SizedBox
  Widget build(BuildContext context) {
    return Column(
      children: [
        Expanded(child: ListView()),
      ],
    );
  }
If the Column is given unbounded constraints by the parent:
    return ListView(
      children: [
        Column(
          children: [
            Container(color: Colors.red, height: 100,)
          ],
        ),
      ],
    );
Then the Column shrinks to the size of the child in that dimension.
If we add the Expanded to the above example:
    return ListView(
      children: [
        Column(
          children: [
            Expanded(child: Container(color: Colors.red, height: 100,))
          ],
        ),
      ],
    );
We will get an exception:
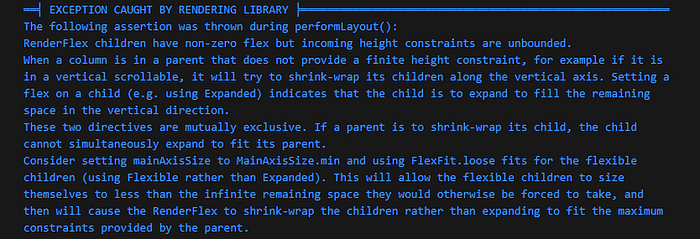
The exception has sufficient description and suggests a fix:
   return ListView(
      children: [
        Column(
          mainAxisSize: MainAxisSize.min,
          children: [
            Flexible(child: Container(color: Colors.red, height: 100,))
          ],
        ),
      ],
    );
We replaced Expanded with Flexible and set MainAxisSize to min.
ListView and SingleChildScrollView
Both those widgets provide unbounded constraints in the scrolling direction dimension.
   return ListView(
      children: [
        Container(
          height: 10000,
          color: Colors.red,
        )
      ],
    );
The container wants to be 10000 in height? No problem, this is what it gets.
Meanwhile, the ListView itself abides by the incoming constraints from its parent. In the above example, the ListView is 844 pixels tall (the size of the screen).
In the other axis (X) ListView passes the incoming constraints to the child, and the container becomes 390 pixels wide.
UnconstrainedBox
A widget that imposes no constraints on its child, allowing child to be rendered at its "natural" size.
This allows a child to render at the size it would render if it were alone on an infinite canvas with no constraints. This container will then attempt to adopt the same size, within the limits of its own constraints. If it ends up with a different size, it will align the child based on alignment. If the box cannot expand enough to accommodate the entire child, the child will be clipped.
In other words UnconstrainedBox provides unbounded constraints to its child.
It has a constrainedAxis property, which (if specified) retains incoming constraints in the specified dimension.
Here are two code examples that demonstrate how UnconstrainedBox changes the layout behavior of Container.
    return Scaffold(
      body: Center(
        child: Container(
          color: Colors.red,
          width: 300,
          height: 200,
          child: Container(
            alignment: Alignment.topCenter,
            color: Colors.green,
            child: Text(
              "Hello Flutter",
              style: TextStyle(fontSize: 20),
            ),
          ),
        ),
      ),
    );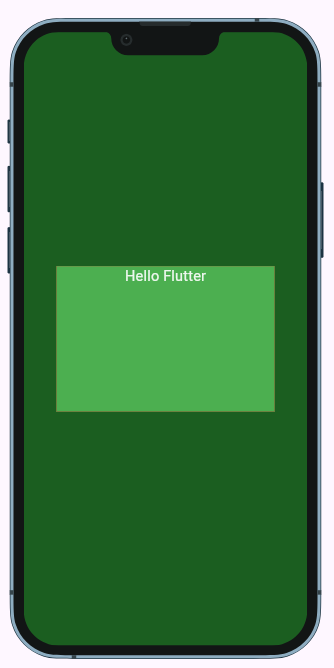
The green Container with the alignment property expands to fit its parent red Container and positions its Text child according to the alignment property value, because the incoming constraints are bounded.
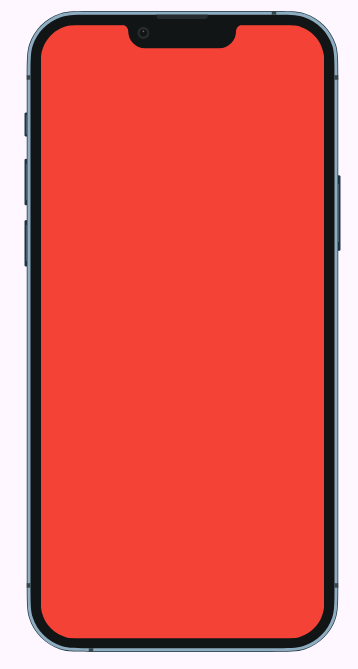
Now, when we wrap the green Container in UnconstrainedBox:
    return Scaffold(
      body: Center(
        child: Container(
          color: Colors.red,
          width: 300,
          height: 200,
          child: UnconstrainedBox(
            child: Container(
              alignment: Alignment.topCenter,
              color: Colors.green,
              child: Text(
                "Hello Flutter",
                style: TextStyle(fontSize: 20),
              ),
            ),
          ),
        ),
      ),
    );
The green Container shrink-wraps its child, because the incoming constraints have become unbounded.
ConstrainedBox
A widget that imposes additional constraints on its child.
The ConstrainedBox is the most straightforward way to provide loose-bounded (min < max, max < infinity) to its child. (It can be used to provide tight constraints as well, but for that, we can use SizedBox which is simpler. )
  Widget build(BuildContext context) {
    return Center(
             Container(color: Colors.red,)
           );
  }
The Container without constraints takes the entire screen.
Let's wrap it in ConstrainedBox:
 Widget build(BuildContext context) {
    return Center(child: ConstrainedBox(
      constraints: BoxConstraints(
        minWidth: 100,
        maxWidth: 200,
        minHeight: 100,
        maxHeight: 200,
      ),
    child: Container(color: Colors.red,)));
  }
The ConstrainedBox specifies a maximum width and height of 200, and that's what the Container obeys.
Another example: Container has its own width and height specified as 50.
  Widget build(BuildContext context) {
    return Center(
        child: ConstrainedBox(
            constraints: BoxConstraints(
              minWidth: 100,
              maxWidth: 200,
              minHeight: 100,
              maxHeight: 200,
            ),
            child: Container(
              color: Colors.red,
              width: 50,
              height: 50,
            )));
  }
However, the ConstrainedBox says it should be a minimum of 100 x 100, and the Container follows.
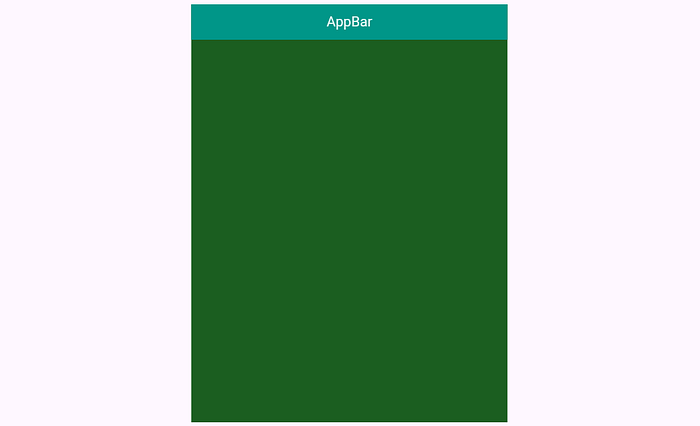
Here is a practical example of using ConstrainedBox.
Widget build(BuildContext context) {
    return Scaffold(
      appBar: AppBar(
        title: Text('AppBar'),
        centerTitle: true,
        backgroundColor: Colors.teal,
      ),
    );
  }
The above looks good 😎 on phone.
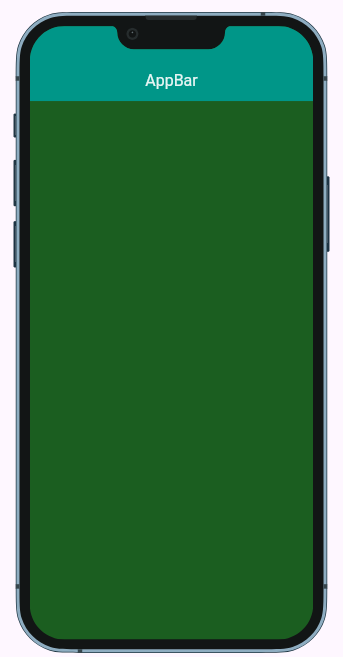
But not so on web/desktop.
The idea is to limit the maxWidth of the Scaffold.
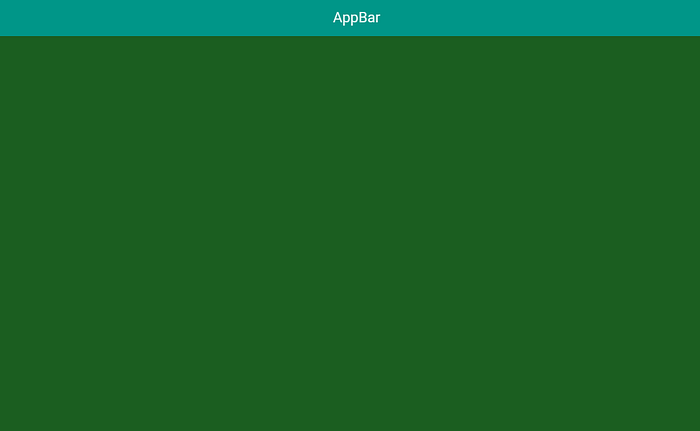
 Widget build(BuildContext context) {
    return Center(
      child: ConstrainedBox(
        constraints: BoxConstraints(
          maxWidth: 500,
          maxHeight: MediaQuery.of(context).size.height - 20,
        ),
        child: Scaffold(
          appBar: AppBar(
            title: Text('AppBar'),
            centerTitle: true,
            backgroundColor: Colors.teal,
          ),
        ),
      ),
    );
  }
Voila. We don't need responsive design. 😉
SizedBox
A box with a specified size.
SizedBox applies tight constraints to its child.
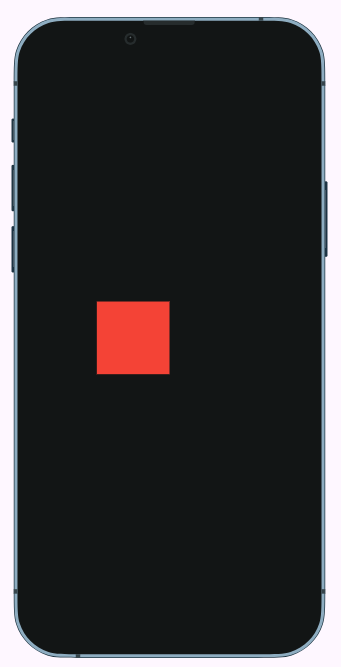
Widget build(BuildContext context) {
    return Center(
        child: SizedBox(
            width: 100,
            height: 100,
            child: Container(
              color: Colors.red,
              width: 50,
              height: 50,
            )));
  }
The Container wants to be 50 x 50, but SizedBox forces it to be 100 x 100.
Let's add another parent SizedBox.
Widget build(BuildContext context) {
    return Center(
        child: SizedBox(
          width: 200,
          height: 200,
          child: SizedBox(
              width: 100,
              height: 100,
              child: Container(
                color: Colors.red,
                width: 50,
                height: 50,
              )),
        ));
  }
The child SizedBox applies tight constraints 100 x 100, but they are ignored since its parent SizedBox applies tight constraints 200 x 200.
This is how tight constraints work: they propagate down the tree.
To make the child SizedBox meaningful, we should wrap it with a widget that applies loose constraints, such as Center, Column, Row, Constrained-, or UnconstrainedBox.
  Widget build(BuildContext context) {
    return Center(
        child: SizedBox(
          width: 200,
          height: 200,
          child: Row(
            children: [
              Row(
                children: [
                  SizedBox(
                      width: 100,
                      height: 100,
                      child: Container(
                        color: Colors.red,
                        width: 50,
                        height: 50,
                      )),
                ],
              ),
            ],
          ),
        ));
  }
Row applied loose constraints, then inner SizedBox made them tight again, and Container became 100 x 100.
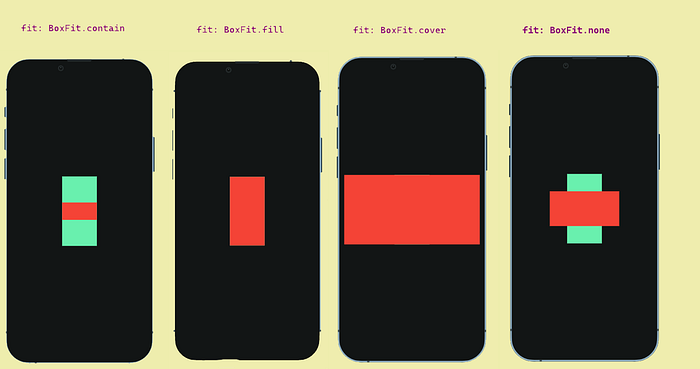
FittedBox
Scales and positions its child within its parent according to fit.
FittedBox applies tight constraints to its child, but does it in a complicated way.
First, it applies unbounded constraints to the child and lets the child grow to its natural size.
Then it fits the child into the parent according to the fit property.
And finally, it calculates the child's fitted constraints and applies them as tight constraints.
Widget build(BuildContext context) {
    return Center(
        child: SizedBox(
          width: 100,
          height: 200,
          child: ColoredBox(
            color: Colors.greenAccent,
            child: FittedBox(
                fit: BoxFit.contain, //BoxFit.fill / BoxFit.cover / BoxFit.none
                child: Container(
                  color: Colors.red,
                  width: 200,
                  height: 100,
                )),
          ),
        ));
  }
That's it. I feel like my understanding of Flutter layout grew from 5% to 75% in the process of writing this article.
I doubt that I got everything right, so every critical note is very welcome!
Thank you for reading, and happy coding!