
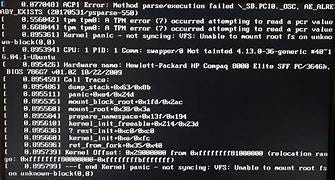
What is Kernel Panic?
When your Linux system encounters a serious error it cannot fix, it crashes and displays error messages repeatedly. This is called a "kernel panic." Your computer becomes stuck and won't boot properly. You might see messages like "Kernel panic — not syncing" and the system refuses to start.
What Happened to Me
While updating my Kali Linux to the latest version, I encountered a kernel panic. This has become a common occurrence lately, but don't worry — there are several reliable methods to fix this issue
How I Fixed It — Simple Steps
Step 1: Get Back to an Older, Working Kernel
When the system crashes, it usually means a newly updated kernel is broken. Older kernels often work fine.
What to do:
- Force restart your computer (hold the power button or click Stop in VirtualBox)
- Turn it back on
- Immediately hold the Shift key or you can esc while it's booting up
- A menu called GRUB should appear showing different kernel options(advanced options)
- Look for an older kernel version in the list
- Select it and press Enter
- The system should boot successfully with the old kernel
Step 2: Check All Your Kernels
Once you're back in a working system, see which kernels you have installed:
bash
sudo dpkg -l | grep linux-image
This shows you a list like:
- linux-image-6.12.38 ← Old kernel (working)
- linux-image-6.16.7 ← Broken
- linux-image-6.16.8 ← Broken
- linux-image-6.16.9 ← Broken
The ones causing problems are usually the newest ones.
Step 3: Remove the Broken Kernels
Remove the problematic kernel versions. But BE CAREFUL — only remove the ones you're NOT currently using.
First, check which kernel you're using RIGHT NOW:
bash
uname -r
For example, if it shows 6.12.38, then you're safely using the old kernel. Now you can remove the broken newer ones:
bash
sudo apt remove linux-image-6.16.7+deb14-amd64 linux-image-6.16.9+deb14-amd64
Golden Rule: Never remove the kernel shown by uname -r command.
Step 4: Update the Boot Menu
After removing broken kernels, tell the system to update its boot menu:
bash
sudo update-grub
Step 5: Restart Your Computer
bash
sudo reboot
Let it restart. It should boot smoothly this time without the kernel panic error.
Step 6: Verify It's Fixed
After reboot, check which kernel you're using:
bash
uname -r
If it shows a kernel number and you can use your computer normally — you're fixed! 🎉
Stop Kernel Updates (Optional)
If you want to prevent the system from automatically updating to broken kernels in the future:
bash
sudo apt update sudo apt upgrade --without-new-kernels
This updates everything EXCEPT the kernel.
Free Up Disk Space
If you're running low on storage after this, clean up safely:
bash
sudo apt autoremove sudo apt autoclean sudo apt clean
These commands only remove old temporary files and cache — they won't delete your important data or tools.
Things I Learned
- GRUB menu is your savior — Always try to boot into an older kernel when something breaks
- Check before you delete — Always use
uname -rto see which kernel you're using before removing anything - Update GRUB after changes — This makes sure the system recognizes your changes
- Keep backups — Always backup important files before making system changes
- Prevent future updates — Once you find a working kernel, prevent it from auto-updating
What If GRUB Menu Doesn't Appear?
If you can't access the GRUB menu (rare but possible):
- Try pressing Escape instead of Shift
- Wait longer before pressing keys during startup
- If nothing works, you may need to create a Linux recovery USB and boot from that
Summary
Kernel panic looks scary, but it's usually fixable by:
- Booting into an old kernel from the GRUB menu
- Removing the broken new kernels
- Updating GRUB
- Restarting
Sometimes this method won't work, so you may need to reinstall Kali by backing up the files you need
What If You Can't Boot Into Any Old Kernel?
If the GRUB menu never shows up and you really can't boot anything, then yes — you need to reinstall.
But before you do:
- Get a live Linux USB (download Kali or Ubuntu ISO)
- Boot from the USB to run Linux from there
- Your broken VM's files will still be there — you can access and copy them
- Save what you need to an external USB drive
- Then do a fresh Kali install
- Restore your files after installation
This way you don't completely lose everything.
Going forward, prevent this problem:
- When updating, use:
sudo apt upgrade --without-new-kernels - This prevents automatic kernel updates that could break things again
- Back up your important files regularly
Bottom line: If GRUB recovery doesn't work in 30 minutes, reinstalling is actually the smarter choice. Don't waste 3 hours troubleshooting when you could have a working system in 30 minutes.