In this article, I'll introduce you to an original application of image search. I've named it Qdrant Kart, and, as you might guess, it involves using a Vector Database (Qdrant) to play Mario Kart 64 — one of my all-time favorite games.
This application is built from several components, so to make it easier to follow, I've divided this article into the following sections:
Table of contents
- Qdrant Kart Architecture
- Data Collection
- Embedding Generation
- Inserting Embeddings into Qdrant
- Mupen64Plus integration
- Conclusion
If you're still with me, chances are you're intrigued by this project. To fuel your curiosity, let me show you a video of the application in action.
Before we begin, you'll need to have the mupen64plus emulator installed as well as a Mario Kart 64 ROM
Time to get into the details! 👇
Qdrant Kart Architecture

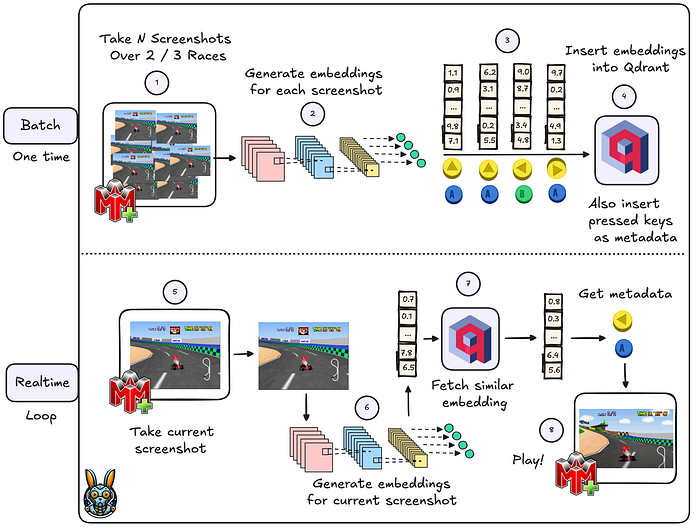
If you take a look at the diagram above, you'll see the various steps involved in Qdrant Kart. The diagram is divided into two sections: the Batch section and the Realtime section.
Batch
- Capture Screenshots and Joystick Data: Take multiple screenshots during 2 / 3 Mario Kart 64 races while simultaneously recording the joystick inputs.
- Generate Embeddings: Use a Convolutional Neural Network (CNN) to create embeddings for each screenshot.
- Add Metadata: Incorporate the joystick information as metadata into the embeddings.
- Insert into Qdrant: Upload the embeddings, along with the joystick metadata, into Qdrant.
Every 200 ms, take a screenshot of Mario Kart 64.
Realtime
- Capture Screenshots Periodically: Every 200 ms, take a screenshot of. Mario Kart 64
- Generate Embeddings: Use the Convolutional Neural Network (CNN) to generate and embed for each new screenshot.
- Fetch Similar Embeddings: Use the current embedding to fetch similar items from Qdrant.
- Apply Joystick Movements: Extract joystick information from the payloads of similar embeddings and use it to apply the next joystick move in Mupen64Plus.
Now that the architecture is clear, let's get into the details of each component.
Data Collection

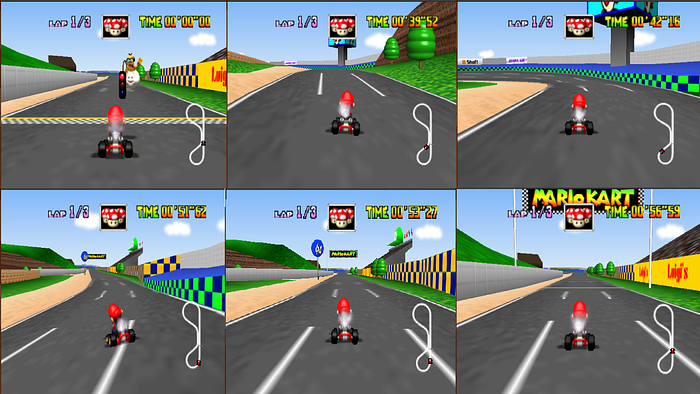
As we saw earlier, the first step in the diagram focuses on capturing screenshots and joystick data. In my case, screenshots were generated from 3 races (with three laps each). Remember, the more races you record, the better the system will perform.
Additionally, you'll need to record the joystick inputs for each frame. Don't worry; you don't need to implement this logic from scratch — simply use TensorKart. This project will automatically take screenshots from the Mupen64Plus gameplay and simultaneously log your joystick controls.
It will also generate a CSV file that links each screenshot to the corresponding joystick controls. You can see an example of the CSV below:
./samples/img_0_85009994-2242-4313-8520-c2d03f434c30.png,2,0,0,0,0
./samples/img_1_b4de066e-52b8-4970-94a9-5a5c53e98bd1.png,2,0,0,0,0
./samples/img_2_00044b43-ad30-444e-8d2d-fdfc9a3026c9.png,2,0,0,0,0
./samples/img_3_ca9d9dbf-e7df-4bb4-a09a-6be06ea0d3ee.png,2,0,0,0,0
./samples/img_4_5837bc40-86fb-4afd-a8dc-f70bf8c752ea.png,2,0,0,0,0
./samples/img_5_55023e31-6099-4a7b-b35c-c1d939302656.png,2,0,0,0,0
./samples/img_6_706f24e3-b354-40c2-93ae-d84a464a0633.png,2,0,0,0,0
Embedding Generation

To generate the embeddings, I decided to use a pre-trained CNN (Resnet-50). The Python code below shows my implementation of this step. I used the img2vec Python library because it provides some of the best CNN architectures out of the box. The code will generate a .npy file containing all the embeddings.
from pathlib import Path

import numpy as np
import pandas as pd
from PIL import Image
from img2vec_pytorch import Img2Vec
from tqdm import tqdm

IMG_PATH = Path("./screenshots")
EMBEDDINGS_NPY_PATH = Path("./embeddings.npy")

img2vec = Img2Vec(model="resnet50")

screenshots = []

for row in tqdm(pd.read_csv(IMG_PATH / "data.csv").values):
    try:
        img_name = row[0].split("/")[-1]
        screenshots.append(Image.open(IMG_PATH / img_name))
    except Exception:
        continue

if not EMBEDDINGS_NPY_PATH.exists():
    print("Generating embeddings for all screenshots ...")

    embeddings = []
    for screenshot in tqdm(screenshots):
        embeddings.append(img2vec.get_vec(screenshot, tensor=False))

    embeddings = np.asarray(embeddings)
    np.save(EMBEDDINGS_NPY_PATH, embeddings)
Inserting Embeddings into Qdrant
For this step, you'll need to have a Qdrant container on your local machine
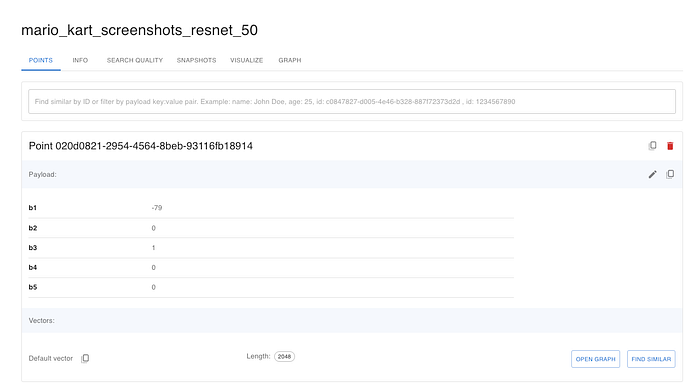
Now, it's time to insert both the embeddings and the joystick data into Qdrant. In the Python code below, you'll see how to create a new collection in Qdrant (mario_kart_screenshots_resnet_50) and populate it with both the embeddings and their corresponding payloads.
By the end of this step, my Qdrant collection looked like this:

Mupen64Plus integration
By now, we have all the necessary information stored in Qdrant. It's time to start "playing" Mario Kart 64. This is where the project gets a bit tricky, so let's begin with the basics: gym-mupen64plus.
As stated in the project's README file:
This project is an OpenAI Gym environment wrapper for the Mupen64Plus N64 emulator. The goal of this project is to provide a platform for reinforcement learning agents to be able to easily interface with N64 games using the OpenAI gym library. This should allow for easier adaptation of existing agents that have been built using the gym library to play Atari games, for example.
As you can see, we are using a platform designed for Reinforcement Learning but without applying any RL algorithms. In our setup, the "RL" agent simply interacts with Qdrant according to this workflow:
- Capture Screenshot and Compute Embedding: Take the current screenshot and use ResNet-50 to compute its embedding vector.
- Retrieve Similar Items: Use this embedding to fetch similar items from Qdrant.
- Extract Joystick Information: Obtain the payloads (joystick information) from similar items and determine the "optimal" move.
- Send Move to Mupen64Plus: Send the optimal move to Mupen64Plus through the gym environment.
- Repeat the Process: Return to step 1 and repeat the process.
If you are interested, here is the Python implementation of the Qdrant agent:
import gym, gym_mupen64plus


def get_final_move(closest_moves):
    """Aggregates the moves of similar historical moves obtained from Qdrant

    Args:
        closest_moves (list): A list containing the top 5 similar moves

    Returns:
        list: Representing the next moves
    """
    average_b1 = int(mean(item["b1"] for item in closest_moves))
    most_common_b2 = Counter(item["b2"] for item in closest_moves).most_common(1)[0][0]
    most_common_b3 = Counter(item["b3"] for item in closest_moves).most_common(1)[0][0]
    most_common_b4 = Counter(item["b4"] for item in closest_moves).most_common(1)[0][0]
    most_common_b5 = Counter(item["b5"] for item in closest_moves).most_common(1)[0][0]

    return [
        average_b1,
        most_common_b2,
        most_common_b3,
        most_common_b4,
        most_common_b5
    ]


env = gym.make("Mario-Kart-Luigi-Raceway-v0")
env.reset()

print("NOOP waiting for green light")
for i in range(30):
    (obs, rew, end, info) = env.step([0, 0, 0, 0, 0]) # NOOP until green light

from qdrant_client import QdrantClient
from img2vec_pytorch import Img2Vec
from PIL import Image
from collections import Counter
from statistics import mean


client = QdrantClient("http://host.docker.internal:6333")
img2vec = Img2Vec(model="resnet50")


print("Qdrant Agent starting!!!")
for i in range(10000):
    if i % 100 == 0:
        print("Step " + str(i))

    img = Image.fromarray(obs)
    embedding = img2vec.get_vec(img, tensor=False)

    search_result = client.search(
        collection_name="mario_kart_screenshots_resnet_50",
        query_vector=embedding,
        query_filter=None,
        limit=2
    )

    payloads = [result.payload for result in search_result]
    final_move = get_final_move(payloads)
    print(final_move)

    (obs, rew, end, info) = env.step(final_move)

input("Press <enter> to exit... ")

env.close()
Conclusion
Thanks for reading my article!
I hope you found this application of image search to Mario Kart 64 as fascinating as I do and that you gained some new insights along the way. I think this project shows how a "simple" image search can be leveraged in unconventional ways to create engaging and interactive experiences. Perhaps it has even inspired you to explore similar techniques in your own projects!
Enjoyed the article? If you want to stay in touch and read similar content, you can find me here ⬇️⬇️⬇️!
👨💻 Github
📺 YouTube

