

If you desire a correct and reliable machine learning model with good performance, then testing is one of the essential practices to conduct, and if you are determined to learn about testing, you are at the right place. In this article, we explain the importance of testing through a practical example where we apply testing across the different steps of machine learning workflow. The entire codebase for this article is accessible in the associated repository.
Table of contents:
· 1. Introduction · 2. Project setting · 3. Code Testing ∘ 3.1. Unit testing ∘ 3.2. Integration testing · 4. Data Testing ∘ 4.1. Data validation ∘ 4.2. Policy compliant ∘ 4.3. Features importance · 5. Model Testing · 6. Conclusion
1. Introduction
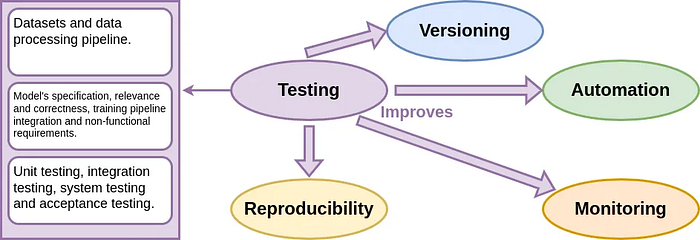
Testing is defined as the process of evaluating an application system, code, or machine learning model to ensure its correctness, reliability, and performance. In MLOps, testing is one of the main principles that I consider it the second one to consider after version controlling when starting your machine learning projects. As version controlling and all the MLops principles, to ensure that we harness all the benefits, testing should be applied across the different steps of machine learning workflow, including data, Machine Learning model (ML model), and code.
Why testing? Testing your code, data, and models improves versioning by ensuring that the code changes is functioning correctly, automation by adding it to the automation pipeline, monitoring by detecting potential issues, reproducibility by ensuring that models can be reproduced consistently over time.
When to perform testing? Testing is a continuous process performed at various stages of the project life cycle: unit testing is performed during the coding phase to ensure the code correctness, integration testing is performed after unit testing to ensure that the interactions between different parts of code (functions, classes, scripts, etc) do not introduce errors, data testing is performed each time the dataset is updated and model testing is performed during the model development and after the training. Once the application is ready, comprehensive system testing and acceptance testing are conducted by testing the entire application as a whole to verify that it meets the requirements specified in the project description (AI or ML canvas). Other testing are conducted continuously after model's deployment such as user acceptance testing and performance testing.
Although this is an article dedicated to how to use tests in your project, it's also part of my MLOps articles series. Furthermore, by following my previous and next tutorials you'll be able to create your own end-to-end MLOps project starting from the workflow to model deployment and tracking.
If you are interested in MLOps, check out my articles:
- Tutorial 1: A Key Start to MLOps: Exploring Its Essential Components
- Tutorial 2: A Beginner-Friendly Introduction to MLOps Workflow
- Tutorial 3: Introduction to MLOps Principles
- Tutorial 4: Structuring Your Machine Learning Project with MLOps in Mind
- Tutorial 5: Version Controlling in Practice: Data, ML Model, and Code
2. Project setting
In a machine learning project with a well-organized project structure, test functions are typically stored in a dedicated directory that is often named "tests", "__tests__" or a similar term. However, the exact location may depend on the project's overall structure and the conventions followed by the development team. In this article, we use the project structure for machine learning projects created using this Github template or this Cookiecutter MLOps repository. Additionally, we include a 'tests' folder within the project structure, where test scripts are organized:
tests
├── data_test.py
├── grad_cam.py
├── model_test.py
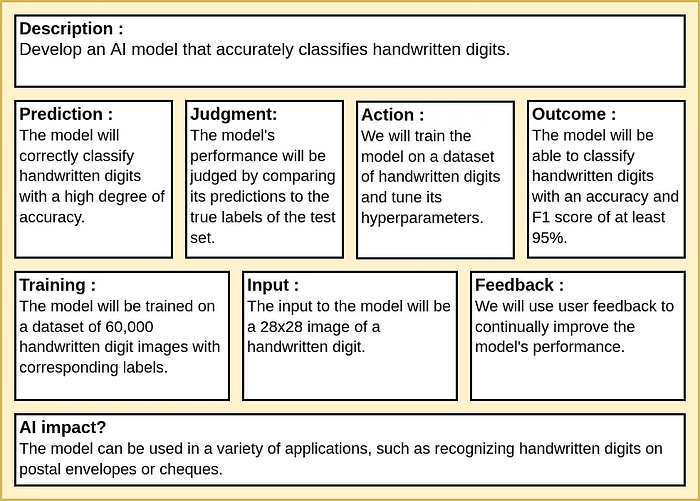
├── preprocessing_test.pyIn this article, we will use handwritten digit classification using Convolutional Neural Network (CNN) as an example. Specifically, given an input image of a handwritten digit ranging from 0 to 9, the model is required to identify the digit and output its corresponding label. The AI canvas is structured and filled as follows:
The entire codebase for this article is accessible in the associated repository.
3. Code Testing
The code testing consists of verifying the correctness and quality of the whole MLOps project code to ensure that the code is free from defects and meets the requirements of the project. It includes unit testing and integration testing.
3.1. Unit testing
Unit testing is a software testing technique in which individual units are tested in isolation in order to validate that each unit performs as desired. A "unit" in this context refers to the smallest testable part of the code: a function, method, or class.
In the context of our project, we test our different functions especially the preprocessing functions such as the one-hot encoding, scaling and reshape functions. In the following example, we test onehot_encoding(feature, num_cat=10) against a single integer, an array of integers and a different number of categories.
import unittest

import numpy as np

from src.models.cnn.preprocessing import onehot_encoding, scale, reshape


class TestFunction(unittest.TestCase):

    def test_onehot_encoding(self):
        # Test 1: Check one-hot encoding for a single integer
        feature1 = 3
        result1 = onehot_encoding(feature1)
        expected_result1 = np.array([0., 0., 0., 1., 0., 0., 0., 0., 0., 0.])
        np.testing.assert_array_equal(result1, expected_result1)

        # Test 2: Check one-hot encoding for an array of integers
        feature2 = np.array([1, 5, 9])
        result2 = onehot_encoding(feature2)
        expected_result2 = np.array([
            [0., 1., 0., 0., 0., 0., 0., 0., 0., 0.],
            [0., 0., 0., 0., 0., 1., 0., 0., 0., 0.],
            [0., 0., 0., 0., 0., 0., 0., 0., 0., 1.]
        ])
        np.testing.assert_array_equal(result2, expected_result2)

        # Test 3: Check one-hot encoding with a different number of categories
        feature3 = np.array([2, 7])
        result3 = onehot_encoding(feature3, num_cat=8)
        expected_result3 = np.array([
            [0., 0., 1., 0., 0., 0., 0., 0.],
            [0., 0., 0., 0., 0., 0., 0., 1.]
        ])
        np.testing.assert_array_equal(result3, expected_result3)


if __name__ == '__main__':
    unittest.main()
We can extend our testing further by evaluating the function with a feature value higher than the number of classes. The appropriate handling of such cases depends on the specifics outlined in the project description.
3.2. Integration testing
Integration testing is a software testing technique that involves testing the interactions between different project's components to ensure that they work together as expected. Its primary goal is to identify any issues that may arise when the integrated components are combined.
In the context of our project, where the different project's components are separated scripts, the integration testing is conducted by creating a higher-level script that calls these scripts in a sequence and then tests the overall functionality :
import os
import subprocess
import unittest

import mlflow
import numpy as np
import yaml
from sklearn.metrics import f1_score

from src.models.cnn.dataloader import load_data
from src.models.cnn.preprocessing import reshape, scale


class TestHandwrittenDigitsPipelineIntegration(unittest.TestCase):

    def setUp(self):
        # Load the configuration file:
        with open('configs/cnn.yaml', 'r') as file:
            config = yaml.safe_load(file)

        # Get parameters:
        data_path = config['data']['dataset_path']
        self.x_test, self.y_test = load_data(os.path.join(data_path, 'test.csv'))
        # Reshape:
        self.x_test = reshape(self.x_test)
        # Scaling:
        self.x_test = scale(self.x_test)

    def test_train_integration(self):
        # Train the model:
        subprocess.run(["python", "-m", "src.models.cnn.train", "c", "configs/cnn.yaml"])

        # Make predictions using the latest model:
        subprocess.run(["python", "-m", "src.models.cnn.predict", "c", "configs/cnn.yaml"])

        # Load model:
        mlflow.set_tracking_uri('http://127.0.0.1:8080')
        runs = mlflow.search_runs(experiment_ids=[mlflow.get_experiment_by_name('cnn').experiment_id],
                                  order_by=["start_time desc"])
        latest_run_id = runs.iloc[0]["run_id"]
        loaded_model = mlflow.pyfunc.load_model(f"runs:/{latest_run_id}/models")

        # Accuracy:
        f1 = float(f1_score(self.y_test, np.argmax(loaded_model.predict(self.x_test), axis=1), average='macro'))
        self.assertGreater(f1, 0.95, "F1 score should be greater than 95%")


if __name__ == '__main__':
    unittest.main()
Note that in this example we have not called the scripts related to data creation since the data is already uploaded and versioned. However, we can instead run tests on the data to ensure its correctness. To run the unit test above, we can use the following command:
python -m unittest tests/integration_test.py4. Data Testing
Data testing ensures the quality and the correctness of the data used for machine learning which ensures the accuracy and reliability of machine learning models. It includes data validation, policy compliant and feature importance.
4.1. Data validation
Data validation refers to the process of ensuring that the data conforms to certain standards and requirements that are usually stated in the problem description (ML or AI canvas). It consists of checking the data schema and the features domain:
- Data schema defines the structure of the data, it generally specifies the types of data that can be stored, the relationships between its different elements, and any constraints on the data. For example, in a relational database, a schema defines the tables, their columns, and the relationships between tables. In the context of our project, we ensure that each image in the dataset has the same shape and the labels have the same dimension as mentioned in the config file. If your images are
28 x 28pixels, the data validation process should automatically check that every image conforms to this structure:
def check_image_dimensions(dataset, dimension):
    assert dataset.shape[1] == (dimension[0] * dimension[1]), f"Image dimensions do not match the expected shape : {dimension[0] * dimension[1]}"
    print(f"Checking images dimensions : {dimension[0] * dimension[1]} ... OK!")


def check_y_dimensions(y, dimension):
    assert y.ndim == dimension, f"Labels dimensions do not match the expected dimension: {dimension}"
    print(f"Checking labels dimensions : {dimension} ... OK!")


# Execute tests:
check_image_dimensions(x_train, image_dimension)
check_image_dimensions(x_test, image_dimension)
check_y_dimensions(y_train, y_dim)
check_y_dimensions(y_test, y_dim)- Features domain defines the specific domain: a range or a set of possible values that they can take. In the context of our project, we validate that pixel values fall within the expected range: pixel values are between 0 and 255. This latter ensures that all pixel values are within this range preventing potential issues like outliers or anomalies. Also, the labels values fall within 0 and 9 thus we ensures that all the labels are within this range.
def check_pixel_values(dataset):
    assert ((0 <= dataset) & (dataset <= 255)).all(), "pixels values are not within thee expected range"
    print("Checking pixels values ... OK!")


def check_y_values(y):
    assert ((0 <= y) & (y <= 9)).all(), "labels values are not within thee expected range"
    print("Checking labels values ... OK!")


# Execute tests:
check_pixel_values(x_train)
check_pixel_values(x_test)
check_y_values(y_train)
check_y_values(y_test)
4.2. Policy compliant
The development and operation of features and the processes involved in data pipelines from source to destination should adhere to relevant policies, regulations, and standards Such as GDPR, HIPAA and COPPA.
- GDPR (General Data Protection Regulation) is a European Union regulation designed to protect the privacy and personal data of individuals. It imposes rules on how organizations collect, process, and store personal data.
- HIPAA (Health Insurance Portability and Accountability Act) is a United States federal law that sets standards for the protection of sensitive patient health information.
- COPPA ( Children's Online Privacy Protection Act) is a United States federal law designed to protect the online privacy of children under the age of 13.
In the context of our project, we can apply GDPR principles to a handwritten digit classification application:
- Obtaining the explicit consent of users before collecting and processing any personal information.
- Collecting and processing the minimum amount of data necessary for the purpose of the application such as the user age and gender that can be used for ML model testing.
- Defining the purpose for which we are collecting and processing data: user interaction for training purposes or improving the model's accuracy.
- Providing clear and transparent information to users about how their data will be used that includes informing users about the purpose of data collection, who will have access to the data, and how long the data will be retained.
However, it's important to note that this task is usually done by consulting with legal professionals experienced in data protection who can provide further guidance tailored to the specific application and its data processing activities.
4.3. Features importance
Feature importance involves understanding which features have the significant influence on the model's predictions. Some features may contribute more to the prediction than others. It is a test that helps to evaluate the relevance or impact of individual features on the model's performance. Common methods include statistical tests, feature importance algorithms (such as tree-based methods like Random Forests), or model-specific techniques.
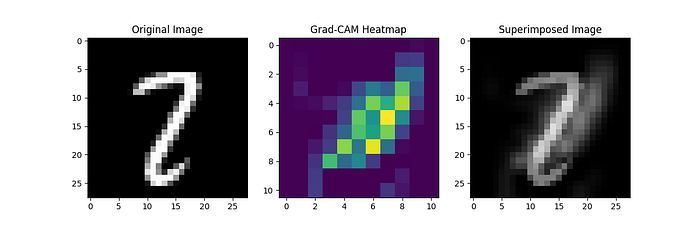
In the context of our project, after training the CNN, we want to perform feature importance analysis to understand which parts of the input images contribute the most to accurate digit classification using Gradient-weighted Class Activation Mapping (Grad-CAM) which is a popular technique for visualizing the regions of an image that are important for a CNN's prediction. It generates a heatmap highlighting the areas of the input image that had the most influence on the final classification decision. You can find the relevant code in this project repository, in the file tests/grad_cam.py.

This visualization allows us to see which regions of the input image were crucial for the CNN's decision. Regions in the images that consistently appear in the heatmap for correctly classified images indicate the important features that the CNN learned to recognize. Conversely, regions in the heatmap for misclassified images might suggest areas where the model struggled or made errors :
5. Model Testing
The ML model testing ensures accurate predictions on new data and evaluates the model's generalization capabilities. Model testing is a crucial component of the MLOps lifecycle that involves various aspects to ensure that machine learning models function as expected and meet the required standards. It includes:
- Model specification testing that is the process of specifying the machine learning model, including defining its structure, parameters, and characteristics is unit tested. In this project, we conduct a unit test to verify whether the input shape has the same shape as the data, and if the output shape contains 10 units.
def test_model_specification(model, input_dim, output_dim):
    inputs = model.metadata.signature.inputs.to_dict()
    outputs = model.metadata.signature.outputs.to_dict()
    assert inputs[0]['tensor-spec']['shape'][
           -3:] == input_dim, f"Model input dimension does not match the expected shape : {input_dim}"
    print(f"Checking model input dimension : {input_dim} ... OK!")
    assert outputs[0]['tensor-spec']['shape'][
               -1] == output_dim, f"Model output dimension does not match the expected shape : {output_dim}"
    print(f"Checking model output dimension : {output_dim} ... OK!")


# test model:
test_model_specification(loaded_model, tuple(input_dim), y_dim)- Model validation testing : that involves evaluating the ML model using a set of predefined metrics and criteria to ensure its effectiveness and generalization on new data. In this project, we make sure that the F1 score is higher than 95% as mentioned in the AI canvas.
def test_model_validation(model, x, y):
    f1 = float(f1_score(y, np.argmax(model.predict(x), axis=1), average='macro'))
    assert f1 >= 0.95, f"F1 score is less than 0.95: {f1}"
    print(f"Checking F1 score : {f1} ... OK!")

# test model:
test_model_validation(loaded_model, x_test, y_test)
Note that, it's recommended that collecting the test set is separated from the training and the validation data to make sure that are independent.
- ML model fairness, bias and inclusion testing : that involves evaluating and ensuring that the model's predictions and outcomes are fair, unbiased, and inclusive across different subgroups of the population by collecting more data that includes potentially under-represented categories. For example, after deploying the application, we also collect the age and gender of users and then apply fairness testing in the context of gender sensitivity and/or age sensitivity. Remember, the collection of such data may be specified in the compliance policy explained above.
- ML model training pipeline integration testing : that refers to the process of testing the integration and functionality of various components within a machine learning model training pipeline.
6. Conclusion
In conclusion, testing is an essential practice that significantly contributes to the success and reliability of development of any project. It's a fundamental principle in MLOps that ensures the quality, reliability, and maintainability of machine learning workflows. The entire codebase for this article is accessible in the associated repository. Additional testing and monitoring techniques are employed post-deployment, and we will cover them in a dedicated article. Tests are typically automated which is the subject of my next tutorials.
Thanks for reading this article. You can find all the examples of the different tutorials I provide in my GitHub profile. If you appreciate my tutorials, please support me by following me and subscribing to my mailing list. This way, you'll receive notifications about my new articles. If you have any questions or suggestions, feel free to leave a comment.
Image credits
All images and figures in this article whose source is not mentioned in the caption are by the author.