

Follow up on my OpenShift blogs about
- Running Virtual Machines with KubeVirt on Minikube — Deep Dive on how OpenShift Virtualization works — with demo
- VMware to OpenShift Virtualizaion Migration
- Red Hat OpenShift Virtualization Engine vs OCPv: Choosing the Right Virtualization Path
- How to Create a VM in OpenShift with a Fixed IP
- EX280 (Red Hat Certified OpenShift Administrator) sample practice tests.
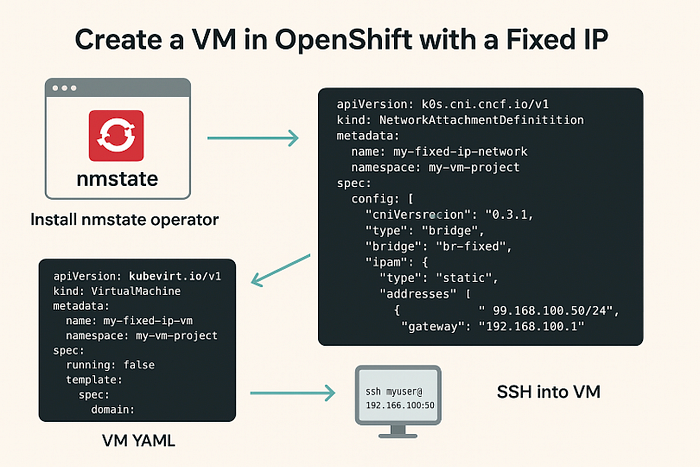
Sometimes you need to run a VM inside OpenShift (OCP) with a fixed IP address — whether it's for a database, a test service, or any workload that shouldn't change its IP on reboot.
By default, OpenShift VM networking relies on DHCP, which means IPs are dynamically assigned and can vary across restarts. Unfortunately, the official Red Hat documentation doesn't clearly outline a reliable method for assigning static IPs to VMs.
This guide documents the approach I used to configure a VM with a fixed IP in OpenShift. It's intended to fill the gaps in existing documentation and provide a clear, reproducible reference for others facing the same need.
Wrap-Up
Steps to follow:
- Install NMState Operator
- Use Multus NAD for static IP
- Set a fixed MAC address
- Clear cloud-init cache when updating network config and especially for existing VM
- Start/stop VM (don't just restart)
- SSH in via direct IP
With this setup, your VM should always come up with the same IP, no DHCP any more.
Step 1 — Install NMState Operator
First, you'll need to install the NMState Operator. While there are other operators available for managing network configurations, I chose NMState because it offers a straightforward and reliable solution.
This operator lets you manage network configuration in OpenShift at the node level. Without it, you can't set custom IPs or MAC addresses for your VM networks in the way we need.
You can install it from the OperatorHub in OpenShift Web Console:
- Go to Operators → OperatorHub
- Search for
nmstate - Install Kubernetes NMState Operator (choose your namespace, usually
openshift-nmstate)
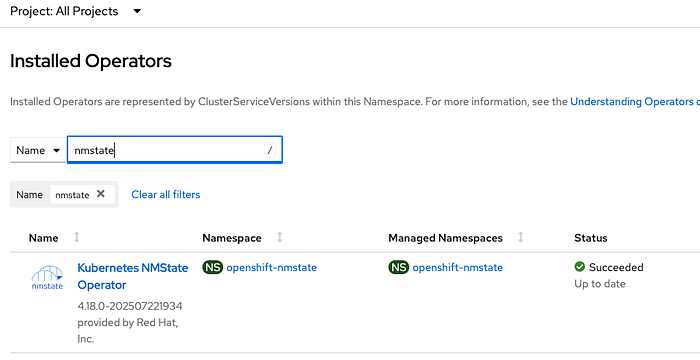
Once installed, check it's running:
oc get pods -n openshift-nmstateYou should see something like nmstate-handler-xxxxx and nmstate-operator-xxxx running.
Step 2 — Define a Network with Multus NAD
To give our VM a custom network, we need a NetworkAttachmentDefinition (NAD) using Multus.
Example nad.yaml:
This sets up a bridge network br-fixed with a static IP assigned to the pod/VM.
Note:
- NAD is namespace-scoped
- update with name , namepsace and IP ranges for your project
apiVersion: k8s.cni.cncf.io/v1
kind: NetworkAttachmentDefinition
metadata:
  name: vlan1234
  namespace: project-1
spec:
  config: '{
      "cniVersion": "0.3.1",
      "type": "bridge",
      "bridge": "br-fixed",
      "ipam": {
        "type": "static",
        "addresses": [
          {
            "address": "192.168.100.0/24",
            "gateway": "192.168.100.1"
          }
        ]
      }
    }'
My company's OCP supports OCP SDN (OVN-Kubernetes), the NAD looks like this:
apiVersion: k8s.cni.cncf.io/v1
kind: NetworkAttachmentDefinition
metadata:
  annotations:
    k8s.ovn.org/network-id: '1'
    k8s.ovn.org/network-name: vlan1234
  name: vlan1234
  namespace: project-1
spec:
  config: |-
    {
      "cniVersion": "0.3.1",
      "name": "vlan1234",
      "type": "ovn-k8s-cni-overlay",
      "topology": "localnet",
      "netAttachDefName": "project-1/vlan1234",
      "vlanID": 1234
    }
Apply it first
oc apply -f nad.yaml

oc get net-attach-def -A
NAD architecture in OpenShift Virtualization
To better understand how NADs work, let's break down the architecture, as shown in Figure 1.
- Primary network: Default OpenShift SDN.
- Multus CNI: Manages secondary networks and interfaces.
- Plug-ins: Specific configurations for MacVLAN, SR-IOV, or other setups.
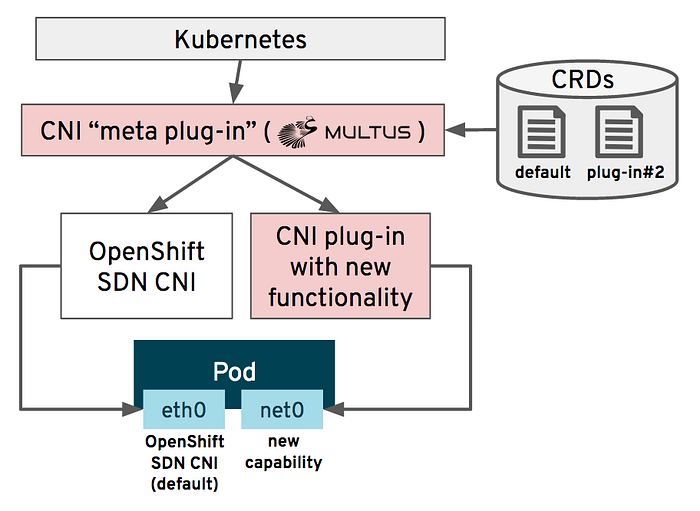
Here are the common types in OCP NAD:

Step 3 — Create the VM YAML
Here's an example vm.yaml:
apiVersion: kubevirt.io/v1
kind: VirtualMachine
metadata:
  name: demo-server
  namespace: project-1
spec:
  runStrategy: Always
  template:
    spec:
      domain:
        devices:
          interfaces:
            - name: default
              macAddress: '02:E4:03:D9:22:4C'
              bridge: {}
              model: virtio
          disks:
            - name: containerdisk
              containerDisk:
                image: quay.io/containerdisks/centos-stream:8
            - name: cloudinitdisk
              cloudInitNoCloud:
                userData: |
                  # I'd like to set the fix password, because it is useful
                  # when login via OCP web console
                  user: cloud-user
                  password: Secret#123
                  chpasswd:
                    expire: false
                  runcmd:
                  - echo "cloud-user" >> /etc/login.group.allowed
                networkData: |-
                  version: 2
                  ethernets:
                    eth0:
                      dhcp4: no
                      match:
                        macaddress: '02:E4:03:D9:22:4C'
                      addresses:
                        - 192.168.100.50/24
                      gateway4: 192.168.100.1
                      nameservers:
                        addresses:
                          - 192.168.10.10
                          - 192.168.20.10

      networks:
        - name: default
          multus:
            networkName: vlan1234
Why Custom MAC Address Matters
If you don't fix the MAC address for your VM's NIC, the VM might get a new one when recreated. The static IP config is tied to the MAC, so if it changes, the network config won't match anymore.
You can run below command to generate randon Mac address .
$ printf '02:%02X:%02X:%02X:%02X:%02X\n' $((RANDOM%256)) $((RANDOM%256)) $((RANDOM%256)) $((RANDOM%256)) $((RANDOM%256))

02:E4:03:D9:22:4C
The MAC address must be fixed and consistently assigned to the VM, as it directly match with the static IP configuration. This detail isn't mentioned in any official documentation, I only discovered it myself after several nights of trial and errors.
Add it like this in the VM YAML:
interfaces:
- name: default
  macAddress: '02:E4:03:D9:22:4C'
  bridge: {}
  model: virtio

# in networkData, need match it
    match:
       macaddress: '02:E4:03:D9:22:4C'
This keeps the MAC stable.
Step 4 — The Cloud-Init Cache Problem
Here's the tricky part, especially for existing VM, when you don't need re-create the VM for fix IP. After you update your vm.yaml and run:
oc apply -f vm.yamlThe network config inside the VM does not always re-run. This is because cloud-init caches its data.
To force it to re-run:
- Login VM via OCP web console or
virtcl ssh <VM>if you have oc and virtctl command line installed - Run:
$ oc login --server=https://api.ocp.example.com.au:6443 -u=bill
$ oc get vm
NAME            AGE     STATUS    READY
demo-server     4d1h    Running   True

$ virtctl ssh cloud-user@demo-server

$ sudo cloud-init clean

# now there should be no files any more.
$ ls -l /var/lib/cloud
3. Stop the VM
4. Start the VM again (not restart , restart won't work)
Now your updated IP config will apply.
Step 5 — SSH into the VM
If the network is reachable from your workstation, just SSH:
$ oc get vmi
NAME        AGE  PHASE     IP                NODENAME                   READY
demo-server 4d   Running   192.168.100.50   compute1.ocp.example.com    True

# make sure it is running and IP is expected and fixed.
$ ssh cloud-user@192.168.100.50
Reference
https://developers.redhat.com/articles/2024/12/19/how-configure-network-attachment-definitions#